Deep Dive into Aperture: The Heart of Photography
Photography, in its essence, is the art of capturing light. At the heart of this artistry lies the aperture—the very pupil of the camera’s eye, through which light flows into the sensor’s embrace. My journey into photography began in the vibrant landscapes of New Zealand, where I founded Stony Studios, capturing the raw and enchanting scenes of life through my lens. As an art form, photography has mirrored my own evolution, from a professional photographer to now, a consultant at DBGM Consulting Inc., where artificial intelligence and machine learning — the frontiers of modern innovation — are my canvas.
In this comprehensive exploration, we delve into the fundamentals of aperture, comparing it to the human eye, its pivotal role in the triad of exposure alongside shutter speed and ISO, and its artistic implications. We will dissect the enigma of f-stops, navigate through the depths of field, and guide you through the mastery of aperture settings, armed with real-world examples and interactive elements to illuminate your path.
As a Harvard graduate with a master’s where I worked in AI and machine learning, and having worked at artificial intelligence entities like Microsoft, I’ve observed the synergy between technology and art. This article will also touch upon how tools like Dall-E are reshaping the photographic landscape. My diverse background, from astrophotography using telescopes coupled with Canon cameras to photographing government functions in North Korea, equips me with a unique perspective that I am eager to share with you.
Together, we will explore how the control of light through the aperture shapes the narrative of a photograph. Whether you’re a novice seeking clarity or a seasoned photographer looking for a refresher, this article promises to enhance your understanding and control of the ever-critical aperture, ensuring that every click of the shutter counts. So, let us embark on this journey of discovery, where light is our guide, and the aperture, our compass in the enthralling world of photography.
Section 1: The Essence of Aperture
Definition and Role in Photography
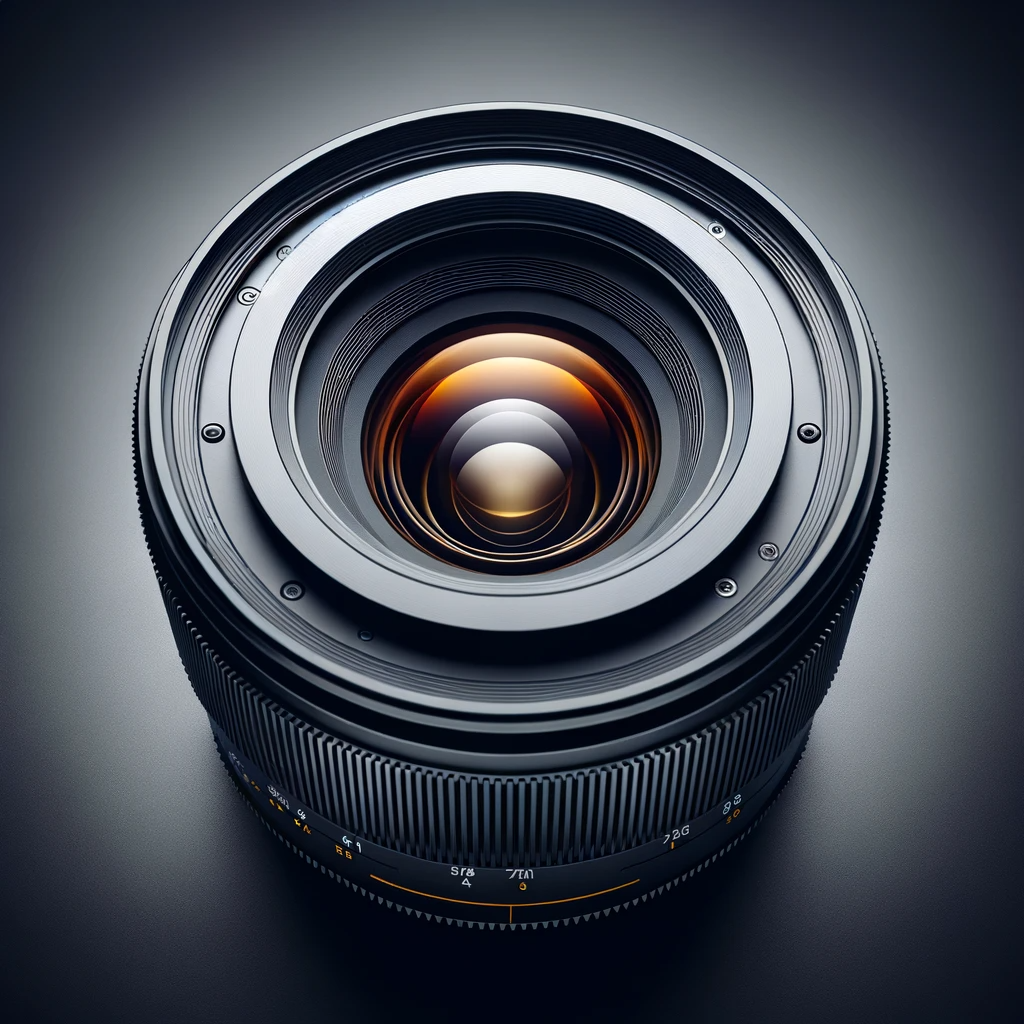
Aperture refers to the opening within a camera lens through which light passes to enter the camera body. It is comparable to the pupil of the human eye, regulating the amount of light that hits the camera’s sensor. The size of the aperture is measured in f-numbers or f-stops, such as f/1.4, f/2, f/2.8, and so forth. A vital component of the exposure triangle—which also includes shutter speed and ISO—aperture directly affects the brightness of the image and depth of field. It plays a pivotal role in photography by not only influencing exposure but also altering the aesthetic qualities of the image, such as the background blur or ‘bokeh’, which can enhance the subject matter by drawing more or less attention to it.
The Aperture and the Human Eye: A Comparison
Just as the human iris expands or contracts to control the pupil size in response to varying light conditions, the camera’s aperture widens or narrows to adjust the volume of light reaching the sensor. In bright conditions, the human pupil shrinks to let in less light, protecting the retina, while in darker environments, it dilates to permit more light to see better. The camera aperture operates on a similar principle: a smaller aperture (a higher f-stop number) limits light to avoid overexposure, and a larger aperture (a lower f-stop number) allows more light to enter, aiding in low-light conditions.
Visual Aid: Aperture Sizes
The following visual aid illustrates different aperture sizes, denoted as f-stops, and their corresponding effects on light entry and depth of field:

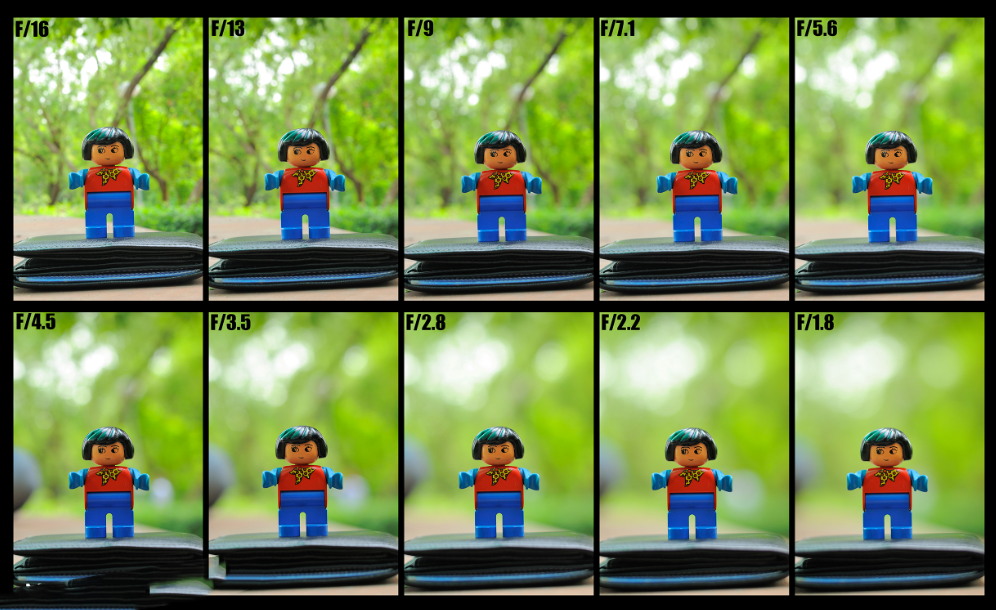
At f/1.4, the aperture is wide open, allowing a maximum amount of light to enter, resulting in a shallow depth of field. This setting is ideal for low-light conditions and achieving a blurred background effect.
At f/5.6, the aperture is moderately open, allowing a balanced amount of light and a moderate depth of field, suitable for general photography.
At f/16, the aperture is small, restricting light entry, leading to a greater depth of field. This is often used in bright conditions and for landscape photography where maximum sharpness throughout the scene is desired.
To accompany this section, a diagram can be created to visually depict these differences. The diagram would show a side-by-side comparison of aperture sizes, with the lens at different f-stops and the resulting light entry into the camera, providing an intuitive understanding of how aperture size influences both exposure and depth of field.
Section 2: Aperture and Exposure Explained
Impact of Aperture Size on Exposure Levels
Aperture size is a critical determinant of exposure, which is the amount of light that reaches the camera’s sensor, thereby affecting the brightness of the image. A larger aperture (indicated by a smaller f-stop number, e.g., f/1.4) allows more light to pass through, increasing exposure and resulting in a brighter image. Conversely, a smaller aperture (a larger f-stop number, e.g., f/16) permits less light to enter, decreasing exposure and producing a darker image. Photographers adjust the aperture size to accommodate the lighting conditions of their shooting environment, thereby ensuring that the final image is neither overexposed (too bright) nor underexposed (too dark).
Benefits of Different Aperture Sizes in Various Scenarios
- Large Aperture (Low f-stop numbers, e.g., f/1.4 – f/2.8):
- Ideal for low-light situations, such as indoor events or nighttime photography, where additional light is required.
- Suitable for portrait photography to create a shallow depth of field, which isolates the subject from the background.
- Useful for emphasizing speed in action shots by allowing faster shutter speeds to freeze motion.
- Medium Aperture (Mid-range f-stop numbers, e.g., f/5.6 – f/8):
- Balanced option for everyday photography, providing sufficient light entry and a moderate depth of field.
- Recommended for group shots to ensure everyone is in focus.
- Often used in street photography where quick adaptability to varied lighting conditions is necessary.
- Small Aperture (High f-stop numbers, e.g., f/11 – f/22):
- Beneficial for landscape photography to ensure a deep depth of field, keeping the entire scene in sharp focus.
- Preferred in bright conditions to prevent overexposure.
- Employed for macro photography to maximize the depth of field when focusing on close-up subjects.
Visual Aid: Comparative Photos with Different Aperture Settings
Section 3: Depth of Field and its Creative Power
Understanding Depth of Field
Depth of field (DoF) is the range within a photograph that appears acceptably sharp and in focus. It extends from the closest point to the camera that is in focus to the furthest point that is also in focus. The aperture size has a direct and powerful impact on DoF; a wider aperture (smaller f-stop number) results in a shallower depth of field, where the subject is in sharp focus against a blurred background. In contrast, a narrower aperture (larger f-stop number) provides a deeper depth of field, rendering a larger area of the scene in focus. This control over DoF allows photographers to guide the viewer’s attention and creatively express the narrative of the image.
Table: Apertures and Corresponding Depths of Field
|
Aperture (f-stop) |
Depth of Field |
Scenario |
|---|---|---|
|
f/1.4 |
Very Shallow |
Portrait with blurred background, emphasizing the subject |
|
f/5.6 |
Moderate |
Street photography with subject in focus and some background detail |
|
f/16 |
Deep |
Landscape with front-to-back sharpness |
This table illustrates how varying the aperture affects the depth of field in different types of photography.
Sidebar: Quick Tips for Achieving Desired Depth of Field
- For a Blurred Background:
- Use a wide aperture (e.g., f/1.4 – f/2.8).
- Position your subject further away from the background.
- Utilize a longer focal length lens.
- For a Sharper Entire Scene:
- Opt for a smaller aperture (e.g., f/11 – f/22).
- Position the subject closer to the background.
- Use a shorter focal length lens or step back from your subject.
- For Controlled Focus in Macro Photography:
- Use a mid-range aperture to balance light and sharpness (e.g., f/8).
- Employ a tripod to stabilize the camera for precise focusing.
- Consider using focus stacking techniques for maximum depth of field.
- General Tip:
- Always preview your depth of field using your camera’s DoF preview button if available, or use live view mode for a digital approximation.
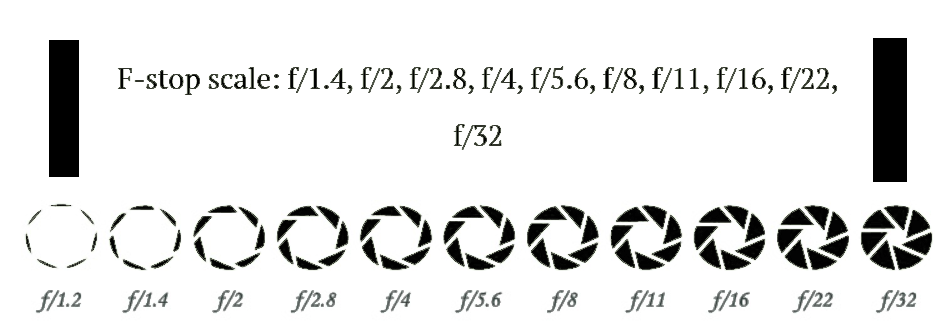
Section 4: Deciphering F-Stops and F-Numbers
Understanding F-Stops
F-stops are a way of describing the size of the aperture opening in a lens, with common f-stops being f/1.4, f/2, f/2.8, and so on. The “f” stands for the focal length of the lens, and the number following it indicates the diameter of the aperture. The nature of f-stops is counterintuitive because the larger the f-number, the smaller the aperture, and the less light is let through the lens. Conversely, smaller f-numbers correspond to larger apertures, allowing more light to reach the sensor. This inverse relationship can be confusing for beginners as one has to remember that a lower f-stop means more light and a shallower depth of field, while a higher f-stop means less light and a deeper depth of field.
Section 5: Aperture in Practice: Large vs Small
Artistic Implications of Aperture Size
The choice between large and small apertures goes beyond exposure; it’s an artistic decision. A large aperture, with its shallow depth of field, can isolate a subject from its background, giving a portrait a dramatic and professional look. On the other hand, a small aperture will bring more of the scene into focus, which is essential in landscape photography where the goal is often to capture the scene with clarity throughout.
Case Study: Portraits vs. Landscapes with Expert Photographer Insight
In a portrait scenario, an expert photographer might choose a large aperture like f/1.4 to separate the subject from a distracting background, creating a pleasing bokeh that focuses attention on the subject. For landscapes, that same photographer would likely stop down the lens to f/16 or smaller to ensure that everything from the foreground to the horizon is in crisp focus, capturing the grandeur of the scene.
Section 6: Mastery of Aperture Selection
Selecting the Right Aperture
Choosing the correct aperture is crucial and depends on both the lighting conditions and the creative vision for the photograph. There are no hard and fast rules, but understanding the principles of exposure and depth of field will guide this decision. It’s about balancing the desired level of light and sharpness with the artistic effect one wishes to achieve.
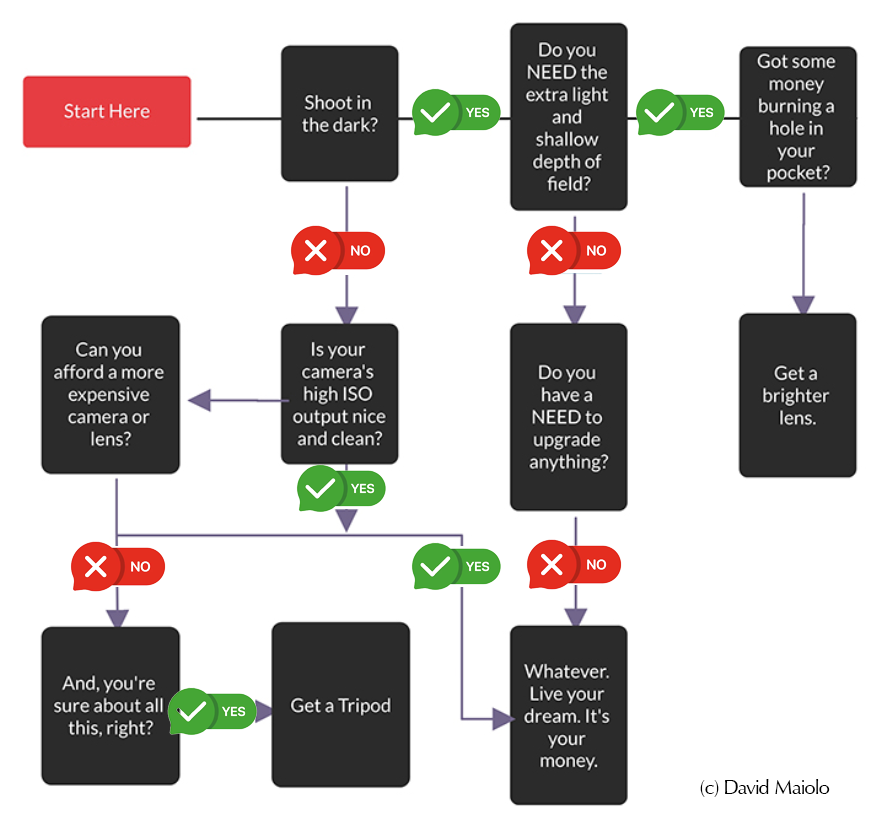
Flowchart: Decision-Making Process for Aperture Selection
Section 7: Navigating Your Camera’s Aperture Settings
Setting Aperture in Aperture-Priority Mode
In aperture-priority mode, the photographer sets the aperture, and the camera automatically selects the shutter speed to achieve a correct exposure. To set the aperture:
- Switch your camera mode dial to ‘A’ or ‘Av’.
- Use the main dial (near the shutter button) to adjust the aperture. As you turn the dial, you will see the f-stop number change on your camera’s display.
- Review the camera’s suggested shutter speed to ensure it aligns with your desired effect (such as freezing motion or allowing motion blur).
Setting Aperture in Manual Mode
In manual mode, you have full control over both aperture and shutter speed settings.
- Set your camera to ‘M’ mode.
- Adjust the aperture using the main dial, similar to aperture-priority mode.
- Select the shutter speed using either a secondary dial or by pressing a designated button while turning the main dial.
- Monitor the camera’s light meter to guide you toward a balanced exposure.
Sidebar: Pro Tips for Quick Aperture Adjustments
- Use your camera’s custom settings to predefine aperture values for different scenarios.
- Memorize the location of the aperture control dial for adjustments without taking your eye off the viewfinder.
- In changing light, use auto ISO with aperture-priority mode to maintain exposure without adjusting the aperture.
Section 8: Lens Aperture Limits: Maximum and Minimum
Implications of Maximum and Minimum Apertures
The maximum aperture of a lens (the smallest f-stop number) is crucial as it determines how much light the lens can let in, impacting its performance in low-light conditions and the ability to create a shallow depth of field. The minimum aperture (the largest f-stop number) affects how much of the scene can be brought into focus, essential for landscape photography.
Table: Lens Comparison
|
Lens Model |
Maximum Aperture |
Minimum Aperture |
Practical Uses |
|---|---|---|---|
|
Standard 50mm |
f/1.4 |
f/22 |
Portraiture, low-light photography |
|
Wide-Angle 24mm |
f/2.8 |
f/16 |
Landscape, architectural photography |
|
Telephoto 70-200mm |
f/2.8 |
f/32 |
Sports, wildlife, event photography |
This table showcases various lenses and their aperture ranges, noting what type of photography each is best suited for based on those limits.
Section 9: Beyond Brightness and Focus: Other Aperture Effects
Exploring Diffraction and Lens Aberrations
While the primary role of aperture is to control brightness and focus, it can also influence other factors like diffraction and lens aberrations. Diffraction is a phenomenon that occurs when light waves encounter the edges of the aperture blades, causing them to spread out and potentially soften the image. This effect is most noticeable at very small apertures (high f-stop numbers). Conversely, lens aberrations, such as chromatic aberration or ‘fringing,’ are often most pronounced at wide apertures (low f-stop numbers) and can cause color distortions or a lack of sharpness near the image’s edges.
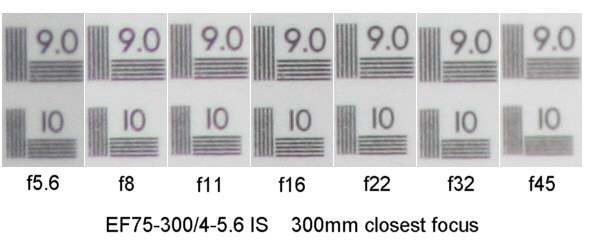
Image that illustrates the effects of diffraction. This is a photograph of the same scene taken at different apertures. The comparison highlights the point at which diffraction begins to impact image sharpness and how closing the aperture for more depth of field might lead to a trade-off in image detail.
Section 10: FAQs and Misconceptions
Addressing Common Aperture Queries
- Does a larger aperture always mean a better photo?
- Not necessarily; the choice of aperture should be based on the artistic vision and the desired depth of field for the photo.
- Is diffraction a major concern?
- It can be at very small apertures; however, modern cameras and lenses are designed to mitigate its effects to an extent.
- Do I always need a lens with the largest maximum aperture?
- A larger maximum aperture provides more flexibility in low light, but it’s not always essential, depending on what you are shooting.
Conclusion: Summary and Further Learning
In conclusion, aperture is a fundamental aspect of photography, integral for managing exposure, depth of field, and contributing to the artistic expression of your images. It has a range of effects, from the obvious to the subtle, like diffraction and lens aberrations.
Checklist: A Photographer’s Cheat Sheet for Aperture Settings
- For portraits with blurred backgrounds: f/1.4 – f/2.8
- For general use and street photography: f/5.6 – f/8
- For landscapes with everything in focus: f/11 – f/16
- To avoid diffraction softness: Avoid going beyond f/16 – f/22, depending on your lens
Further Exploration
For those keen on deepening their understanding of aperture and its multifaceted role in photography, consider exploring additional resources such as advanced photography books, online courses, and hands-on workshops. Articles that delve into the optical science behind lenses and light can also provide a more technical perspective on how apertures shape the photographs we create.
If you wish to have illustrative photos or a more detailed photographer’s cheat sheet developed, feel free to let me know. Additionally, I can guide you to more resources and articles for further exploration into the vast and nuanced world of aperture in photography.

