Highlands Community Church began its journey in 1999 with a small group of committed individuals led by Pastor Tim Gonzalez. Pastor Tim is originally from upstate New York. From its original vision of sharing the love of Christ in Highlands County, the church has grown into a thriving hub for spiritual growth, education, and community outreach. Today, it spans a 17,500-square-foot building situated on a 6-acre lot and regularly hosts activities ranging from worship services to community events.
The church also plays a key role in supporting missions both locally and globally, partnering with the broader Missionary Church organization to fulfill its commitment to Jesus Christ and the Great Commission. The current building was acquired in 2012, and it has since undergone multiple renovations to better serve the community’s needs. The facilities include a main worship hall, classrooms, and dedicated spaces for various ministries, ensuring that the church is well-equipped to host community activities and services.
Whether you are a long-time member or a seasonal attendee, tithing is an important way to contribute to the church’s mission. This article will explore the history of Highlands Community Church, its community events, and provide a practical guide to determine your tithing, complete with tables and formulas.
Community Events and Activities
Highlands Community Church is not just a place of worship; it is also a community center that fosters fellowship, learning, and service. Here are some key events and activities that define the church’s role in the community:
Weekly Worship Services: Every Sunday, Highlands Community Church holds a worship service at 10:30 AM, preceded by a time for fellowship at 10:00 AM. The church is located at 3005 New Life Way, Sebring, FL, and welcomes everyone to join in worship. These services are designed to bring people together in worship and to hear the Word.
Food Distribution Fridays: The church runs a food distribution program every Friday from 11:00 AM to 1:00 PM. This is part of the church’s ongoing effort to support those in need in the community, offering basic food supplies to anyone who comes by. The church partners with local charities and organizations to make this event successful week after week.
Children’s and Youth Ministries: During Sunday services, Kids Church is also offered, providing a dedicated space for children to learn about faith in an age-appropriate setting. There is also a nursery available for families with young children.
Special Community Events: Highlands Community Church hosts a range of special events, such as women’s ministry gatherings like the recent “Flip Flops” event where women gathered to decorate flip-flops, share food, and enjoy fellowship. These events are designed to engage specific groups within the church community and provide fun, meaningful experiences.
Membership in Central Florida Cities: Highlands Community Church recently became a member of Central Florida Cities, which has expanded their reach, allowing them to post events and share church activities on broader platforms such as sebring.com. This helps attract people from nearby communities like Avon Park and Lake Placid.
Community Engagement Projects: The church encourages members to be involved in community projects, such as helping with infrastructure improvements like the paving of New Life Way. This hands-on approach helps foster a strong sense of community among members and residents.
New Series and Bible Studies: The church is constantly renewing its teaching series, encouraging attendees to participate actively in their faith journey. Bible studies and discussions, such as those led by Pastor Tim Gonzalez, are integral parts of the church’s weekly offerings.
Men’s Bible Study: There is a men’s bible study held at the church every other Tuesday where men get together, share a dish that one of the members’ wives made, and then do bible study and catch up. It runs from 6 to 7 PM and is led by Pastor Tim.
Understanding Tithing
Tithing is traditionally considered the act of giving 10% of your income to the church. It is both a spiritual discipline and a practical way to support your faith community. Highlands Community Church relies on the generosity of its members to cover its operating costs and help it fulfill its mission.
Whether you attend regularly or just occasionally, determining how much to tithe can be simplified with a formula based on your income, attendance, and personal commitment. Let’s break down how you can calculate a tithing amount that works for you.
Basic Formula for Calculating Your Tithe
To calculate your tithe, you can use a simple formula based on your gross annual income and percentage of income you feel called to give. The formula is:
Where:
Gross Annual Income: Your yearly earnings before taxes and deductions.
Tithing Percentage: Traditionally, this is 10%, but it can be adjusted based on your comfort and financial capability.
Number of Giving Occasions: The number of times per year that you plan to give (e.g., weekly, monthly, etc.).
Example Calculation
Let’s take a member named Sarah, who attends Highlands Community Church every Sunday. Sarah earns $50,000 annually and plans to tithe 10%. She gives on Sundays (52 occasions per year).
Using the formula:
Sarah would give approximately $96 each time she attends church.
Attendance-Based Giving Guidelines for Highlands Community Church
For those who attend less frequently or want to adjust their giving based on attendance, here is a table to help determine your approximate tithing amount based on a base income of $50,000:
Attendance Frequency
Gross Income ($50,000)
Tithing Percentage (10%)
Number of Occasions
Suggested Tithe per Occasion ($)
Every Sunday
50,000
10%
52
96
Every Other Sunday
50,000
10%
26
192
Twice per Month
50,000
10%
24
208
Seasonal Attendance (12 visits)
50,000
10%
12
417
Nuanced Giving Formulas Specific to Highlands Community Church
Depending on how often you attend and your financial situation, you might want to adjust your giving approach. Here are some more nuanced ways to calculate your tithe:
1. Seasonal Attendee Formula
If you are a seasonal attendee (e.g., you visit during winter months when you are in Florida), you may want to calculate a lump sum to cover your intended tithe for the year. This can be broken down across your visits:
For instance, if Mary attends only during winter and earns $50,000 annually, intending to give 10%, and she visits 12 times per year:
Mary would give approximately $417 per visit.
2. Monthly Giving Plan
For those who prefer a consistent monthly amount rather than giving based on attendance, a monthly giving plan could be more manageable:
For example, if you earn $50,000 annually and want to tithe 10%:
This means you could set up a monthly donation of $417 to maintain consistency in your giving.
Should Occasional Attendees Tithe 10%?
For occasional attendees, the traditional guideline of 10% might not always feel applicable, especially if you only attend a handful of times each year. It is perfectly reasonable for occasional or irregular attendees to adjust their giving in a way that better reflects their attendance and financial situation.
Here are a few considerations:
Proportional Giving: Instead of focusing on the 10% rule, occasional attendees might give a proportional amount that feels comfortable and meaningful. This could mean donating a larger lump sum once or twice per year, or giving a smaller amount each time you attend.
Supporting Specific Initiatives: Some attendees choose to direct their giving toward specific church projects or community initiatives, like supporting the Food Distribution Fridays or contributing during seasonal fundraising campaigns. This way, their giving feels more closely tied to the activities they value most.
Modified Tithing Percentage: You might consider lowering the percentage from 10% to something that fits better with your financial circumstances and the number of times you attend. For instance, a 5% tithe might be more appropriate for someone who attends sporadically.
The important thing is that your giving reflects both your ability and your commitment to supporting the church’s mission in whatever way is most meaningful to you. Highlands Community Church values every contribution, regardless of size or frequency, as each donation helps keep the community and its outreach efforts thriving.
Personalizing Your Tithe
While 10% is often used as a guideline, there is no strict rule for tithing at Highlands Community Church. Some members may give more during financially stable periods, while others may contribute less based on their personal circumstances. It’s ultimately about giving what feels right to you in support of the church’s mission.
Alternative Tithing Formula for Irregular Attendees
For those who attend irregularly (e.g., seasonal visitors during winter months), consider determining a lump sum annual tithe instead:
For example, if you attend only during the winter and earn $50,000 annually, you might decide to give a lump sum of $5,000 over the course of your visits or split across a few occasions.
Summary
Note: This article is written by me, just a member of the church, and does not reflect any official messages or information from Highlands Community Church.
Tithing is a meaningful way to contribute to the growth and sustainability of Highlands Community Church. By giving according to your means and commitment level, you are helping ensure that the church can continue its mission of serving Highlands County for many years to come. Whether you give $20 when you attend or follow a traditional 10% guideline, your contributions make a difference.
How You Can Give
There are several ways to contribute to Highlands Community Church, based on what best suits your needs and preferences:
Mail: Send your contribution to Highlands Community Church at 3005 New Life Way, Sebring, FL 33870.
In Person: Place your donation in one of the baskets during Sunday services.
Specific Giving Opportunities
General Tithes: Regular contributions help support the church’s general operations and ongoing activities.
Benevolence Ministry: Gifts to this ministry go toward helping those in need within the community.
Children / Student Ministry: Contributions support programs that nurture the spiritual growth of young people.
Pay Down Church Mortgage: As of October 2024, there is over $125,000 remaining on the mortgage. Additional support can help pay this down faster, freeing up resources for more ministry work.
Miscellaneous Gifts: Contributions for various specific needs of the church.
Vacation Bible School Supplies: Provide supplies for Vacation Bible School (VBS) to ensure a positive experience for the children involved.
We encourage everyone to give in a way that reflects both their financial ability and personal connection to the church’s mission. Please feel free to contact Pastor Tim Gonzalez or Administrative Assistant Lori Andrews if you have questions about tithing or need guidance on how to get started.
https://www.davidmaiolo.com/wp-content/uploads/2024/10/images.jpg194259David Maiolohttps://www.davidmaiolo.com/wp-content/uploads/2023/11/cropped-David-Maiolo-Logo3b-ICON-300x300.pngDavid Maiolo2024-06-21 03:49:002024-10-21 03:55:10How to Determine Your Tithing at Highlands Community Church: A Walk Through History and Giving
Welcome to my analysis of the ARK 21Shares Bitcoin ETF, a new financial instrument in the world of cryptocurrency investment. This Exchange-Traded Fund (ETF) represents a significant development in the digital asset market, offering investors a new way to engage with Bitcoin, the “de facto” cryptocurrency.
At the heart of the ARK 21Shares Bitcoin ETF’s strategy is its aim to closely track the performance of Bitcoin, thereby offering investors exposure to Bitcoin price movements without the complexities of direct cryptocurrency ownership. This ETF is designed to mirror the dynamics of Bitcoin, reflecting its value shifts and market trends, making it a unique instrument for investors looking to diversify their portfolio with digital assets.
In this article, I will delve into the fund’s structure, its investment strategy, and the potential risks and rewards associated with this innovative investment vehicle. The goal is to provide a detailed and insightful exploration, tailored for a financially literate audience, to understand better where the ARK 21Shares Bitcoin ETF stands in today’s investment landscape.
By the end of this analysis, readers will gain a deeper understanding of the ARK 21Shares Bitcoin ETF, its place in the market, and how it might align with various investment strategies in the ever-evolving world of digital assets.
Overview of the ARK 21Shares Bitcoin ETF
The ARK 21Shares Bitcoin ETF is a pivotal financial product, structured as an exchange-traded fund (ETF), offering investors a new avenue to engage with the cryptocurrency market. This ETF is listed on the Cboe BZX Exchange, a leading platform for ETF trading, ensuring accessibility and liquidity for investors.
Central to this ETF’s strategy is its investment objective: to track the performance of Bitcoin as closely as possible. This is achieved by investing in standardized, cash-settled Bitcoin futures contracts traded on commodity exchanges registered with the Commodity Futures Trading Commission (CFTC). The aim is to provide investors with exposure to Bitcoin’s price movements in a regulated and transparent manner, without the need for direct investment in the cryptocurrency itself.
This ETF represents a significant step in bridging the gap between traditional investment mechanisms and the rapidly evolving world of digital currencies, offering a unique investment proposition to those looking to diversify their portfolios with cryptocurrency exposure.
Investment Objective and Strategy
The investment objective of the ARK 21Shares Bitcoin ETF is to track the performance of Bitcoin, employing a method that mirrors the CME CF Bitcoin Reference Rate – New York Variant. This reference rate is a standardized, widely-recognized benchmark for Bitcoin pricing, ensuring that the ETF’s performance aligns closely with the actual price movements of Bitcoin.
Table: Investment Strategy Breakdown
Element
Description
Primary Objective
Track Bitcoin’s performance
Benchmark
CME CF Bitcoin Reference Rate – New York Variant
Investment Method
Utilization of cash-settled Bitcoin futures contracts
Exchange
Cboe BZX Exchange
Regulatory Compliance
Adherence to CFTC regulations
The fund achieves this objective by primarily investing in Bitcoin futures contracts, which are financial derivatives allowing investors to speculate on the future price of Bitcoin without holding the actual cryptocurrency. This strategy provides a regulated, transparent, and efficient way to gain exposure to Bitcoin’s price movements, making it an attractive option for investors seeking cryptocurrency exposure within a traditional investment framework.
Role and Responsibilities of Key Players
In the ARK 21Shares Bitcoin ETF, the key players each have distinct roles that ensure the smooth functioning and regulatory compliance of the fund:
Sponsor – 21Shares US LLC: The Sponsor oversees the overall operation of the ETF, including but not limited to, ensuring regulatory compliance, overseeing the fund’s investment strategies, and managing administrative and marketing activities.
Trustee – Delaware Trust Company: The Trustee is responsible for the general oversight of the ETF, ensuring that it operates in accordance with the trust agreement and applicable laws.
Bitcoin Custodian – Coinbase Custody: Coinbase Custody, as the Bitcoin Custodian, handles the safekeeping of the Bitcoin assets involved in the fund. This includes ensuring the security and proper accounting of the Bitcoin holdings.
Sub-Adviser – ARK Investment Management LLC: ARK Investment Management LLC acts as the Sub-Adviser, providing advice and recommendations on the fund’s investment strategies, particularly in relation to selecting and managing the Bitcoin futures contracts.
These roles are crucial in maintaining the integrity, security, and performance of the ETF, ensuring that it adheres to its investment objectives while complying with regulatory standards.
Performance Analysis
The ARK 21Shares Bitcoin ETF, known as ARKB, is designed to mirror the performance of Bitcoin. The fund’s historical performance, when available, will reflect the volatility and trends inherent to Bitcoin as illustrated in the provided historical price chart. Given Bitcoin’s dramatic price movements over the years, the ETF’s value would likewise exhibit significant fluctuations in a similar pattern.
Analyzing the recent snapshot of ARKB’s performance, which shows a Year-to-Date (YTD) return and an Expense Ratio, can offer insights into the fund’s current status compared to the broader historical context of Bitcoin’s price movement.
Comparison with Other Bitcoin Investment Vehicles
The ARK 21Shares Bitcoin ETF (ARKB) is distinct among Bitcoin investment vehicles due to its structure as an ETF. This allows for traditional investment with the added benefit of tracking Bitcoin’s performance. It stands out for its accessibility on major stock exchanges, regulatory compliance, and potentially lower investment thresholds.
Table: Comparison of Bitcoin Investment Vehicles
Investment Vehicle
Accessibility
Regulatory Oversight
Potential Advantages
ARKB ETF
High (Stock Exchanges)
Strong (CFTC-regulated futures)
Ease of trade, familiar structure
Direct Bitcoin Ownership
Low (Cryptocurrency Exchanges)
Limited
Direct market exposure
Bitcoin Mutual Funds
Moderate
Varies
Professional management
Bitcoin Trusts
Moderate
Varies
Shares can be held in tax-advantaged accounts
ARKB’s use of futures contracts to track Bitcoin’s price may offer more stability compared to direct ownership, and its stock exchange listing provides familiarity and ease of access for traditional investors. These factors, combined with professional management and regulatory oversight, position ARKB as a unique offering in the Bitcoin investment space.
Regulatory and Tax Implications
Investing in the ARK 21Shares Bitcoin ETF involves navigating a complex regulatory landscape as well as understanding the tax implications. The ETF is subject to regulations by entities such as the SEC and CFTC, given its structure and the use of futures contracts.
Table: Regulatory and Tax Overview
Aspect
Details
Implications for Investors
Regulatory Body
SEC, CFTC
Compliance with federal securities and commodities laws
Tax Treatment
As per IRS guidelines for ETFs
Subject to capital gains tax; reporting requirements
Investors should be aware that gains from the ETF could be taxed as capital gains, and they must report these in their tax filings accordingly. It is vital for investors to consult with a financial advisor or a tax professional to understand the specific implications for their individual circumstances.
Investor Suitability and Profile
The ARK 21Shares Bitcoin ETF is best suited for investors who are specifically looking to add digital assets to their portfolios as a means of diversification and potential growth. Ideal investors would be those with a strong understanding of the cryptocurrency market dynamics and a willingness to accept the possibility of substantial price swings, which are characteristic of Bitcoin investments.
Investor Profile:
Risk Tolerance: Moderate to high, comfortable with significant price volatility.
Investment Horizon: Long-term, able to withstand periods of market fluctuation without the necessity of liquidating positions.
Market Knowledge: Informed about cryptocurrency and blockchain technology trends and their implications.
Diversification Strategy: Seeks to include alternative investments as a hedge against traditional market movements.
Tax Consideration: Aware of the tax consequences of ETF investments and prepared for potential tax liabilities associated with trading activities.
Fee Structure
To ensure potential investors are fully informed about the cost of investing in the ARK 21Shares Bitcoin ETF, it is essential to outline the fee structure comprehensively. Below is a table that details the various fees and expenses that an investor may incur.
Table: Fee Structure of ARK 21Shares Bitcoin ETF
Fee Type
Description
Amount (%)
“Sponsor Fee:
Annual fee paid to the fund’s manager for operating the fund.
0.21%
Administrative Fees
Fees related to the day-to-day administration of the fund.
To Be Determined
Custody Fees
Fees for the safekeeping of the fund’s assets.
To Be Determined
Distribution Fees
(If applicable) Fees for marketing and distributing the fund.
To Be Determined
Other Expenses
Includes various operational costs such as legal, compliance, and audit fees.
To Be Determined
Total Expense Ratio
The total percentage of the fund’s assets used for operational expenses.
To Be Determined
The Trust will pay the unitary Sponsor Fee of 0.21% of the Trust’s bitcoin holdings. The Sponsor Fee is paid by the Trust to the Sponsor as compensation for services performed under the Trust Agreement. The Sponsor intends to waive the entire Sponsor Fee for (i) a six month period commencing on the day the Trust’s Shares are initially listed on the Exchange, or (ii) the first $1 billion of Trust assets, whichever comes first.
Except for during periods during which the Sponsor Fee is being waived, the Sponsor Fee will accrue daily and will be payable in bitcoin weekly in arrears. The Administrator will calculate the Sponsor Fee on a daily basis by applying a 0.21% annualized rate to the Trust’s total bitcoin holdings, and the amount of bitcoin payable in respect of each daily accrual shall be determined by reference to the Index. The Sponsor has agreed to pay all operating expenses (except for litigation expenses and other extraordinary expenses) out of the Sponsor Fee.
Market Outlook and Future Prospects
The Bitcoin market has been a subject of intense interest and scrutiny, with its value experiencing notable fluctuations over time. As the ARK 21Shares Bitcoin ETF (ARKB) closely tracks Bitcoin’s performance, it’s essential to consider the broader market outlook when evaluating the ETF’s future prospects.
The cryptocurrency market has seen increased institutional adoption, with major companies and financial institutions expressing interest in Bitcoin. This growing acceptance and recognition of Bitcoin as a legitimate asset class could potentially drive its adoption among traditional investors.
Moreover, the ongoing development of blockchain technology and the potential for wider adoption of cryptocurrencies in various sectors, including finance and technology, could further boost the prospects of Bitcoin and, by extension, ARKB.
It’s crucial to acknowledge the inherent volatility of Bitcoin and its susceptibility to regulatory changes and market sentiment. Investors should be prepared for price swings while maintaining a long-term perspective. Furthermore, staying informed about regulatory developments and market trends will be essential for making informed investment decisions.
Conclusion
In conclusion, the ARK 21Shares Bitcoin ETF offers investors an avenue to gain exposure to the cryptocurrency market through a traditional and regulated investment vehicle. While Bitcoin’s market is known for its volatility, ARKB provides a structured and accessible means of participating in this digital asset’s potential growth.
Investors should consider their risk tolerance, investment horizon, and financial goals when evaluating ARKB. It is advisable to consult with financial professionals and stay informed about regulatory changes and market dynamics.
The ETF’s ability to closely mirror Bitcoin’s performance, combined with the evolving landscape of digital assets, positions it as a unique investment option for those looking to diversify their portfolios. However, as with any investment, thorough research and careful consideration of one’s individual circumstances are essential.
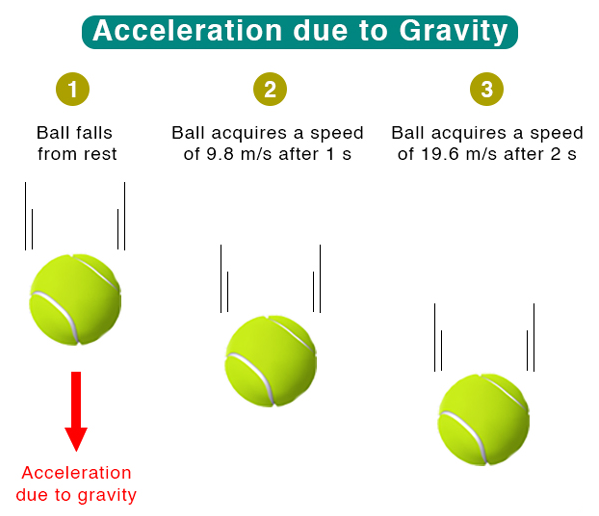
As I delve into the intricacies of physics, I’m continually fascinated by the concept of acceleration – a fundamental principle that transcends the simple notion of ‘speeding up’. In my exploration of the physical world, from the macroscopic down to the quantum level, I’ve realized that acceleration is not just about how fast an object’s velocity changes; it’s a cornerstone in understanding the complexities of both linear and rotational motion. Whether it’s the graceful arc of a planet orbiting a star or the elegant spin of a dancer, acceleration is at the heart of these motions, shaping the dynamics of our universe in profound ways.
In this exploration, I aim to unravel how acceleration plays a pivotal role in various forces that govern motion. We’ll embark on a journey through different realms of physics, from the familiar gravitational pull that keeps our feet firmly on the ground, to the centripetal and centrifugal forces that rule circular motion, and even into the realm of angular momentum, which rules everything from spinning tops to swirling galaxies. Our journey will not stop there; we’ll venture into the realms of Einstein’s relativity and the mysterious quantum field theory, offering diverse perspectives on these forces. Through this, we aim to gain a deeper understanding of how acceleration, in its many forms, is woven into the very fabric of our physical reality.
Section 1: The Fundamentals of Acceleration
In exploring the realms of motion, it’s crucial to distinguish between linear and angular acceleration, both fundamental yet distinct in their nature. Linear acceleration is straightforward; it’s a change in the velocity of an object in a straight line, easily felt as a car speeds up or slows down. Measured in meters per second squared, it quantifies how quickly an object’s speed changes along a path. Angular acceleration, on the other hand, is subtler yet omnipresent in anything that rotates. It describes the rate of change of angular velocity – a concept critical in understanding rotational motion. What’s fascinating, and often a point of misconception, is that an object in circular motion, like a spinning wheel, is constantly accelerating even if its rotational speed remains constant. This is because acceleration, in a physical sense, is not just about changes in speed; it’s about changes in velocity, which includes direction. A spinning object continually changes its direction, and hence, is always undergoing acceleration, even if the rate of its spin doesn’t increase. This distinction underscores the complex nature of motion, where even seemingly steady rotation masks a continuous state of acceleration.
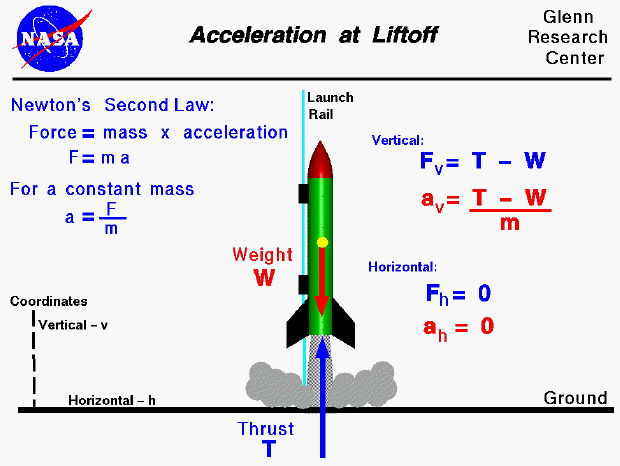
Sir Isaac Newton’s laws of motion, formulated in the 17th century, are cornerstones of classical mechanics and have laid the foundation for much of our understanding of physical motion. His first law, the law of inertia, states that an object will remain at rest or in uniform motion in a straight line unless acted upon by an external force. As we see here, the box continues on as only the car is acted on a force to stop.
This principle is at the heart of understanding linear acceleration. Yet, it applies equally to rotational motion – a spinning object will maintain its angular velocity unless acted upon by an external torque. Think of the earth or a top spinning. They are much like the box on the car that wants to keep moving forward unless there is a force enacted on it.
In the first law, an object will not change its motion unless a force acts on it. In Newton’s second law, the force on an object is equal to its mass times its acceleration. This second law, often written as F = ma, links force to linear acceleration. Observe how it is easier for the man to push the smaller ball. What we are saying here is that the there is a force required to get something to accelerate, and that is also dependent on how massive the object is. When you think about it, it’s quite intuitive.
However, in the context of rotational motion, it translates to torque being equal to the product of moment of inertia and angular acceleration. So in the same scenario as pushing the ball, the force to get a wheel to accelerate will be dependent on how massive that wheel is. This is also intuitive. I imagine a giant, town sized, stone wheel would be much harder to accelerate than a bike tire.
This law helps us quantify the changes in rotational motion under the influence of external forces. Curiously, Newton’s understanding of gravity as a force acting at a distance was inherently based on acceleration, although this connection was fully realized only with Einstein’s theory of General Relativity, which redefined gravity not as a force, but as the curvature of spacetime influencing the acceleration of objects.
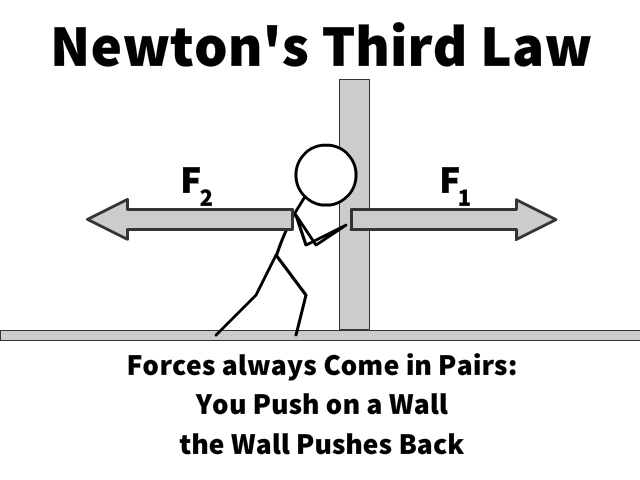
Newton’s third law, the principle of action and reaction, has its rotational counterpart as well. Just as forces result in equal and opposite reactions, a torque applied to a body will produce an equal and opposite torque. Think, when you push on a wall, it tends to wants to push back on us as well, otherwise we’d all just be able to smash down any wall.
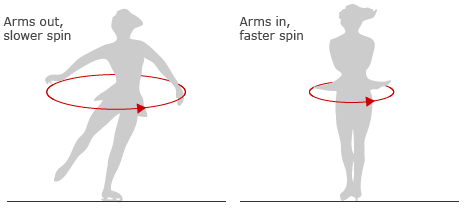
This principle of action and reaction in rotational motion leads us directly into the fascinating realm of angular momentum, a concept in rotational dynamics analogous to linear momentum. Angular momentum in a closed system is conserved – meaning the total angular momentum before any interaction is equal to the total angular momentum afterward, provided no external torque influences the system. This conservation is crucial in explaining various phenomena, one of the most visually intuitive being the behavior of an ice skater spinning on ice.
Imagine an ice skater beginning a spin with arms extended. In this position, the skater’s body has a certain angular momentum, determined by the rotational speed (angular velocity) and how the mass is distributed (moment of inertia). When the skater pulls in their arms, they are reducing their moment of inertia. Because there are no external torques acting (assuming ideal conditions with no friction or air resistance), the total angular momentum must remain constant. The only way to balance the equation, so to speak, is for the rotational speed to increase as the moment of inertia decreases.
This increase in rotational speed isn’t just a mathematical outcome; it’s a vivid demonstration of the conservation of angular momentum. By pulling in their arms, the skater brings more mass closer to their axis of rotation, decreasing the moment of inertia. To compensate, the rotational speed increases, allowing the skater to spin faster. This same principle is observed in the wider cosmos, where celestial bodies exhibit changes in rotational speed due to variations in their moment of inertia, yet always adhering to the unwavering rule of angular momentum conservation.
Understanding these laws and principles in both linear and angular forms provide a comprehensive picture of the mechanics governing motion in our universe.
Section 3: Exploring Forces – Gravity, Centripetal, and Centrifugal
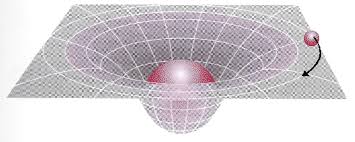
Reflecting upon Newton’s laws and the developments that followed, it becomes increasingly clear that gravity, centripetal, and centrifugal forces, while seemingly distinct, are intricately linked and are, in many ways, manifestations of the same underlying principle viewed from different perspectives. The unifying thread among these is acceleration. Historically, gravity was perceived as a mysterious force pulling apples to the ground or keeping planets in orbit. However, it wasn’t until Einstein’s theory of General Relativity that we truly understood gravity not as a force in the traditional sense, but as an effect of the curvature of spacetime – objects in free fall are actually in a state of constant acceleration, not being ‘pulled’ by a force. This revelation shifts our perspective, aligning gravity more closely with the concept of acceleration than with a conventional force.
As you can see here, a spaceship on earth experiencing the acceleration of 9.8 m/s² from the curvature of spacetime is the exact same experience inside the ship as that spaceship in outer space accelerating at 9.8 m/s².
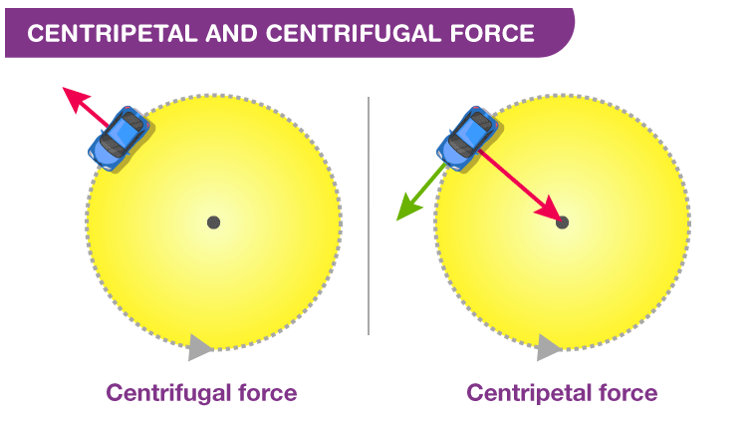
Similarly, centripetal and centrifugal forces, traditionally viewed in the context of circular motion, are deeply rooted in acceleration. Centripetal force, essential for any object moving in a circular path, is fundamentally about acceleration towards the center of the circle – consistent with Newton’s insight that a force causes acceleration. In contrast, centrifugal force, often misunderstood as a ‘real’ force, is actually an apparent force experienced in a rotating reference frame. It is the sensation of being pushed outward when in reality, it’s the inertia of the moving object – its resistance to the change in direction, which is, again, a form of acceleration.
Here, acceleration is not a force per se, but it manifests as what we perceive as force, depending on our frame of reference.
Visual 4 (Table):
Concept
Traditional Understanding
Modern Perspective
Unifying Principle
Gravity
A force pulling objects together.
Curvature of spacetime causing acceleration.
Acceleration as the effect of spacetime curvature.
Centripetal
Force causing circular motion.
Acceleration towards the center of a circular path.
Acceleration as the cause of circular motion.
Centrifugal
Force pushing objects outward in rotation.
Apparent force due to inertia in a rotating frame.
Acceleration (inertia) perceived as a force in a rotating frame.
Section 4: Simulating Gravity Through Forces and Debunking Myths
The concept of using forces to simulate gravity is both fascinating and complex, with acceleration playing a pivotal role. For instance, consider the idea of continuously accelerating a spacecraft at 9.8 m/s² to mimic Earth’s gravitational pull. While theoretically sound, this method encounters a fundamental limit: as the spaceship’s velocity increases, it would eventually approach the speed of light, a scenario that defies the laws of physics as defined by Einstein’s theory of relativity. To help understand why, when we say “9.8 m/s²”, we are saying the spaceship is feeling acceleration at 9.8m/s faster than it did the second before, forever!
This same reasoning helps to debunk certain conspiracy theories, such as the notion of a flat Earth continuously accelerating upwards at 9.8 m/s² to simulate gravity.
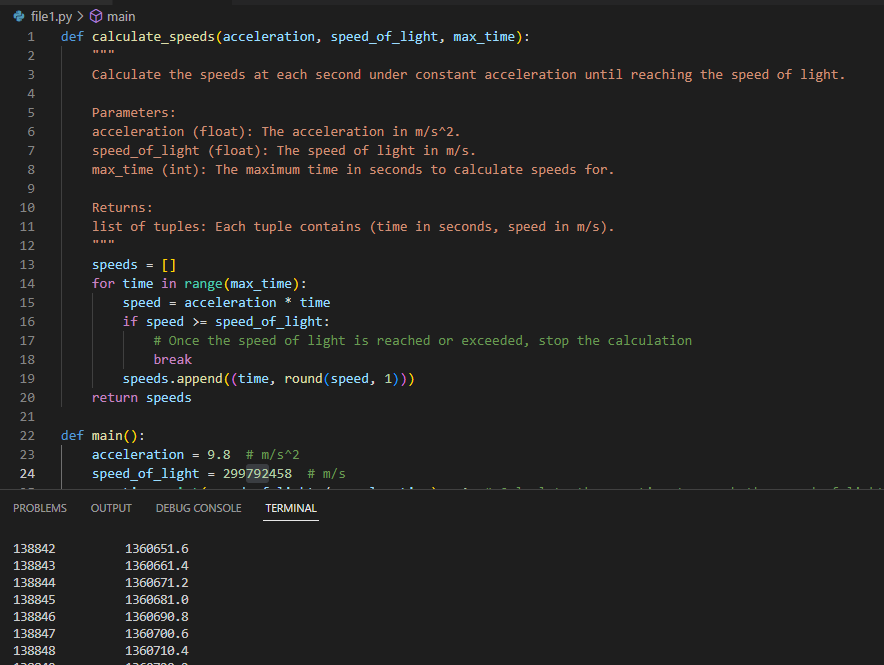
If it weren’t for Einstein’s relativity, you might think that, with each second that passes by, you’d simply increase your speed by another 9.8 m/s. So how long would it take to reach the speed of light? I created a python program to answer this very question.
If you started off at rest, it would only take you a little less than a year — about 354 days — to reach the speed of light: 299,792,458 m/s. Even so, that this is a theoretical exercise under Newtonian physics. In reality, as an object’s speed approaches the speed of light, relativistic effects significantly alter the outcomes, preventing any object with mass from actually reaching the speed of light, so…yeah…the earth is round, and that acceleration is definitely gravity. 😊
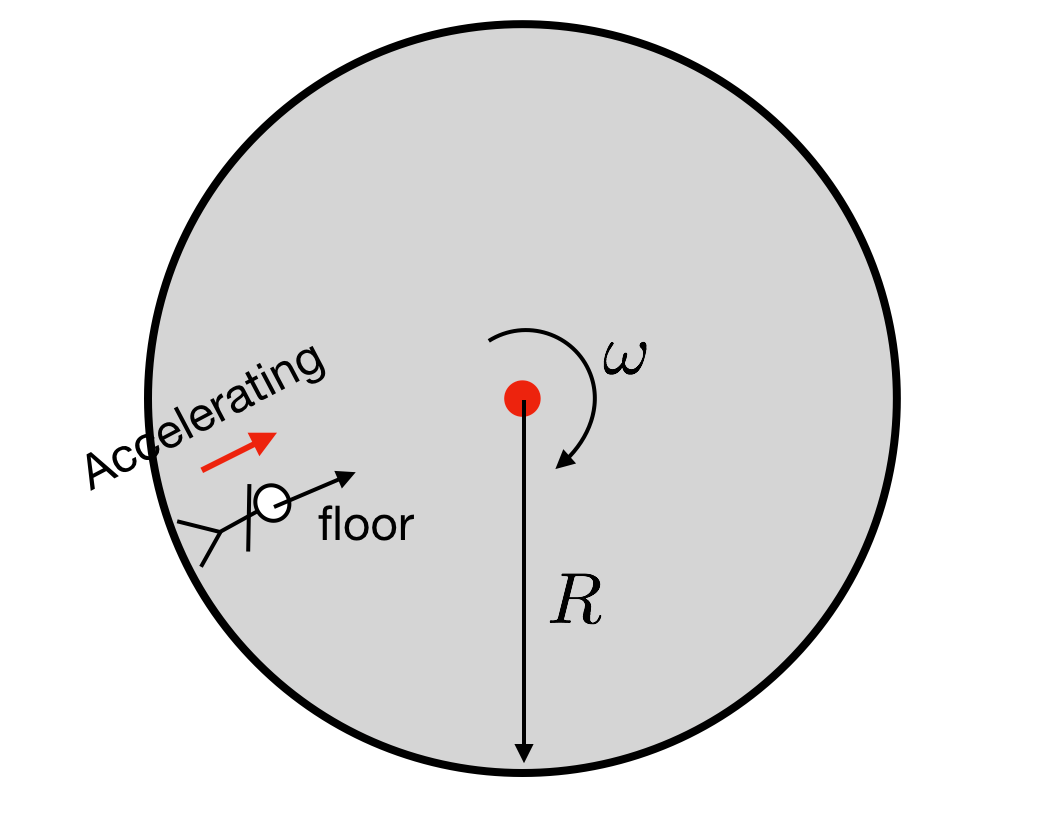
When comparing other forces like centripetal and centrifugal forces with gravity, the common thread linking them is, again, acceleration. In a rotating space station, for example, centrifugal force provides a gravity-like sensation. As the station spins, its occupants experience an outward force – not due to any external ‘push’, but as a result of their inertia and the continuous change in direction, a kind of acceleration. This force can be calibrated to mimic Earth’s gravity by adjusting the station’s rotation rate. It’s an elegant solution to the limitations of linear acceleration in space travel.
This space station, although it spins at a constant rate (it doesn’t speed up or slow down) can exert a very similar sensation to gravity as, just like with gravity, we are experiencing a constant acceleration. That is why a spinning space station (and not a constantly accelerating one) is often used in science fiction to simulate gravity. One is at least theoretically possible, whereas the other is not.
Delving deeper into the nuances of rotational dynamics, consider a ball spinning in place at a constant speed. This too experiences a constant acceleration, as remember a change in direction, just like in the example above, is acceleration. In fact, a spinning ball in place and a spinning space station are one and the same. The only difference being that you can be “inside” the ball in the space station, whereas a solid ball you cannot. The challenges of simulating gravity within a rotating object like a spinning ball are then simply because you can’t be inside the ball to be pushed towards its inner edge. Therefore, we tend to see a ball spinning in place as having acceleration being pushed away from the ball (like an “anti-gravity” of sorts), but really this is just a matter of perspective on where we want to focus on the accelerating forces. The space station, the spinning ball, and gravity all have the same force: acceleration.
This exploration of simulated gravity in various contexts not only deepens our understanding of acceleration but also illuminates the subtleties of how we experience forces. Whether it’s the constant acceleration of a spacecraft, the outward push in a spinning space station, or the outward-directed forces in a rotating ball, these forces are all about acceleration changing the velocity of objects and people. Yet, how we perceive and harness these forces can vary dramatically. These insights challenge us to think beyond traditional notions of forces and motion, recognizing acceleration as a versatile and fundamental component in the tapestry of physics. In the end, understanding and applying these concepts pushes the boundaries of technology and exploration, allowing us to adapt and thrive in environments far different from the familiar pull of Earth’s gravity.
Section 5: Relativistic and Quantum Perspectives
Delving into Einstein’s theory of relativity again, we encounter a profound shift in how we understand acceleration, especially in the context of gravity. Einstein’s General Relativity posits that what we perceive as gravitational force is actually the result of spacetime curvature. Massive objects like planets and stars warp the fabric of spacetime, and this curvature dictates the motion of objects, leading to what we interpret as acceleration due to gravity. In this framework, an object in freefall doesn’t experience force in the traditional sense; it’s merely following the natural curvature of spacetime. This interpretation aligns with our earlier discussions about acceleration being the central theme of gravitational effects. Einstein’s perspective doesn’t just enrich our understanding of gravity; it provides a broader context to view all motion and forces as interactions within spacetime, offering a more unified picture of physical laws.
Quantum Field Theory and the Nuances of Acceleration
Quantum Field Theory (QFT) offers a profoundly different lens through which to view acceleration, particularly when juxtaposed with the more intuitive descriptions offered by classical mechanics. Quantum field theory (QFT) treats particles as excited states of their underlying quantum fields. These fields are more fundamental than the particles and can sometimes act like particles and sometimes like waves.
In the quantum realm, acceleration is less about objects speeding up or changing direction and more about the fundamental interactions at the subatomic level. QFT posits that particles are manifestations of underlying fields, and forces, including those causing acceleration, arise from the exchange of force-carrier particles, like photons in electromagnetic interactions or gluons in the strong nuclear force. This perspective radically departs from the classical notion of acceleration as a change in velocity over time, instead framing it as a consequence of quantum interactions.
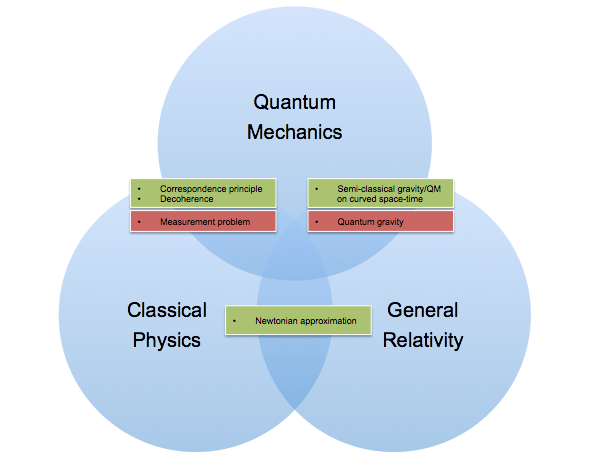
Oddly, and of trouble to any physicist trying to get to the bottom of acceleration as a force, QFT can’t handle gravity, and gravity is mathematically equivalent to acceleration. If you want to go down that rabbit-hole, you will enter the attempts to unify general relativity with quantum field theory in what is known as finding a unifying or grand theory of everything.
Yet, despite its fundamental nature in QFT and Relativity, acceleration in many practical scenarios is often more conveniently and effectively understood through the lens of classical mechanics (as discussed earlier with Newtonian laws). This is because, in everyday experiences and macroscopic scales, the effects predicted by classical physics are remarkably accurate and easier to comprehend. For instance, when launching a spacecraft or constructing a building, the classical equations of motion provide sufficiently precise and practical solutions. In these cases, the fine details of quantum or relativistic interactions are not necessary to effectively describe or predict the behavior of objects under acceleration.
This dichotomy between QFT, relativity, and classical mechanics highlights a broader theme in physics: the need for different models to describe different scales and scenarios. While QFT offers the most fundamental understanding of forces and acceleration, its complexity and the minuscule scales at which it operates often render it less practical for everyday applications. Conversely, classical mechanics, with its more intuitive and manageable approach, provides ‘good enough’ approximations for most engineering and technological purposes. This pragmatic approach in physics underlines the importance of context and scale in choosing the right model or theory to apply, balancing the pursuit of fundamental understanding with the need for practical applicability.
Section 6: Real-World Applications and Implications
The principles of acceleration, both linear and angular, have profound applications in technology, engineering, and astronomy, shaping our world and beyond in remarkable ways. In engineering, understanding acceleration is crucial for designing vehicles, from cars that navigate city streets to spacecraft that venture off to Mars with Elon Musk inside with all of his stock in X. The ability of structures to withstand various acceleration forces determines their safety and efficiency. In the realm of technology, these principles are harnessed in devices like accelerometers, integral to smartphones and gaming controllers for motion sensing. In the expanses of astronomy, these concepts enable us to understand celestial phenomena: from the orbital mechanics of planets and moons, governed by gravitational acceleration, to the dizzying spins of neutron stars, where extreme angular acceleration plays out on a cosmic scale. Each of these applications not only leverages our understanding of acceleration but also continually refines it, as real-world scenarios provide feedback to theoretical models.
Reflecting on the philosophical and practical implications of acceleration in our understanding of the universe reveals a fascinating tapestry of interconnected concepts. Philosophically, the study of acceleration touches on the fundamental nature of reality, challenging our perceptions of motion and forces. It bridges the gap between the tangible experiences of everyday life and the abstract realms of advanced physics. Practically, these principles are a testament to the power of human inquiry and ingenuity. The ability to understand, predict, and utilize acceleration in various forms underpins much of modern technology and scientific exploration. It demonstrates our evolving mastery over the physical world, highlighting both the capabilities and limitations of our current scientific knowledge. As we continue to explore and understand these forces, we not only expand our technological horizons but also deepen our connection to the universe, appreciating the intricate laws that govern it.
Conclusion
As we conclude our exploration of acceleration and its role in simulating gravity and shaping our understanding of forces, we’re reminded of the elegance and complexity of the physical world. From the fundamental principles laid down by Newton to the revolutionary perspectives offered by Einstein, and the intricate quantum realm, each step in our journey has revealed acceleration as a central, unifying theme. It is a concept that transcends the boundaries of classical and modern physics, offering insights into everything from the engineering challenges of our daily lives to the grand scale of celestial mechanics. This journey through various perspectives of physics not only enhances our comprehension of motion and forces but also deepens our appreciation for the intricate and interconnected nature of the universe. As we continue to probe the mysteries of the cosmos and refine our technologies, the principles of acceleration will undoubtedly remain at the forefront, guiding our understanding and innovations.
Further Reading
“Classical Mechanics” by John R. Taylor: A comprehensive textbook that provides an in-depth look at the principles of classical mechanics, including Newton’s laws and their applications.
“Gravitation” by Charles W. Misner, Kip S. Thorne, and John Archibald Wheeler: This seminal book offers a thorough introduction to Einstein’s general relativity, a theory that redefined our understanding of gravity and acceleration.
“Quantum Field Theory for the Gifted Amateur” by Tom Lancaster and Stephen J. Blundell: An accessible introduction to Quantum Field Theory, explaining its fundamental concepts and implications for understanding forces and acceleration.
NASA’s Educational Resources: NASA offers a wealth of materials on space technology, astronomy, and the physics of space travel, including the principles of acceleration in various contexts.
The Physics Hypertextbook – Acceleration: An online resource providing a clear and concise overview of the concept of acceleration in physics.
“Exploring Black Holes: Introduction to General Relativity” by Edwin F. Taylor and John Archibald Wheeler: This book offers an engaging exploration of black holes and the role of acceleration and gravity in their formation and behavior.
These resources provide further insights into the fascinating world of physics, delving deeper into the concepts discussed in our exploration and offering a more comprehensive understanding of acceleration and its pivotal role in the universe.
https://www.davidmaiolo.com/wp-content/uploads/2024/01/if-the-earth-is-spinning-1000-mph-why-dont-we-fl.jpeg13111920David Maiolohttps://www.davidmaiolo.com/wp-content/uploads/2023/11/cropped-David-Maiolo-Logo3b-ICON-300x300.pngDavid Maiolo2024-01-11 01:31:202024-01-13 06:29:28So Many “Forces” Are Just Acceleration
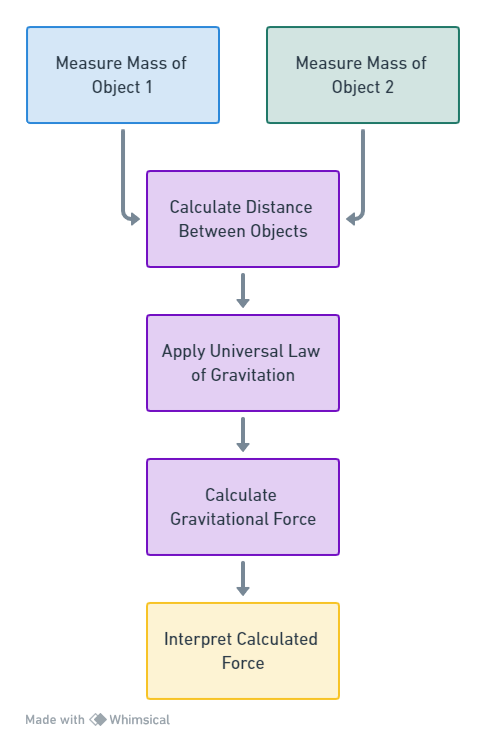
Use this gravitational force calculator to see how objects, big and small, attract to one another with gravity.
Welcome to my exploration of one of the universe's most profound and ubiquitous forces: gravity. This fundamental force is the invisible hand sculpting the architecture of the cosmos, from the fall of an apple to the dance of galaxies. It's a force that permeates our everyday lives, yet it took the genius of Sir Isaac Newton to recognize and quantify its influence on the physical objects around us.
Newton's Law of Universal Gravitation was revolutionary. It provided us with the first mathematical framework for understanding how objects attract each other with a force that is directly proportional to their masses and inversely proportional to the square of the distance between their centers. This was a monumental leap for 17th-century science and remained the cornerstone of our understanding of gravitational phenomena for nearly three centuries.
However, the story of gravity didn't end with Newton. At the dawn of the 20th century, Albert Einstein reshaped our understanding of gravity through his General Theory of Relativity. Einstein proposed that gravity is not just a force but the curvature of spacetime itself, caused by the presence of mass and energy. This perspective has since passed rigorous tests—from the bending of light to the precise orbits of the planets—and continues to inform our understanding of the cosmos.
To bridge the gap between the abstract concept of gravity and tangible experience, I've embedded the above gravitational force calculator. Whether you're a student, educator, hobbyist, or just plain curious, this calculator offers a hands-on approach to understanding the dynamics of gravity. It's a demonstration of how the laws that govern the motion of planets and stars also apply to the objects in our daily lives.
Let's embark on this gravitational journey together. Feel the pull of curiosity? Start experimenting with the calculator that ties together the celestial and the terrestrial, and discover the cosmic ballet that's been choreographed by gravity.
Section 2: Fun and Educational Examples
Engaging with the concept of gravity doesn't have to be a purely academic endeavor—it can be a playful and enlightening experience too. To illustrate the versatility of the gravitational force calculator, let's dive into some examples that range from the vast expanse of our solar system to the more familiar confines of our surroundings.
Celestial Pairings
The cosmos is a grand stage for the gravitational dance between celestial bodies. The calculator can help us comprehend the immense forces at play. Below is Table 1, where I've calculated the gravitational force between various celestial pairings:
Pairing
Mass 1
Mass 2
Distance
Answer
Earth and Moon
1 Earth
0.0123 Earths
60 Earth Radii
200,370,011 TN
Sun and Jupiter
1 Sun
317.8 Earths
420,000 Earth Radii
35,188,471,919 TN
Earth and Sun
1 Earth
1 Sun
1 AU
35,423,960,813 TN
Sun and Mercury
1 Sun
0.055 Earths
170,000 Earth Radii
37,171,487 TN
Table 1: The gravitational force between various celestial bodies calculated using the average mass and distance of each pairing.
For the actual force values, you can input the data from the table into the calculator and watch the cosmic choreography unfold in numbers.
Everyday Objects
Moving from the cosmic scale to our daily surroundings, the gravitational attraction exists even between everyday objects, albeit with much smaller forces. In Table 2, you'll find the gravitational forces between common objects that we see around us:
Objects
Mass 1 (kg)
Mass 2 (kg)
Distance (m)
Answer
Car and Bicycle
1,000
10
1
0.000001 Newtons (N)
Dog and House
40
100,000
10
0.000003 Newtons (N)
Table 2: The gravitational force between common objects, demonstrating that gravity acts on all scales.
To find the exact force, simply use the figures provided and calculate them with our gravitational force calculator. While these forces are too small to feel, they're a wonderful reminder that the same principles that keep the Moon in orbit around Earth also apply to the car and bicycle resting in your driveway.
The calculations provided in these tables offer just a glimpse into the gravity's reach. From the grand cosmic ballet to the tiniest tug between a pet and its home, gravity is the silent composer of this universal symphony.
Section 3: Newton's Law of Universal Gravitation
In the 17th century, Sir Isaac Newton revolutionized our understanding of the universe with his Law of Universal Gravitation. This was a time of immense scientific ferment, where the mysteries of the cosmos were being unraveled using the light of reason and the tools of mathematics. Newton's insight laid the groundwork for celestial mechanics, enabling us to predict the motion of planets and moons with astonishing precision.
Newton postulated that every particle of matter in the universe attracts every other particle with a force that is directly proportional to the product of their masses and inversely proportional to the square of the distance between their centers. This force of attraction is what we understand as gravity.
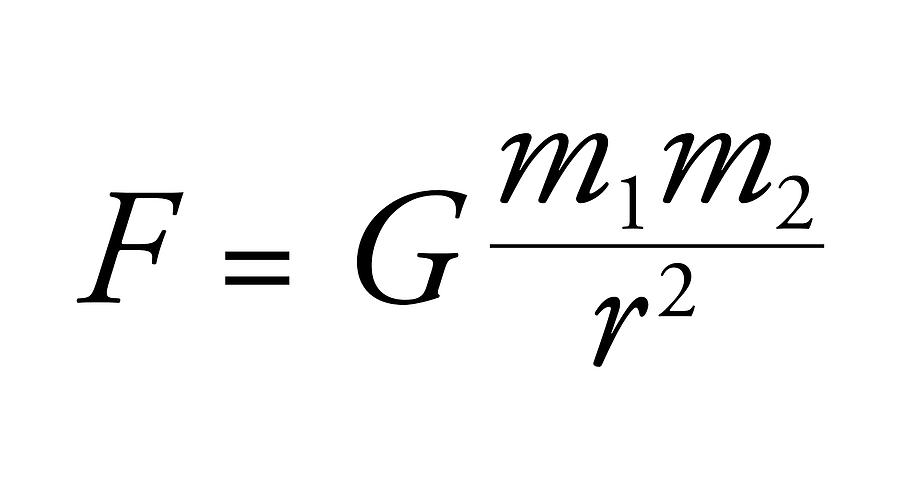
The formula that encapsulates this law is elegantly simple yet profoundly far-reaching:
Here, F is the gravitational force between two masses, G is the gravitational constant, m1 and m2 are the masses of the objects, and r is the distance between the centers of the two masses.
This formula tells us that the gravitational force:
Increases with greater mass of the objects involved.
Decreases as the distance between the objects increases.
Is universal—applying to apples and oranges on Earth as well as to planets and stars in the heavens.
Newton’s law showed us that the same physical principles that guide the falling of an apple are also responsible for the orbits of the planets. This universality was a profound revelation, suggesting a cosmos interconnected by laws that could be understood and described mathematically.
Diagram of Newton’s Law of Universal Gravitation
Newton's Law of Universal Gravitation is a cornerstone of classical physics. It's a testament to the power of human curiosity and intellect, and it remains one of the greatest scientific discoveries in history.
Section 4: Einstein's General Theory of Relativity
While Newton's law provided a robust framework for understanding gravitational phenomena for centuries, it was Albert Einstein who, in the early 20th century, delved deeper into the fabric of reality to reformulate the nature of gravity. His General Theory of Relativity, published in 1915, redefined gravity not as a force, but as a consequence of the curvature of spacetime caused by mass and energy.
Einstein proposed that what we perceive as the force of gravity is actually the motion of objects following the straightest path in a curved spacetime. This curvature is like a trampoline stretched by a heavy object; other objects placed on it will naturally roll towards the heavier object not because of a force between them, but because of the shape of the surface.
This perspective departs radically from the Newtonian view by describing gravity as a geometric property of space and time. According to Einstein, mass and energy tell spacetime how to curve, and spacetime tells objects how to move.
The equations of General Relativity are complex, but the idea can be visualized with the following thought experiment: imagine the Sun as a massive bowling ball placed in the center of a trampoline. The Sun's mass causes the trampoline to warp, creating a 'dent' around it. Now, if we place a smaller ball, say Earth, on this trampoline, it will roll around the Sun, trying to move in a straight line but instead following the curve created by the Sun. This is similar to how planets orbit around the Sun in our solar system.
Graphic of Spacetime Curvature
Einstein's theory has been confirmed by numerous experiments and observations. It has provided predictions such as the bending of light around massive objects (gravitational lensing), the precise orbit of Mercury, and the recently observed gravitational waves—ripples in the fabric of spacetime itself.
General Relativity has not only advanced our understanding of gravity but also opened new vistas into the study of black holes, the evolution of the universe, and the conditions during the Big Bang. It remains one of the most successful theories in physics.
Section 5: Gravitational Force in Our Universe
Gravity is the grand conductor of the cosmos, silently shaping the vast and majestic tapestry of the universe. It is the force that forms galaxies and guides their rotation, that coalesces matter into stars and planets, and that influences the path of everything from comets to spacecraft. Without gravity, the universe as we know it would simply not exist.
In the celestial realm, gravity is the force that keeps planets in orbit around stars and moons in orbit around planets. It governs the tides on Earth, the formation of black holes, and the mergers of galaxies. It is also the force behind some of the most spectacular cosmic events, such as supernovae and neutron star collisions, which send gravitational waves rippling through spacetime.
Despite its universal presence, gravity is still not fully understood. Anomalies such as the rotation rates of galaxies and the movements of stars hint at phenomena like dark matter and dark energy—concepts that challenge and extend our current theories. Researchers around the world are actively studying these gravitational mysteries, seeking to uncover the hidden structure and dynamics of our universe.
As we consider the large-scale effects of gravity, it is interesting to compare the predictions made by Newtonian gravity and Einstein's General Relativity. In many everyday scenarios, both theories provide the same predictions; however, at extreme scales—such as near massive stars or in the early universe—the predictions diverge significantly.
Below is a table that outlines how Newtonian and Einsteinian gravity compare in different cosmic scenarios:
Scenario
Newtonian Prediction
Einsteinian Prediction
Observed Reality
Orbit of Mercury
Slight precession
Precise precession
Matches Einsteinian Prediction
Bending of Light by the Sun
No bending
Light bends
Matches Einsteinian Prediction
Expansion of the Universe
Should slow down
Can accelerate
Observed to accelerate
Time Dilation near Massive Objects
Time is absolute
Time slows down
Time dilation observed
Gravitational Waves
Not predicted
Predicted
Directly observed
Table 3: Comparison of Newtonian and Einsteinian Gravity Predictions
This table reveals the extraordinary precision and foresight of Einstein's theory, especially when it comes to extreme gravitational conditions. From the peculiar orbit of Mercury to the stretching of time near a black hole, General Relativity has provided a more accurate description of our universe.
In conclusion, the story of gravity is still being written. With every new observation and theory, we peel back another layer of this cosmic force, deepening our understanding of the universe and our place within it.
Section 6: Applying the Calculator to Real-World Problems
The gravitational force calculator on my website is more than just an educational tool; it mirrors the types of calculations that scientists and engineers use in various fields of research and industry. Understanding the gravitational force between objects is fundamental to solving real-world problems and advancing our technological capabilities.
In the field of aerospace engineering, for example, precise calculations of gravitational forces are critical. When plotting the course of a spacecraft, mission planners must account for the gravitational pull of celestial bodies. This is essential for maneuvers such as gravity assists, where a spacecraft uses a planet's gravity to gain speed or alter its trajectory—a technique that conserves fuel and is a staple in interplanetary travel.
Gravitational calculations also play a pivotal role in placing satellites into orbit. Engineers calculate the necessary velocity and altitude to achieve a stable orbit around Earth, taking into account the gravitational pull that varies with altitude above the Earth's surface. These calculations ensure that satellites maintain their orbits and don't drift off into space or fall back to Earth.
Another area where gravity calculations are utilized is in the study of climate and ocean patterns. Satellites such as GRACE (Gravity Recovery and Climate Experiment) measure minute changes in Earth's gravity field, which can indicate changes in mass distribution due to melting ice, aquifer depletion, and sea level rise. Such data is crucial for understanding and responding to climate change.
Flowchart of Gravitational Calculations in Practical Applications
The applications of gravity calculations extend beyond these examples, influencing areas such as urban planning, where the gravitational pull of the Earth can affect the structural integrity of buildings and bridges. Even in the realm of personal electronics, gravity sensors help your smartphone's screen rotate and are instrumental in navigation systems.
In essence, the same gravitational principles that govern the motion of planets and stars are also at work in a multitude of earthly technologies and scientific inquiries. By using this calculator, we gain a deeper appreciation for the universal laws of physics and their profound implications across various aspects of our daily lives and the world at large.
Conclusion
Our journey through the realms of gravity, from Newton's apple to the curvature of spacetime, highlights the profound role this fundamental force plays in shaping our universe. Understanding gravity is not just an academic pursuit; it's a window into the mechanics of the cosmos and a tool for solving real-world problems.
I encourage you to use the gravitational force calculator embedded in this article. Experiment with different masses and distances—be they celestial or terrestrial—and observe the resulting forces. This hands-on experience is invaluable in transforming abstract concepts into tangible realities, deepening your appreciation and understanding of the gravitational forces that bind the universe together.
As we continue to explore and understand gravity, we unlock more of the universe's secrets. Every calculation is a step towards a greater understanding, each discovery a testament to human curiosity and ingenuity.
References
For those interested in delving deeper into the topic of gravity, here are some valuable resources:
Books:
"The Principia: Mathematical Principles of Natural Philosophy" by Isaac Newton - A foundational work in the history of science.
"Relativity: The Special and General Theory" by Albert Einstein - A clear explanation of the theory of relativity by Einstein himself.
"Gravity: An Introduction to Einstein's General Relativity" by James B. Hartle - A comprehensive textbook on the subject.
"Measurement of Gravitational Waves from a Binary Black Hole Merger" by B.P. Abbott et al. (Physical Review Letters, 2016) - A landmark paper on the first observation of gravitational waves.
Websites:
NASA's Solar System Exploration [solarsystem.nasa.gov] - An excellent resource for understanding the gravitational dynamics of our solar system.
The Gravity Probe B Experiment [einstein.stanford.edu] - Stanford University's page detailing a fascinating experiment to test aspects of General Relativity.
These resources provide a mix of historical perspective, theoretical background, and modern scientific developments. They offer a pathway to a deeper understanding of gravity and its role in the universe.
In closing, gravity is more than just a force; it's a narrative that connects us with the stars above and the world under our feet. As you engage with these concepts and tools, may your understanding of this universal force grow, enriching your appreciation of the cosmos and its intricate workings.
Welcome to my comprehensive guide on establishing a more efficient and profitable business model in the world of online boutique and Amazon sales. Inspired by the experiences of my friend, Kay, who faced challenges with product sourcing, website management, customer service, and inventory systems in her journey of selling wholesale clothing to middle-class women, this article aims to explore the transformative potential of dropshipping.
Dropshipping offers a streamlined approach where you can sell products without maintaining a physical inventory, significantly reducing overhead costs and operational complexities. By leveraging this model, we aim to address the hurdles that Kay encountered – from finding the right products to simplifying customer service and website structure.
This guide is crafted to help entrepreneurs like Kay transition from traditional wholesale methods to a dropshipping model, retaining their business focus while optimizing for profitability and efficiency. Join me as we delve into this journey, providing practical insights and strategies to elevate your online boutique or Amazon store to new heights of success.
Stay tuned as we delve deeper into the steps and strategies for starting your own dropshipping clothing store, where I’ll share more about market research, identifying your niche, selecting a business model, and much more. This guide is designed to provide a roadmap for aspiring entrepreneurs looking to venture into this exciting and dynamic field. Let’s embark on this journey together!
Conducting Market Research
In the dynamic world of the clothing industry, conducting thorough market research is not just beneficial; it’s a necessity. Understanding market trends, customer preferences, and the competitive landscape is crucial for any business, but even more so in an industry driven by style and fast-changing trends.
Importance of Market Research in the Clothing Industry
Market research in the clothing industry is foundational for understanding what your potential customers want. It helps identify emerging trends, gauge demand for specific types of clothing, and understand the competitive landscape. This knowledge is vital for making informed decisions about product selection, pricing, and marketing strategies.
Tools and Methods for Effective Market Research
There are several tools and methods available for conducting effective market research. Online tools like Google Trends, social media analytics, and consumer behavior analysis platforms offer valuable insights into what consumers are looking for. Surveys and focus groups can also provide direct feedback from potential customers.
Identifying trending topics and influential fashion content
Paid plans
This table provides a comprehensive overview of the tools available for market research in the dropshipping clothing industry. Each tool offers unique insights and data that can be leveraged to make informed business decisions.
Interpreting Market Research to Inform Business Decisions
Interpreting the data from market research is as crucial as collecting it. This involves looking for patterns in consumer behavior, understanding the significance of emerging trends, and assessing the strengths and weaknesses of competitors. These insights should directly inform your business decisions, helping you to tailor your product offerings, marketing strategies, and even operational decisions to better align with market demands.
In conclusion, market research is an indispensable part of starting a successful dropshipping business in the clothing industry. It offers the insights needed to make informed decisions, stay ahead of trends, and meet customer expectations effectively.
Identifying Your Niche
The selection of a niche within the clothing market is a critical step in establishing a successful dropshipping business. A niche allows you to focus your efforts on a specific segment of the market, making your marketing more targeted and effective.
Importance of Selecting a Niche in the Clothing Market
Focusing on a niche helps to stand out in a crowded market. It allows for more personalized branding and marketing, which can resonate more deeply with a specific group of customers. This focus also helps in building a loyal customer base who are passionate about the particular style or type of clothing you offer.
Criteria to Consider When Choosing a Niche
When selecting your niche, consider factors such as market demand, competition level, your personal interests, and potential profitability. It’s important to choose a niche you are passionate about, as this passion will reflect in your business. Also, look for a niche with a balance of sufficient demand but not too much competition.
Identifying the right niche is not just about finding a gap in the market; it’s about finding a place where your passion and business potential meet. This can be the key to a fulfilling and successful venture in the dropshipping clothing industry.
Selecting a Business Model
Choosing the right business model is a critical decision in establishing a dropshipping store. Each model has its own set of advantages and considerations.
Overview of Different Dropshipping Models:
Traditional Dropshipping: Involves selling products from suppliers without holding any inventory. It’s popular due to its low startup costs and ease of entry.
Print-on-Demand: This model is focused on customizing products with unique designs when an order is made. It’s ideal for those who want to offer personalized or unique clothing items.
Private Label: Involves creating your own brand on products sourced from manufacturers. This model requires more investment but offers higher margins and brand control.
Factors to Consider When Choosing a Business Model
When selecting a business model, consider factors like startup costs, control over product quality and branding, scalability, and your target market’s preferences. Each model has different implications for these aspects.
Business Model
Startup Costs
Control Over Branding
Ease of Scalability
Ideal For
Traditional
Low
Low
High
Entrepreneurs starting with low budget
Print-on-Demand
Moderate
Moderate
Moderate
Creative individuals with unique designs
Private Label
High
High
Varies
Entrepreneurs seeking brand control and higher margins
This comparison will help aspiring entrepreneurs make an informed decision about which model aligns best with their goals, budget, and vision for their dropshipping business.
Developing a Business Plan
A well-structured business plan is the backbone of any successful venture, including a dropshipping business. It serves as a roadmap for your business, outlining your goals, strategies, and how you plan to achieve them.
Essential Components of a Dropshipping Business Plan:
Executive Summary: A concise overview of your business and its objectives.
Market Analysis: Insights into your target market, competition, and industry trends.
Product Selection: Details about the types of products you plan to offer.
Marketing and Sales Strategy: Your approach to promoting and selling your products.
Operations Plan: How you will manage the day-to-day operations.
Financial Projections: A breakdown of your expected revenue, expenses, and profitability.
Tips for Creating a Thorough and Realistic Plan:
Conduct comprehensive research to inform each section of your plan.
Be realistic with your financial projections and timelines.
Clearly define your unique value proposition.
Regularly update your plan to reflect changes in the market or your business.
The creation of a thorough and realistic business plan is not just a formality; it’s a crucial step in laying a strong foundation for your dropshipping business.
Setting Up Your Online Store
Setting up an online store is a critical step in launching your dropshipping business. For this example, let’s focus on Shopify, a popular and user-friendly e-commerce platform.
Steps to Choose and Set Up an E-commerce Platform (Shopify)
Sign Up for Shopify: Visit Shopify’s website and sign up for an account.
Choose a Plan: Select a plan that suits your budget and business needs.
Set Up Your Store: Customize your store’s settings, including payment options, shipping, and taxes.
Select a Theme: Choose a theme that aligns with your brand and customize it.
Add Products: Upload your product details, images, and descriptions.
Organize Products: Categorize your products into collections for easier navigation.
Set Up Domain: Purchase a domain through Shopify or link an existing domain.
Optimize for SEO: Use keywords and meta descriptions to make your store easily discoverable.
Test Your Store: Conduct a test transaction to ensure everything is functioning correctly.
Launch Your Store: Once everything is set up and tested, launch your store to the public.
Advice on Domain Name Selection: Choose a domain name that is unique, memorable, and reflects your brand. Keep it short, easy to spell, and avoid using hyphens or numbers.
Setting up your store on Shopify or any other e-commerce platform requires careful attention to detail, but with the right approach, it can be a smooth and rewarding process.
Partnering with Manufacturers
Finding Dropshipping Companies & Suppliers for Your Ecommerce Store
When starting or expanding an ecommerce business, choosing the right dropshipping service is crucial. Dropshipping allows your business to sell products without stocking inventory. The supplier sends purchased items directly to the customer, bypassing your hands.
Best Dropshipping Suppliers
For high-quality products, consider these suppliers, with no particular order:
Spocket: Connects retailers to suppliers in the USA and Europe.
AliExpress Dropshipping: Offers a wide range of products, including electronics and apparel.
Modalyst: Features trending brand names and is an AliExpress partner.
SaleHoo: A well-known supplier directory with various niches.
Doba: Allows searching and listing wholesale products.
Wholesale2B: Integrates with various platforms and offers a vast product range.
Worldwide Brands: A comprehensive directory of dropshippers and bulk distributors.
MegaGoods: Specializes in wholesale electronic and household items.
Inventory Source: Provides access to numerous suppliers and syncs with your platform.
How to Spot a Fake Dropshipping Supplier
Beware of fake wholesalers. Red flags include minimum order sizes, pre-order fees, or ongoing fees. For legitimate operations, look for suppliers without these signs.
Dropshipping Automation
Companies like Spark Shipping specialize in automating the connection between ecommerce platforms and dropshippers.
FAQs About Dropshipping Suppliers:
Supply Chain: Involves several stages from manufacturing to reaching the end consumer.
Free Dropshippers: Many don’t charge fees except for product and shipping costs.
Legality: Dropshipping is legal, but familiarize yourself with regulations.
Profitability: It’s a low-risk model with potential profitability.
Payment Methods: Suppliers often accept credit cards.
Dropshipping on Amazon and eBay: Possible, but adhere to their policies.
Handling Returns: Usually involves getting an RMA from the supplier.
In summary, selecting the right supplier is fundamental in dropshipping. Consider factors like product range, supplier reliability, and your ecommerce platform compatibility. Avoid scams by looking out for unrealistic fees and choose suppliers that align with your business model.
Sample Orders and Quality Checks
Ordering samples is a critical step in ensuring the quality of your dropshipping products. It allows you to physically evaluate the quality, fit, and overall appeal of the items before making them available to your customers.
Importance of Ordering Samples for Quality Assurance
Ordering samples helps you avoid the pitfalls of selling low-quality products. It gives you a firsthand look at what your customers will receive, ensuring that the products meet your standards and descriptions.
Process of Reviewing Samples and Providing Feedback:
Evaluate the Quality: Check the material, stitching, and durability.
Fit and Sizing: Ensure the sizes are accurate and fit as expected.
Aesthetics: Assess the colors, prints, and overall look.
Feedback: Provide detailed feedback to the manufacturer. Include any necessary changes or improvements.
Conducting thorough quality checks on sample orders is essential for maintaining the integrity of your dropshipping business and ensuring customer satisfaction.
Marketing and Launching Your Store
Marketing your store effectively is key to attracting customers and driving sales. It’s important to leverage both social media and digital marketing strategies to reach your target audience.
Strategies for Marketing Your Dropshipping Store:
Content Marketing: Create valuable and relevant content that appeals to your target audience.
SEO: Optimize your website for search engines to improve visibility.
Email Marketing: Build an email list to engage with customers directly.
Influencer Partnerships: Collaborate with influencers who resonate with your brand.
Effective Use of Social Media and Digital Marketing
Utilize platforms like Instagram, Facebook, and Pinterest to showcase your products and engage with your audience. Paid advertising on these platforms can also be highly effective in reaching a broader audience.
Here is a sample timeline for a 6-month marketing strategy, including key milestones:
This timeline provides a structured approach to marketing and launching your store, ensuring you cover all essential aspects systematically for maximum impact.
Managing Operations and Customer Service
Effective operations management and customer service are vital for the success of your dropshipping business. They ensure customer satisfaction and efficient handling of orders.
Best Practices for Daily Operations Management:
Automate Processes: Use software tools to automate order processing and inventory management.
Monitor Supplier Performance: Regularly assess your suppliers to ensure they meet delivery and quality standards.
Stay Organized: Keep detailed records of orders, customer queries, and inventory changes.
Ensuring a High Level of Customer Service:
Responsive Support: Offer timely and helpful customer support.
Clear Policies: Have clear and transparent shipping, return, and refund policies.
Feedback Loop: Encourage and act on customer feedback to continuously improve your service.
Maintaining efficient operations and providing exceptional customer service are crucial for building a loyal customer base and ensuring the smooth running of your dropshipping business.
Business Analysis and Growth Strategies
Regular analysis of business performance and strategizing for growth are key to the long-term success of your dropshipping business.
Techniques for Analyzing Business Performance:
Sales Analysis: Regularly review your sales data to identify trends and areas for improvement.
Customer Feedback: Utilize customer feedback to gauge satisfaction and identify potential changes.
Financial Metrics: Keep a close eye on profitability, costs, and other financial metrics.
Ideas for Scaling and Expanding Your Business:
Diversify Product Range: Consider expanding your product offerings to cater to wider customer interests.
Explore New Markets: Look into selling in different regions or countries.
Enhance Marketing Efforts: Increase your marketing activities or explore new channels to reach more customers.
Continuously analyzing and adapting your business strategies based on performance data is crucial for sustaining growth and staying competitive in the dropshipping market.
Case Study and Transformation into a Dropshipping Model: Pink Lily
Pink Lily, a successful online boutique, has become a go-to destination for trendy women’s clothing and accessories. They stand out due to their unique style, blending custom designs with popular fashion trends.
Key Strategies of Pink Lily:
Branding: Strong emphasis on unique branding through customized graphics and logos.
Inventory Management: Initially, they managed their own warehouse and inventory.
Transitioning to a Dropshipping Model:
Supplier Collaboration:
Find suppliers who allow customization of products.
Create unique designs or logos to distinguish your brand.
Direct-to-Consumer Approach:
Focus on online sales through an ecommerce platform.
Utilize social media for marketing and brand awareness.
Reduced Overhead:
Eliminate the need for warehousing by using dropshipping.
Reinvest savings into marketing and product development.
Potential Suppliers
Here’s a table of potential suppliers that can help in creating a dropshipping store similar to Pink Lily, focusing on women’s clothing with options for customization and a variety of styles.
Supplier Name
Key Features
Niche Focus
Fulfillment Location
Membership Fee
Website
My Online Fashion Store
Fast US shipping, large catalog, customization options, free returns, restocking twice a week
These suppliers offer a range of options, from high-end designer brands to customizable clothing and print-on-demand services. They are suitable for a dropshipping business model similar to Pink Lily, where you can sell directly to consumers without maintaining a physical inventory. Each supplier has its strengths, and your choice would depend on your specific business goals, target market, and the type of clothing you wish to offer.
Remember, integrating these suppliers into your business model requires careful consideration of product quality, shipping times, costs, margins, and ease of integration with your e-commerce platform. Conducting a thorough analysis of each option and starting with a small selection of products can help test their service quality and reliability.
Benefits of the Dropshipping Model:
Scalability: Easier to scale without the constraints of inventory management.
Flexibility: Quickly adapt to fashion trends and customer preferences.
Lower Initial Investment: Reduced upfront costs compared to traditional retail models.
In summary, by adopting a dropshipping model while maintaining a strong branding and marketing strategy akin to Pink Lily, new entrepreneurs can create a successful online boutique with fewer barriers to entry and greater flexibility.
Conclusion
In summary, starting a dropshipping clothing store is a journey filled with learning, challenges, and opportunities. From conducting thorough market research to selecting a niche, creating a business plan, setting up an online store, partnering with reliable manufacturers, and implementing effective marketing strategies, each step is crucial for success. Remember, persistence and adaptability are key. I encourage aspiring entrepreneurs to embrace this journey with enthusiasm and resilience. The world of dropshipping offers immense potential for those willing to invest their time and efforts.
Additional Resources
For further learning and support, consider exploring the following resources:
Shopify Blog: Offers insights on e-commerce and dropshipping.
https://www.davidmaiolo.com/wp-content/uploads/2024/01/word-image-2921-2.png10241024David Maiolohttps://www.davidmaiolo.com/wp-content/uploads/2023/11/cropped-David-Maiolo-Logo3b-ICON-300x300.pngDavid Maiolo2024-01-09 05:06:292024-01-13 06:30:10How to Start a Dropshipping Clothing Store: A Step-by-Step Guide
The mastery of medical terminology is not just an academic exercise; it is a crucial tool for effective communication within the healthcare sector. Understanding these terms enhances clarity and precision in patient care, research, and collaboration among healthcare professionals.
This article aims to empower the public or medical professionals with a thorough grasp of medical terminology. It is designed to build a strong foundation in the basic structure and usage of medical terms, delving into the intricacies of their origins, applications, and evolving nature. With this knowledge, future healthcare providers can navigate the complex world of medicine with confidence and competence.
Foundations of Medical Terminology
The Structure of Medical Words
The basic structure of medical words includes root words, prefixes, and suffixes. Root words provide the core meaning, prefixes modify this meaning, and suffixes often indicate the word’s type or the body part involved. Understanding this structure is key to deciphering medical language.
Table 1: Common Greek and Latin Roots, Prefixes, and Suffixes
Component
Example
Meaning
Type
Root
Cardi
Heart
Greek
Prefix
Hyper-
Over, Excessive
Greek
Suffix
-itis
Inflammation
Latin
Root
Gastr
Stomach
Greek
Prefix
Sub-
Under, Below
Latin
Suffix
-ectomy
Removal
Greek
Root
Hemat
Blood
Greek
Prefix
Anti-
Against
Greek
Suffix
-oma
Tumor
Greek
Combining forms, where a vowel is used to connect roots and improve pronunciation, are also essential. For example, ‘oste/o’ (bone) can be combined with ‘arthr’ (joint) to form ‘osteoarthritis’.
Visual 2: Diagram of Medical Term Construction
The Origin of Medical Terms
Medical terms often originate from Greek and Latin. Knowledge of these languages’ influences helps in understanding and memorizing complex terms.
Table 2: Examples of Terms Derived from Greek and Latin
Term
Origin Language
Original Words
Meaning
Cardiology
Greek
Cardia + Logos
Study of Heart
Pulmonary
Latin
Pulmo
Pertaining to Lung
Hematology
Greek
Haima + Logos
Study of Blood
Historical context enriches the understanding of medical terms. As medical science evolved, so did its terminology, adapting to new concepts and technologies.
Infographic 1: Evolution of Medical Terminology Timeline
Understanding Medical Terms through Structure
Anatomical Terms
Anatomical terms often follow the structure of root, prefix, and suffix. This section will explore how these components build terms that precisely describe body parts and locations, enhancing comprehension and communication in medical settings.
Table 3: ‘Anatomical Terms and Their Structure’
Anatomical Term
Root Word
Prefix/Suffix
Description
Cephalic
Cephal
-ic (pertaining to)
Relating to the head
Brachial
Brachi
-al (pertaining to)
Relating to the arm
Thoracic
Thorac
-ic (pertaining to)
Pertaining to the chest
Visual 3: Annotated Human Body Diagram
Diagnostic Terms
Diagnostic terms, while not always following the root-prefix-suffix structure, are essential in identifying medical conditions. This subsection demonstrates their usage in the medical diagnosis process.
Table 4: ‘Common Diagnostic Terms and Their Structure’
Diagnostic Term
Root Word
Prefix/Suffix
Description
Biopsy
Bio
-opsy (viewing)
Tissue examination
MRI
Magnetic Resonance
Imaging
Advanced imaging technique
Visual 4: Flowchart of the Diagnostic Process
Symptomatic Terms
Terms describing symptoms often reflect their Greek or Latin roots. This subsection examines how understanding these roots aids in identifying and communicating patient symptoms.
Table 5: ‘Symptomatic Terms and Their Roots’
Symptom
Root Word
Description
Dyspnea
Dys- (difficult) + pnea (breathing)
Difficulty breathing
Tachycardia
Tachy- (fast) + cardia (heart)
Rapid heart rate
Visual 5: Symptom-Diagnosis Mapping Diagram
Surgical Terms
Surgical terms often combine Greek and Latin roots with specific prefixes and suffixes to describe procedures. This subsection reveals the structure behind common surgical terminologies.
Table 6: ‘Surgical Terms and Their Structures’
Procedure
Components
Description
Cholecystectomy
Chole- (bile) + cyst (sac) + -ectomy (removal)
Gallbladder removal
Arthroplasty
Arthro- (joint) + -plasty (molding)
Joint reconstruction
Visual 6: Diagrams of Surgical Procedures
Pharmacological Terms
Pharmacological terms combine roots, prefixes, and suffixes to describe drug classes and their effects. This section delves into how these terms are structured and applied.
Table 7: ‘Pharmacological Terms and Their Structure’
Drug Class
Components
Description
Analgesics
An- (without) + algesia (pain)
Pain relievers
Antibiotics
Anti- (against) + biotic (life)
Bacteria-fighting drugs
Pathological Terms
Pathological terms often derive from Latin and Greek, helping describe diseases and conditions. This subsection explores the structure behind these terms.
Table 8: ‘Pathological Terms and Their Roots’
Disease/Disorder
Components
Description
Osteoarthritis
Osteo- (bone) + arthritis (joint inflammation)
Joint disease
Leukemia
Leuk- (white) + -emia (blood condition)
Blood cancer
Visual 7: Disease terminology
Building and Interpreting Medical Words
Decoding Medical Terminology
Decoding medical terminology requires understanding its foundational structure. Strategies for this include breaking down complex terms into their roots, prefixes, and suffixes, and learning the meaning of these components. Another effective method is to familiarize oneself with common medical terms in everyday practice. This not only aids in memorization but also helps in applying these terms in real-life medical contexts.
Interactive Table 1: ‘Mix-and-Match Roots, Prefixes, and Suffixes’
Mix-and-Match Roots, Prefixes, and Suffixes
Select a prefix, root, and suffix to create a medical term.
Prefix
Root
Suffix
hyper-
therm
-ia
hypo-
gastr
-ic
intra-
derm
-itis
sub-
cardi
-osis
brady-
nephr
-ectomy
tachy-
neur
-plasty
angio-
oste
-gram
osteo-
my
-logy
myo-
hepat
-scope
hemi-
cephal
-megaly
hepato-
cyst
-centesis
arthro-
laryng
-itis
bio-
card
-pathy
Combined Term: None
Description: None
Term Definition: None
This table table allows learners can combine different roots, prefixes, and suffixes to form and understand various medical terms, and even make up ones that don’t exist.
Visual 9: Step-by-Step Guide on Decoding a Term
Practical Exercises
Practical exercises are invaluable for reinforcing the understanding and application of medical terminology. These exercises simulate real-world scenarios, challenging learners to apply their knowledge in interpreting and using medical terms correctly.
Exercise Set 1: Case Studies for Term Interpretation
Objective: The primary goal of this exercise set is to enhance students’ ability to interpret and apply medical terminology in real-world clinical scenarios. By analyzing these case studies, students will gain a deeper understanding of how medical terms are used in practice and the importance of accurate interpretation in patient care.
Case Study 1: Cardiovascular Concerns
Scenario: A 65-year-old male patient presents with chest pain and shortness of breath. The ECG report shows signs of myocardial infarction.
Task: Interpret the medical terms in the patient’s diagnosis and explain the implications for treatment and care.
Case Study 2: Neurological Complications
Scenario: A 30-year-old female exhibits symptoms of aphasia and hemiparesis after a stroke.
Task: Define the terms aphasia and hemiparesis, and discuss the potential rehabilitation approaches.
Case Study 3: Pediatric Allergies
Scenario: A 6-year-old patient is diagnosed with urticaria and angioedema, triggered by a food allergy.
Task: Explain the terms urticaria and angioedema in the context of allergic reactions and outline the emergency treatment protocol.
Case Study 4: Gastrointestinal Disorders
Scenario: A patient is diagnosed with gastroesophageal reflux disease (GERD) and peptic ulcer disease (PUD).
Task: Describe the pathophysiology of GERD and PUD, and compare the treatment strategies for both conditions.
Case Study 5: Endocrine System Management
Scenario: A patient with a history of diabetes mellitus presents with symptoms of polyuria, polydipsia, and polyphagia.
Task: Interpret these symptoms in the context of diabetes management and discuss the necessary modifications in treatment.
Supporting Material:
Glossary of Terms: A comprehensive list of the medical terms used in the case studies.
Explanation Guides: Detailed descriptions of the conditions and symptoms for each case study.
Treatment Overview: A brief overview of common treatments and management strategies for the conditions presented in the case studies.
Exercise Set 1: Case Studies for Term Interpretation – Answer Key
Case Study 1: Cardiovascular Concerns – Myocardial Infarction
Myocardial
Prefix: “Myo-” meaning muscle
Root: “Cardi-” meaning heart
Suffix: None
Infarction
Prefix: None
Root: “Infarct-” meaning tissue death
Suffix: “-ion” indicating a process
Diagnosis Implication: The term indicates muscle death in the heart due to blocked blood supply.
Case Study 2: Neurological Complications – Aphasia and Hemiparesis
Aphasia
Prefix: “A-” meaning without
Root: “Phas-” meaning speech
Suffix: “-ia” indicating a condition
Hemiparesis
Prefix: “Hemi-” meaning half
Root: “Pares-” meaning weakness
Suffix: “-is” indicating a state
Diagnosis Implication: Loss of speech and weakness on one side of the body.
Case Study 3: Pediatric Allergies – Urticaria and Angioedema
Urticaria
Prefix: None
Root: “Urtic-” derived from Latin for nettle (referring to rash)
Suffix: “-aria” indicating a condition
Angioedema
Prefix: “Angio-” meaning vessel
Root: “Edem-” meaning swelling
Suffix: “-a” indicating a condition
Diagnosis Implication: Skin rash (hives) and swelling beneath the skin due to allergic reaction.
Case Study 4: Gastrointestinal Disorders – GERD and PUD
Gastroesophageal Reflux Disease (GERD)
Prefix: “Gastro-” meaning stomach
Root: “Esophageal” referring to the esophagus
Suffix: “-al” indicating related to; “Disease” is a standalone term
Peptic Ulcer Disease (PUD)
Prefix: “Pept-” meaning digestion
Root: “Ulcer” meaning sore
Suffix: None; “Disease” is a standalone term
Diagnosis Implication: Acid reflux into the esophagus and digestive ulcers.
Case Study 5: Endocrine System Management – Polyuria, Polydipsia, Polyphagia
Polyuria
Prefix: “Poly-” meaning many
Root: “Uri-” meaning urine
Suffix: “-a” indicating a condition
Polydipsia
Prefix: “Poly-” meaning many
Root: “Dips-” meaning thirst
Suffix: “-ia” indicating a condition
Polyphagia
Prefix: “Poly-” meaning many
Root: “Phag-” meaning eating
Suffix: “-ia” indicating a condition
Diagnosis Implication: Excessive urination, thirst, and hunger, common in uncontrolled diabetes.
Common Mistakes and Challenges
Common errors in medical terminology often arise from misinterpreting the roots, prefixes, and suffixes, leading to incorrect term formation or usage. Another frequent mistake is confusing terms with similar spellings or sounds but different meanings. Understanding and avoiding these errors is crucial for clear and accurate medical communication.
Table 11: ‘Common Errors in Medical Terminology and Corrections’
Error Example
Correction
Explanation
Hyper- vs. Hypo-
Hyperthyroidism (Excessive thyroid activity) vs. Hypothyroidism (Insufficient thyroid activity)
Confusing ‘hyper-‘ (over) with ‘hypo-‘ (under)
Itis vs. Osis
Bronchitis (Inflammation of the bronchi) vs. Bronchosis (Abnormal condition of the bronchi)
‘Itis’ indicates inflammation, while ‘osis’ refers to a general condition
Ectomy vs. Otomy
Appendectomy (Removal of the appendix) vs. Colotomy (Incision into the colon)
‘Ectomy’ means removal, while ‘otomy’ indicates cutting into
Ology vs. Opathy
Cardiology (Study of the heart) vs. Cardiopathy (Disease of the heart)
‘Ology’ denotes the study of, whereas ‘opathy’ refers to a disease
Arterio- vs. Athero-
Arteriosclerosis (Hardening of the arteries) vs. Atherosclerosis (Plaque buildup in arteries)
Confusing ‘arterio-‘ (related to arteries) with ‘athero-‘ (plaque)
Tachy- vs. Brady-
Tachycardia (Fast heart rate) vs. Bradycardia (Slow heart rate)
Mixing up ‘tachy-‘ (fast) and ‘brady-‘ (slow)
Visual 10: “Common Medical Terminology
Advanced Topics in Medical Terminology
Specialty-Specific Terminology
Medical specialties have unique terminologies reflecting their specific focus areas. Understanding these terms is essential for professionals working within or interacting with these specialties. For example, cardiology uses terms related to the heart, while neurology focuses on terms pertaining to the nervous system.
Table 12: ‘Specialty-Specific Terms’
Specialty
Term
Meaning
Cardiology
Myocardial
Pertaining to heart muscle
Neurology
Neuroplasticity
Ability of the nervous system to change
Oncology
Carcinoma
A type of cancer
Gastroenterology
Gastroesophageal
Relating to the stomach and esophagus
Evolving Medical Vocabulary
Medical vocabulary continuously evolves with the advent of new diseases and technologies. New terms are regularly introduced to describe emerging health conditions, treatments, and technological innovations. Staying updated with these changes is vital for healthcare professionals.
Infographic 2: Timeline of New Terms in the Medical Field
Resources for Further Learning
Expanding your understanding of medical terminology is facilitated by a variety of resources, each offering unique perspectives and methods of learning. From traditional textbooks to digital platforms, these resources cater to diverse learning styles and needs.
Table: Specific Resources for Medical Terminology
Resource Type
Specific Resource
Description
Useful For
Textbooks
“Medical Terminology for Dummies”
Simplified explanations of medical terms
Beginners
Online Courses
Coursera’s Medical Terminology Course
Comprehensive online learning modules
In-depth study
Mobile Apps
MedTerm Scramble
Interactive app for learning on the go
Practice and revision
Journals
The New England Journal of Medicine
Regular updates on medical advancements
Keeping up-to-date with new terms
Websites
WebMD Medical Dictionary
Online dictionary with extensive term listings
Quick reference and clarification
Guide 2: Tips on Using These Resources
Combine traditional and digital resources for a balanced approach.
Utilize interactive tools for active learning.
Regularly consult medical journals for the latest in medical terminology and advancements.
Conclusion
We have journeyed through the intricate landscape of medical terminology, exploring its fundamental structures, specialty-specific terms, and common pitfalls. This guide aims to provide a foundational understanding, crucial for anyone in the healthcare field or aspiring to enter it. The importance of mastering this language cannot be overstated, as it is essential for accurate diagnosis, treatment, and communication within the medical community.
As you move forward, remember that the journey of learning medical terminology is ongoing. Embrace the challenges and complexities of this language with enthusiasm. Regular practice, continuous learning, and application in real-world scenarios will deepen your understanding and enhance your communication skills in the medical field. Your dedication to this endeavor will not only benefit your professional growth but also contribute significantly to the quality of patient care and medical research.
https://www.davidmaiolo.com/wp-content/uploads/2024/01/a-medical-scene-in-a-hospital-room-a-senior-male.png10241024David Maiolohttps://www.davidmaiolo.com/wp-content/uploads/2023/11/cropped-David-Maiolo-Logo3b-ICON-300x300.pngDavid Maiolo2024-01-01 05:14:092024-01-13 06:26:03Speak Like a Doctor: How Medical Words Work
As someone who has always been captivated by the expressive world of dance, I find the art of choreography particularly enthralling. It’s a realm where creativity and storytelling coalesce, transforming movement into a language of its own. This article, “Choreography and Composition: Crafting Dance Through Creativity and Storytelling,” aims to unravel this intricate art form, with a unique focus on the anime series “Jujutsu Kaisen” as an intriguing case study.
My journey, although not as a dancer or choreographer, has been marked by a deep appreciation for the arts and a curiosity for diverse cultural expressions. From my global travels as a photographer to exploring the nuances of different art forms as a pianist, my experiences have cultivated a rich understanding and appreciation of artistic creativity. It is this perspective that I bring to this exploration of dance, viewing it not just as a spectator but as someone deeply intrigued by its creative potential.
In this article, we will dive into the core elements of choreography — space, time, and energy — and explore how they intertwine to create captivating dance narratives. We’ll discuss the importance of creativity and innovation, drawing inspiration from renowned choreographers who have transformed the dance landscape. Additionally, we’ll delve into the technical aspects, such as the relationship between music and dance and the art of conveying stories through movement.
A central feature of our discussion will be the choreographic interpretation of “Jujutsu Kaisen.” This anime series, known for its dynamic and intricate storylines, provides a rich tapestry for exploring how its themes and aesthetics can be translated into dance. This segment aims to illustrate the fascinating intersection between the animated world and choreography, offering a fresh perspective on how diverse art forms can interconnect.
This article is intended not just as a guide but as an immersive journey into the soulful and vibrant world of dance, viewed through the lens of a passionate enthusiast. Whether you are an aspiring choreographer, a dancer seeking inspiration, or simply an art lover, this exploration is designed to offer insights and inspiration to all. Join me in this rhythmic adventure as we discover the magic that lies at the heart of choreography and composition.
Section 1: Foundations of Choreography and Composition
Subsection 1.1: Understanding the Basics
Choreography, at its core, is about making choices. When creating a dance, choreographers manipulate the elements of space, time, and energy to convey meaning and emotion. Let’s delve into these foundational elements:
Space: This refers to where the dance happens. It includes the directions the dancers move in, the pathways they trace, and the patterns they form. Spatial design can be symmetrical or asymmetrical, reflecting the balance and dynamics of the performance.
Time: Time relates to the rhythm, speed, and duration of movements. It includes the beats per minute in the music, the pacing of the steps, and the timing of entrances and exits. The manipulation of time creates suspense, anticipation, or a sense of urgency in a dance.
Energy: Energy speaks to the quality of movement. It encompasses dynamics such as the force, flow, and weight. Whether movements are sharp and quick or smooth and languid, energy imbues dance with texture and feeling.
Table: Theories of Choreography
Element
Description
Example
Space
The area within which dance occurs, encompassing level, direction, and shape.
A dancer moving from upstage left to downstage right in a diagonal line.
Time
The timing of movements in relation to the music, including rhythm, speed, and syncopation.
A dancer holding a pose for four beats before swiftly transitioning to the next.
Energy
The force or quality of movement, ranging from sharp to fluid.
A sequence of quick, staccato steps followed by a slow, sustained lift.
Subsection 1.2: The Role of Creativity and Innovation
Innovation in dance is the lifeblood that keeps the art form evolving. It’s about challenging the norms, experimenting with new ideas, and bringing a unique voice to traditional movements. Fostering originality in dance requires an environment that encourages risk-taking and supports the exploration of uncharted territories.
The triptych of art pieces representing the distinct musical influences on various dance styles. Each panel captures the essence of the dance form it represents, from the elegance of classical movements to the raw energy of hip-hop, and the animated dynamism inspired by anime.
One effective approach is to draw from a wide array of influences, both within and beyond the dance world. Integrating cross-disciplinary insights, such as those from visual arts, literature, or even technology, can lead to groundbreaking choreographic work.
Quotes from Renowned Choreographers on Creativity
“Choreography is writing on your feet.” – Bob Fosse
“Dance is the hidden language of the soul.” – Martha Graham
“The job of feets is walking, but their hobby is dancing.” – Amit Kalantri
Section 2: Technical Aspects of Choreography
Subsection 2.1: Music and Rhythm
The synchronization of beats to movement is the thread that binds the dancer to the music, a physical manifestation of the score’s rhythm. In the art I generated below, the dancer’s limbs are extended in precise alignment with the invisible beats, each position a note played out through flesh and bone. This synchronization is a complex dialogue where timing is crucial; a fraction of a second off can disjoin what should be a seamless conversation between the music and the dancer. When executed with precision, this interplay transforms into a compelling narrative that the audience can not only see but feel within their own pulse.
The influence of different styles of music on dance is profound and varied. Classical music, with its intricate harmonies and structured compositions, often leads to choreography that is formal and expressive, such as ballet. The movements are fluid, the transitions are smooth, and there is an emphasis on line and form. In contrast, the hard-hitting beats of hip-hop give rise to more grounded movements, isolations, and an overall raw energy that is palpable in the performance. The dancer’s body becomes an instrument of the beat, hitting each note with sharp precision.
As we consider the influence of anime-themed music on dance, we enter a realm where the traditional meets the contemporary, the East meets the West. This music often features fast-paced rhythms and electronic sounds that can inspire a choreography that is vibrant, high-energy, and dramatic. The dance that emerges from anime music is narrative-driven, much like the storytelling nature of the anime itself, with movements that are exaggerated and filled with emotional intensity.
The triptych of art pieces I put together below serves as a visual representation of these distinct musical influences on dance. It depicts ballerina poised en pointe, her left arm gracefully arched above her head, embodying the elegance that classical music imparts to dance. The second shows a hip-hop dancer mid-freeze, his body angled in a gravity-defying pose that captures the beat-driven essence of the genre. On either side we see a scene straight out of an anime, where the dancer’s pose is exaggerated and dynamic, suggesting a narrative as complex and layered as the music that drives the choreography.
Each style of music carves its unique signature on the choreography it inspires. The choreographer’s role is to interpret these musical cues into a visual dance narrative that not only represents the music but also transcends it, creating a piece that stands on its own as a work of art.
Subsection 2.2: Storytelling Through Dance
Narrative in dance is about using the body to convey a story without words. It’s a visual and visceral form of storytelling that taps into the universal language of emotions. Techniques for narrative conveyance in dance include:
Mime and Gesture: Using recognizable actions and symbols to illustrate a story or theme.
Facial Expressions: Enhancing the emotional undertone of the dance.
Body Language: Utilizing posture and movements to convey character and narrative.
Repetition and Motif: Establishing a theme or character through repeated movements.
Contrast and Dynamics: Using varying energy levels and movement qualities to differentiate characters and plot developments.
Use of Props and Costumes: Enhancing the narrative by incorporating physical elements that support the story.
Table: Storytelling Techniques in Dance
Technique
Description
Visual Cue
Mime
Conveying action or emotion through stylized gesture.
A dancer ‘opening a door’ or ‘looking into a mirror’.
Expression
Facial cues that reflect the internal emotions of the character.
A frown or a smile to depict sadness or joy.
Body Language
The dancer’s posture and motion conveying the essence of the narrative.
A slouched posture for weariness, an upright stance for pride.
Repetition
Using a sequence of movements to reinforce a theme or idea.
A dancer repeating a leaping motion to symbolize freedom.
Contrast
Juxtaposing different movements to highlight changes in the narrative.
Sharp, quick movements followed by slow, graceful ones to show a transition from conflict to peace.
Props/Costumes
Elements that add depth to the story being told by the dance.
A mask to depict transformation or a specific style of dress to place the story in a certain era.
Section 3: Practical Application – Choreographing for ‘Jujutsu Kaisen’
Subsection 3.1: Understanding the Anime World
“Jujutsu Kaisen,” at its essence, is an intricate narrative that captures the perennial struggle between good and evil, set against a backdrop of a world where cursed spirits and dark forces loom. It’s a tale that centers around Yuji Itadori, a high school student who becomes entangled in an epic battle of sorcerers and malevolent entities. This anime weaves together themes of sacrifice, the significance of life and death, and the pursuit of a righteous path amidst chaos. Understanding these thematic pillars is crucial as they serve as the narrative bedrock for our dance choreography.
To truly translate “Jujutsu Kaisen” into a dance routine, one must first become intimately acquainted with the anime’s universe. It’s not just about the high-octane action sequences; it’s about the subtler undercurrents of emotion, relationships, and moral dilemmas that the characters navigate. The intricate storytelling of “Jujutsu Kaisen” is rife with symbolism and layers of meaning, each offering a different rhythm and movement in the choreographic piece we aim to create.
Our dance will need to embody the anime’s dynamic pacing, from the serene moments of introspection to the explosive confrontations. As we conceptualize this transformation, we will draw from key scenes that showcase the series’ signature blend of action and character development. These moments, frozen in time, will inspire our dance sequences, with each step, leap, and turn narrating a part of the “Jujutsu Kaisen” saga.
To fully immerse the audience in the “Jujutsu Kaisen” experience, the visual aids I have put together below will play a pivotal role to help you visualize our art-form as we create it. I created these to underscore the mood and tone of each scene we aim to capture. These visuals will not only guide our choreographic interpretations but also provide a storyboard that aligns our dance narrative with the anime’s storyline.
Depicting Yuji’s inner conflict
The haunting presence of Ryomen Sukuna – the King of Curses whom Yuji unwittingly becomes host to – and the camaraderie between the sorcerers will serve as the cornerstone for our routine. By integrating these visuals, we set the stage for a performance that not only tells a story but also transports the viewers into the heart of “Jujutsu Kaisen’s” world.
As we delve deeper into the nuances of each character and plot point, the choreography will evolve to mirror the anime’s thematic depth. Our routine will unfold like a carefully crafted narrative, where each movement and expression pays homage to the original work. This section is not just about comprehending the plot; it’s about absorbing the ethos of “Jujutsu Kaisen” to ensure that our dance is a true reflection of its spirit.
Subsection 3.2: Developing a Concept
The concept development stage is where the heart of “Jujutsu Kaisen” begins to beat within the structure of our dance. Developing a dance storyline based on the anime requires a delicate balance of fidelity to the original narrative and artistic interpretation. To achieve this, we must first identify the key story arcs and character journeys that will form the backbone of our choreography.
In our conceptualization, we recognize the need to distill the complex world of “Jujutsu Kaisen” into its most emblematic elements. We look at Yuji Itadori’s unexpected entry into the world of curses and his growth from an ordinary teenager to a sorcerer with the heavy burden of housing a powerful curse within him. The conflict between his innate kindness and the ruthless demands of his new world is a dynamic that we want our dance to explore.
To bring this to life, we envisage a series of interconnected dances, each depicting a significant aspect of Yuji’s journey. From his initial encounters with the curses to the pivotal moments where he grapples with the curse of Sukuna, the King of Curses, and his interactions with fellow sorcerers and mentors. Each piece will be carefully crafted to convey the emotional and psychological evolution of the characters.
A mood board becomes a crucial tool in this process, a collage of inspiration drawn from various elements of the anime. It would include character sketches, color palettes from the anime’s art direction, and snapshots of key moments. This visual collection will not only serve as a guide for the aesthetic of our dance but also as a constant reminder of the emotional tones we aim to express.
As you create yours, remember the mood board should be peppered with dark, rich colors that reflect the anime’s tone, alongside vibrant bursts that represent the characters’ spirit and determination. Images capturing the intensity of battles, the complexity of the curse techniques, and the depth of the characters’ emotions will inform our choreographic decisions, ensuring that every movement sequence carries the narrative forward.
Through the mood board, we will derive inspiration for the costumes, lighting, and stage design, all of which will be integral to narrating our story. The board will evolve as our concept solidifies, serving as a dynamic, visual script for the unfolding story we are choreographing.
As we solidify our concept, we begin to map out the dance’s structure — identifying the climax, the resolution, and the various peaks and troughs of the story. The resulting concept will not only be a dance routine but an artistic translation of “Jujutsu Kaisen’s” world, a narrative ballet that captures the anime’s soul in the language of movement.
Subsection 3.3: Choreography Inspired by Anime
Crafting a choreography inspired by anime, especially one as action-packed and emotionally charged as “Jujutsu Kaisen,” requires a foray into a style of dance that is as bold and explosive as the source material. The task at hand is to translate the anime’s dynamic visual language into dance movements that carry the same weight and intensity.
To achieve this, we examine the signature physicality of anime: the exaggerated poses that convey a character’s intent, the swift and sometimes abrupt transitions that mark a change in scene or emotion, and the seamless flow from one movement to another that mirrors the fluidity of anime’s frame-by-frame storytelling.
Our choreography will draw heavily from the anime’s high-energy combat scenes, the delicate expressions of internal struggle, and the poignant moments of stillness amidst chaos. These elements will be expressed through a combination of dance styles — each selected for its ability to embody the anime’s diverse thematic elements. For instance:
Hip-hop and krump can encapsulate the raw intensity of the fight scenes.
Contemporary dance can convey the complexity of the characters’ emotional journeys.
Popping can emulate the precision and suddenness of the curse techniques.
In integrating these styles, we also consider the narrative significance of each movement. A leap is not just a leap; it is Yuji’s aspiration to overcome the curses he faces. A contraction is not merely a technical movement; it represents the characters’ grappling with their inner demons and fears.
Table: “Jujutsu Kaisen” Themes and Dance Styles
Theme
Dance Style
Description
Combat
Hip-hop, Krump
Energetic, powerful movements that mimic the intense physical battles between characters and curses.
Curse Techniques
Contemporary, Popping
Sharp, isolated movements that symbolize the precision and suddenness of curse energy and its manifestations.
Camaraderie
Jazz, Lyrical
Expressive sequences that reflect the bonds and relationships between the sorcerers, emphasizing fluidity and emotional connection.
Emotional Turmoil
Modern, Interpretive
Movements that express the internal conflicts and psychological complexities of the characters, often using grounded, weighty motions.
In our choreography, the dancers’ bodies become the medium through which the anime’s storyline is reimagined. Their movements are carefully choreographed not just to entertain but to tell the “Jujutsu Kaisen” story through a dance narrative. We focus on creating sequences that are not only visually spectacular but also narratively coherent, ensuring that the audience can follow the storyline through the language of dance.
The challenge lies in not just replicating the anime’s action but in capturing its essence. This means paying close attention to the subtleties — the gestures that convey a character’s personality, the movements that echo the anime’s thematic depth, and the rhythms that resonate with its overarching narrative pulse.
Subsection 3.4: Music Selection
Selecting the appropriate music for a “Jujutsu Kaisen”-themed dance routine is akin to finding the perfect score for an epic film. The music must not only match the anime’s intensity and pacing but also encapsulate its emotive undercurrents. It must serve as a guiding force that weaves through the choreography, accentuating the narrative peaks and valleys, and resonating with the storyline’s thematic resonance.
The process begins with an analysis of “Jujutsu Kaisen’s” own musical score — its tempo, its rhythm, its use of instruments, and how it underscores the anime’s pivotal moments. From this analysis, we extrapolate the audio elements that can be translated into our dance performance. We look for compositions that can support the narrative arc we’ve crafted, with the flexibility to adapt to the varying emotional landscapes we aim to traverse.
Let’s listen to the original soundtrack together and focus on inspirational tracks:
For our high-octane battle scenes, we may lean towards tracks with a strong, driving beat — perhaps percussion-heavy music that mimics the heart-pounding excitement of combat. These selections will be layered with sound effects that mirror the anime’s energy, creating a soundscape that fuels the intensity of the movements.
Conversely, for moments that delve into the characters’ deeper emotional experiences, we seek out music that speaks to the soul. These tracks might feature a haunting melody or a slower tempo that allows the audience to breathe and fully absorb the narrative unfolding on stage. Here, the music is not just a backdrop but a character in itself, telling a story parallel to the dance.
For a scene depicting the release of cursed energy, the track “Ryomen Sukuna” (track 8, Disc 1) might be the most fitting. Its crescendos and decrescendos capture the eerie nature of the curses, mirroring the ebb and flow of their unpredictable energy.
During moments of introspection or loss, “Feelings of Regret” (track 13, Disc 1) could provide the necessary somber tone. The solitary notes can echo the gravity of these scenes, offering a musical reflection of the characters’ inner turmoil.
For the portrayal of camaraderie and teamwork, “Strong and Intelligent Allies” (track 26, Disc 1) might serve as an uplifting backdrop. Its rhythm could underscore the collective strength of the characters, their unity, and the bonds that they share.
These selected tracks will not just accompany the dance but will guide it, each beat and melody line becoming a part of the choreography itself. The music becomes more than a layer; it becomes the spine of the narrative dance, an essential component of the storytelling.
Each musical piece is carefully vetted to ensure that it aligns with our creative vision and the emotions we wish to evoke. In some cases, we may opt for an original composition or a remix that fuses traditional Japanese instruments with modern beats to pay homage to the anime’s cultural setting while maintaining a contemporary feel.
The music for our “Jujutsu Kaisen”-themed dance routine is curated with meticulous attention to the interplay between audio and visual storytelling. It is a harmonious blend of the anime’s essence and the universal language of rhythm and melody. Through this thoughtful selection process, we ensure that the music not only complements but also enhances the narrative journey of our dance, guiding the audience through the rich tapestry of the “Jujutsu Kaisen” world.
Section 4: Choreography Workshops and Feedback
Subsection 4.1: Collaborative Creation
Choreography, while often seen as the vision of a single individual, flourishes through collaboration. The exchange of ideas, the fusion of diverse movements, and the collective exploration of themes — all of these are vital to the creation of a piece that resonates with both performers and audiences. Collaborative creation encourages choreographers to break from their insular mindset, embracing the input and creativity of dancers, set designers, music composers, and even the audience.
Workshops provide an invaluable platform for this collaboration. They are incubators for innovation where the raw material of inspiration is shaped by the hands of many. In a workshop setting, every step taken, every movement executed is open to interpretation and improvement. This shared space is not only for learning but also for challenging and expanding the boundaries of traditional choreography.
This photo series from a 2021 Student Choreography Workshop at the SAB, School of American Ballet, captures the essence of collaborative creation. We see intense group discussions, spontaneous movement sessions, and the raw emotions of dancers and choreographers engaged in the creative process. These visuals tell the story of a piece’s evolution from concept to performance, highlighting the collective effort behind every choreographed work.
Courtesy of SAB, School of American Ballet
Courtesy of SAB, School of American Ballet
Courtesy of SAB, School of American Ballet
Subsection 4.2: Technical Skills for Staging
Staging a performance is a complex task that extends beyond choreography. It involves a myriad of technical elements that are essential to bringing a dance piece to life. Lighting, sound, set design, and costume are just a few of the components that must be meticulously planned and executed to support and enhance the choreography.
Technical staging skills are crucial for choreographers. Understanding the nuances of lighting, for instance, can transform a performance, creating mood, directing the audience’s attention, and accentuating movements. Sound design, including the selection and timing of music and effects, can significantly affect the pacing and impact of the piece. Set design and props must be thoughtfully integrated to complement the dance, while costumes can express character and era, adding depth to the narrative.
There is such an importance to lighting, as depicted in this art. Always think, how will the lighting affect the story?
Table: Staging Checklist
Item
Description
Visual Representation
Lighting
Plan for key lighting moments and general ambiance.
Icons of spotlights and color gels.
Sound
Arrange sound cues and ensure quality of acoustics.
Symbols of speakers and sound waves.
Set Design
Create a layout that supports the choreography.
Sketches of stage props and backdrops.
Costume
Design costumes that reflect the dance’s theme.
Fabric swatches and costume drawings.
Rehearsals
Schedule technical and dress rehearsals.
Calendar with marked rehearsal dates.
The technical staging of a performance is a dance in itself — one of precision, timing, and artistry. It is the unseen choreography that supports the visible, the framework upon which the dance is presented. A well-staged performance allows the choreography to shine, providing a seamless experience that leaves the audience captivated.
Section 5: Career Opportunities in Choreography
Subsection 5.1: Beyond Performance
The field of choreography extends far beyond the stage and studio performances. It encompasses a multitude of career paths, each offering unique opportunities to showcase creative talent and dance expertise. In major cultural hubs like Los Angeles and New York, the career avenues expand into the realms of film, television, theater, and even emerging digital spaces such as virtual reality and video games. Choreographers in these cities often have the chance to work with top-tier talent, contribute to blockbuster productions, and innovate in spaces where technology meets dance.
In smaller cities like Buffalo, NY, choreographers might engage more closely with community theaters, local dance schools, and regional television. These settings offer the chance to have a substantial impact on the local arts scene, often allowing for greater creative control and the opportunity to foster grassroots talent. Moreover, smaller cities can be breeding grounds for dance innovation, with opportunities to create and lead dance initiatives or start one’s own dance company.
Subsection 5.2: Advice for Aspiring Choreographers
For those looking to pursue a career in choreography, the journey is as much about developing one’s craft as it is about understanding the industry. Here’s some advice for aspiring choreographers:
Cultivate a Unique Style: Find your voice in dance. What makes your work stand out? What stories are you compelled to tell?
Continue Learning: Stay a student of dance. Explore different styles, study the masters, and keep abreast of industry trends.
Network: Build relationships within the dance community. Collaboration and connections can lead to opportunities.
Be Versatile: Learn to choreograph for a variety of settings and groups. Flexibility can open doors in multiple dance environments.
Understand the Business: Know the basics of contracts, negotiations, and marketing. A successful choreographer is also a savvy entrepreneur.
Table: Skills and Attributes for Choreographers
Skill/Attribute
Description
Importance
Creativity
The ability to conceive and execute original ideas in dance.
Essential for developing unique and engaging routines.
Leadership
Directing rehearsals and guiding dancers to interpret choreography.
Critical for maintaining the vision and quality of the performance.
Communication
Clearly conveying ideas to dancers, producers, and clients.
Necessary for collaboration and ensuring that concepts are understood.
Adaptability
Adjusting choreography to suit different venues or talent abilities.
Important for working in various performance settings.
Technical Knowledge
A strong foundation in dance techniques and styles.
Fundamental for creating choreographically sound and safe routines.
Conclusion
As we reach the finale of our exploration into the world of choreography, we reflect on the journey we’ve undertaken. From the foundational principles of dance composition to the intricate process of crafting a routine inspired by the vibrant storytelling of “Jujutsu Kaisen,” we’ve traversed the multifaceted landscape of choreography. We delved into the technical aspects that intertwine music and movement, and we unlocked the narrative power of dance as a form of storytelling. Moreover, we cast a spotlight on the varied career opportunities that await in both the bustling metropolises and the close-knit communities of smaller cities.
The world of choreography is as diverse as it is dynamic, continuously evolving with the rhythms of time, culture, and technology. It beckons those who are not only passionate about dance but who also have the drive to bring stories to life through the tapestry of movement. For aspiring choreographers, the path is one of constant learning, unwavering creativity, and the courage to carve out a space in the dance world.
Appendix: Resources and Further Reading
For those who wish to delve deeper into the world of dance and choreography, the following resources provide a wealth of information:
Table: Comprehensive List of Resources
Resource
Description
Type
Dance Magazine
Offers a range of articles on dance technique, industry news, and choreographer interviews.
Magazine
The Choreographer’s Handbook
A comprehensive guide by Jonathan Burrows on the creative process of choreography.
Book
Dance/USA
The national service organization for professional dance, providing leadership and resources.
Website
Jacob’s Pillow Dance Interactive
An online video archive of dance performances and documentaries.
Digital Archive
International Choreographers’ Festival
An event that showcases new works and provides networking opportunities.
Festival
In closing, our foray into choreography is a testament to the art’s capacity to stir the soul, challenge the body, and elevate stories to new heights. It’s an invitation to step into the dance, to embrace the beat of creativity, and to leave an indelible mark on the canvas of human expression. Whether through the lens of a specific narrative, like “Jujutsu Kaisen,” or through the broad strokes of career development, choreography remains a field ripe with possibility and rich with potential for those who dare to dream in motion.
https://www.davidmaiolo.com/wp-content/uploads/2023/12/A-triptych-of-art-pieces-representing-the-influence-of-different-musical-genres-on-dance-styles.png10241792David Maiolohttps://www.davidmaiolo.com/wp-content/uploads/2023/11/cropped-David-Maiolo-Logo3b-ICON-300x300.pngDavid Maiolo2023-12-01 03:29:302024-01-13 06:30:41Choreography and Composition: Crafting Dance Through Creativity and Storytelling
Born in 1503 in Saint-Rémy-de-Provence, a small town in the heart of Renaissance France, Michel de Nostredame, who would come to be known as Nostradamus, began his life journey. His birth coincided with an era of profound transformation, where medieval traditions intersected with the burgeoning spirit of the Renaissance.
Key Historical Contexts and Influences
Year
Event/Influence
Relevance to Nostradamus
1503
Birth in Saint-Rémy-de-Provence
Marks the beginning of his life in a culturally rich environment
Early 16th Century
Height of the Renaissance
Exposure to revolutionary ideas in art, science, and philosophy
1500s
Spread of the Bubonic Plague
The omnipresent threat that would later shape his medical pursuits
The world into which Nostradamus was born was one on the cusp of modernity. The Renaissance, a period marked by a reawakening of learning and artistic expression, was in full swing. This era was characterized by a significant shift from the medieval focus on religious dogma to a broader exploration of science, art, and humanism.
Figure 1 Map of ancient France (1600)
Detailed Exploration of His Childhood
Family Life: The Nostredame family was originally Jewish, but converted to Catholicism before Michel’s birth, likely due to social pressures of the time. This blend of cultural and religious backgrounds might have contributed to Nostradamus’s later eclectic interests.
Influence of the Renaissance: Growing up, Nostradamus would have been surrounded by the Renaissance’s innovations in art, literature, and science. This period was marked by luminaries like Leonardo da Vinci and Michelangelo, whose works redefined cultural and intellectual life.
Early Education: Nostradamus’s education during his formative years likely included a blend of classical studies (Latin, Greek, Hebrew, and mathematics) and the emerging humanist ideas of the Renaissance. This early grounding set the stage for his diverse interests and pursuits later in life.
Figure 2 Collage reflecting the Renaissance period around 1505. It captures elements of Renaissance art, ancient manuscripts, and educational settings typical of the era, providing a glimpse into the intellectual and cultural environment that influenced him
The Shadow of the Plague
Impact on Society: The bubonic plague was a constant threat during Nostradamus’s childhood, recurring in various outbreaks. This ever-present danger would have left an indelible mark on him, influencing his later work as a physician.
Personal Resilience: Nostradamus’s experiences with the plague in his early years may have contributed to his resilience and interest in medical practices. The plague’s impact on society cannot be understated, shaping the course of history and personal destinies alike.
Figure 3 Archaeological site locations and chronologies. a Map showing the geographic locations of archaeological sites from which second pandemic (14th- to 18th-century AD) Y. pestis genomes have been reconstructed (≥1-fold). The number (n) of genomes obtained
Academic Pursuits and Interruptions
Michel de Nostredame, a young man with a burgeoning thirst for knowledge, found his way to the University of Avignon, eager to immerse himself in the world of academia. However, his academic journey was to face unforeseen interruptions, reshaping his path in ways he couldn’t have imagined.
University of Avignon: A Brief Sojourn
Early Studies: Nostradamus’s time at the University of Avignon was intended to be a formative period, focusing on the humanities – a foundation for any learned individual of the time.
The Plague’s Interruption: Tragically, his studies were cut short by the outbreak of the bubonic plague, a devastating event that ravaged Europe. This interruption was not just a personal setback but a profound experience that introduced him to the fragility of life and the importance of medical knowledge.
Figure 4 The image represents a digital recreation of the University of Avignon in the 16th century, juxtaposed with a graphical representation of the spread of the plague across Europe. This visual contrast highlights the dichotomy between the pursuit of knowledge and the plague.
The University of Montpellier: Aspirations and Challenges
A New Beginning: Undaunted, Nostradamus enrolled at the prestigious University of Montpellier, one of the leading medical schools in Europe, to pursue a career in medicine.
Confronting Tradition: His unconventional methodologies and prior experience as an apothecary, which was frowned upon in academic circles, eventually led to his expulsion. This episode highlights the clash between traditional academic norms and emerging practices in medicine and science.
Figure 5 The illustration depicts two contrasting aspects of Nostradamus’s life. One side shows him engaged in traditional academic studies, while the other portrays him as an apothecary. This visual juxtaposition highlights the tension between established academic norms and his innovative approaches in medicine.
The Traveling Apothecary
In the 1530s, Nostradamus embarked on a journey unlike any other. As a traveling apothecary, he traversed the landscapes of Southern France and possibly Italy, driven by a mission to combat the deadly plague.
Journey Across Southern France
The Mission: Each town and village presented a new challenge, with Nostradamus offering remedies and care to those suffering from the plague.
Learning from Experience: This period was crucial in shaping his medical expertise. The direct exposure to the plague and its victims provided him with practical knowledge and insights that formal education could not offer.
Google maps tracing Nostradamus’s journey across Southern France, with markers indicating key locations where he might have stopped.
The Italian Sojourn: A Possibility
Speculative Travels: Some accounts suggest that Nostradamus’s travels took him to Italy, another center of Renaissance thought and another battleground against the plague.
Expanding Horizons: If these travels occurred, they would have further broadened his perspectives, exposing him to different cultural and medical practices.
Settling Down and Building a Family
Introduction: In the midst of a life marked by travel and professional pursuits, Nostradamus sought stability in the town of Salon-de-Provence. Here, he would find not just a home but also a family, marking a new chapter in his personal life.
Salon-de-Provence: A New Home
A Place to Settle: Salon-de-Provence, with its charming streets and vibrant community, offered Nostradamus a respite from his travels and a place to establish his roots.
Marriage to Anne Ponsarde: In this picturesque town, Nostradamus married Anne Ponsarde. Their union brought stability and personal joy, and together they had six children.
Salon-de-Provence, capturing its historic streets and buildings, providing a glimpse into the kind of environment Nostradamus chose for his family.
Tragedy and Resilience
Loss of His First Family: Prior to his life in Salon-de-Provence, Nostradamus experienced profound personal loss. His first wife and two children died, likely victims of the plague. This tragedy would have deeply affected him, both personally and in his medical pursuits.
Moving Forward: Despite these heartbreaks, Nostradamus’s decision to remarry and build a new family demonstrates his resilience in the face of personal tragedy.
A depiction of Nostradamus’ Marriage to Anne Ponsarde
The Scholar and the Seer
The town of Salon-de-Provence was not just a home for Nostradamus; it became the cradle of his most enduring work. Here, he delved into the realms of astrology and prophecy, crafting what would become his magnum opus, “Les Prophéties.”
The Turbulent Times
Political and Religious Upheaval: The 16th century was a period rife with conflict and change. Religious reformation, political power struggles, and social upheaval provided a complex backdrop for Nostradamus’s work.
Influence on His Writings: These turbulent times undoubtedly influenced the themes and tones of his prophecies. His writings reflect the uncertainties and anxieties of an era in flux.
Field of the Cloth of Gold, a notable event from the 16th century. This historic meeting in 1520 between King Henry VIII of England and King Francis I of France
Astrology and Prophecy
A New Venture: In Salon-de-Provence, Nostradamus began to focus more on astrology, aligning it with his medical knowledge and interests in mysticism and prophecy.
Crafting ‘Les Prophéties’: This period saw the creation of “Les Prophéties,” a collection of quatrains that would become synonymous with his legacy. This work was a reflection not just of his personal beliefs and insights but also of the era’s collective consciousness.
Pages from “Les Prophéties”
The Climate and Landscape
The physical environment in which we live profoundly shapes our experiences and perspectives. For Nostradamus, the Mediterranean climate of Southern France was not just a backdrop but an active influence in his life and work.
The Mediterranean Climate
Characteristics: Southern France is characterized by its Mediterranean climate, featuring mild, wet winters and hot, dry summers.
Impact on Agriculture: This climate facilitated a certain type of agriculture, dominated by vineyards, olive groves, and other crops suited to the warm, dry conditions.
The landscapes of Southern France, emphasizing the vineyards, olive groves, and the general lushness of the region.
Influence on Health and Disease
The Spread of Diseases: The climate of this region had implications for the spread and management of diseases, particularly relevant to Nostradamus as a physician. Warm temperatures and varying seasonal conditions could affect the prevalence and transmission of illnesses, including the plague.
A Physician’s Challenge: Understanding the relationship between climate and health would have been crucial for a medical practitioner like Nostradamus. His treatments and remedies would have been influenced by this understanding.
The remains of Bubonic plague victims in Martigues, France.
A Time of Upheaval
Nostradamus lived in an era of profound transformation and turmoil. The 16th century was a time marked by groundbreaking discoveries and relentless conflicts, a period that undoubtedly shaped his perspectives and writings.
Key Historical Events
The Discovery of the Americas: The New World was discovered by Christopher Columbus in 1492, just a decade before Nostradamus’s birth. This monumental event reshaped global geopolitics and trade.
The Protestant Reformation: Initiated by Martin Luther in 1517, the Reformation brought about significant religious upheaval, altering the religious and political landscape of Europe.
Discovery of the Americas, an event that occurred not much before Nostradamus’s birth.
Influence on Nostradamus’s Worldview
A World in Flux: Living through these groundbreaking events would have given Nostradamus a unique perspective on the world. His prophecies, though not directly mentioning these events, reflect the uncertainties and anxieties of a world undergoing rapid change.
Reflections in His Work: The tumultuous nature of his times can be seen as an undercurrent in his writings, where he alludes to upheavals, conflicts, and transformations.
The painting depicts the key moment of the Protestant Reformation in the 16th century, a significant event that would have influenced Nostradamus’s work. It captures Martin Luther nailing his 95 Theses to the door of the Castle Church in Wittenberg in 1517, marking the beginning of the Reformation and a major shift in the religious and cultural landscape of Europe. The artwork shows Luther in the act of posting his theses, set against the backdrop of the church’s door and the surrounding environment of the time.
The Final Chapter
Every life has its closing pages, and for Nostradamus, this final chapter was written in 1566 in the town he had come to call home, Salon-de-Provence.
The End of an Era
Final Days: The exact circumstances of Nostradamus’s death remain somewhat enigmatic, mirroring the mystique that surrounded much of his life. It is widely believed that he died of natural causes, possibly related to the arduous life he led and the diseases he combated.
Legacy: His passing marked the end of a significant chapter in the history of Renaissance thought and the world of prophecy and astrology.
Salon-de-Provence
The Burden of Time and Health
Health Struggles: Nostradamus’s health in his later years was likely compromised by the very diseases he spent his life fighting against, as well as the general hardships of life in the 16th century.
A Physician’s Fate: His death, potentially hastened by these factors, highlights the irony of a physician falling victim to the prevailing health challenges of his time.
Nostradamus in his later years, showcasing both his wisdom and the toll taken by his lifelong battles against disease.
Reflecting on the Man
As we close the book on Nostradamus’s life, it’s important to reflect on the man behind the myth – a complex figure who was a product of his time as much as he was a shaper of future narratives.
Early Life and Education
Saint-Rémy-de-Provence, France (1503): Born here.
Avignon, France (c. 1519): Attended the University of Avignon, but his studies were cut short due to the outbreak of the plague.
Medical Training and Early Career
Montpellier, France (1529): Entered the University of Montpellier to study medicine, but was expelled for being an apothecary, which was considered a manual trade and incompatible with university status at the time.
Travels as an Apothecary and Plague Doctor
Traveling Through Southern France (Early 1530s): Worked as a traveling apothecary. Specific locations are speculative, but he likely visited various towns and villages affected by the plague.
Possibly Italy (1530s): Some accounts suggest he may have traveled to Italy during his time as an apothecary, but this is not definitively documented.
Settling Down and Writing
Salon-de-Provence, France (Mid-1530s – 1566): After remarrying in 1547, he settled in Salon-de-Provence, where he wrote his prophecies and almanacs.
Agen, France (1530s): Briefly lived in Agen, where he befriended Jules-César Scaliger, a prominent scholar. However, their friendship ended badly.
Later Life
Return to Salon-de-Provence, France (1540s – 1566): He returned to Salon-de-Provence and remained there for the rest of his life, focusing on his writing and astrological work.
Death
Salon-de-Provence, France (1566): Nostradamus died here on July 2, 1566.
A Man of Many Facets
Beyond the Mystic: Nostradamus was more than a seer of future events; he was a dedicated physician, a curious scholar, an intrepid traveler, and a resilient survivor of one of Europe’s most tumultuous periods.
Entwined with History: His life and work were deeply interwoven with the social, political, and religious fabric of 16th-century Europe, reflecting the broader human experience in an era of profound change.
Closing Thoughts
Enduring Spirit: The story of Nostradamus reminds us of the enduring spirit of humanity in the face of relentless change and challenges.
A Testament to Complexity: His life is a testament to the complexities of history and the layered nature of those who navigate its currents.
Bonus Section: Exploring “Les Prophéties”
While our journey through the life of Nostradamus has concluded, there remains an intriguing aspect of his legacy that continues to captivate the world: “Les Prophéties.” This collection of quatrains, cryptic and shrouded in mystery, has been the subject of countless interpretations. Let’s delve into a few of these famous quatrains, exploring their original language, English translations, and the significant events they have been linked to.
Quatrain 1
Original:
Le lion jeune le vieux surmontera, En champ bellique par singuliere duelle, Dans cage d’or les yeux lui crevera, Deux classes une, puis mourir, mort cruelle.
Translation:
The young lion will overcome the older one, In a field of combat in single battle, He will pierce his eyes in a cage of gold, Two wounds in one, then he dies a cruel death.
Significance: This quatrain is often linked to the death of King Henry II of France. In a jousting match, the young Count of Montgomery, referred to as the “young lion,” fatally wounded Henry, the “older lion.” The “cage of gold” is thought to symbolize the king’s helmet.
Quatrain 2
Original:
De sang Troyen naistra coeur si hardy, Qui deffendra l’Espagne & Gaulois, Par mer & terre aux Anglois fera guerre, Et sera d’eux si grandement craint.
Translation:
From the Trojan blood will be born a heart so brave, Who will defend Spain and the Gauls, He will wage war against the English by sea and land, And he will be greatly feared by them.
Significance: This quatrain has been associated with Napoleon Bonaparte. “Trojan blood” could hint at Napoleon’s Italian ancestry. He waged wars across Europe, including against the English, and greatly impacted both Spain and France (the Gauls).
Quatrain 3
Original:
Hister sera demeuré bien loing, De la Gaule ne s’approchera guere: Par Bastarnas, Pannonie, & les troupes Hongres, La Gaule prendra à l’enseigne Aquilique.
Translation:
Hister will remain far away, From Gaul, he will not come close: By way of the Bastarnas, Pannonia, and the Hungarians, Gaul will be overtaken under the Aquiline standard.
Significance: Often misinterpreted to refer to Adolf Hitler (due to the similarity in name), “Hister” actually refers to the lower Danube River. The quatrain has been retrospectively applied to World War II and the Nazi expansion into France.
Quatrain 4
Original:
Lorsque serpents viendront envelopper, Les troupes navales à la mer seront prêtes, Leur plus grand navire plein de malfaisance, Par boc inconnu, viendra tyranniser.
Translation:
When serpents come to envelop, The naval troops at sea will be ready, Their greatest ship full of malevolence, By unknown wood, will come to tyrannize.
Significance: This quatrain has been linked to the rise of naval powers and conflicts at sea. Some interpret the “greatest ship” as a metaphor for powerful naval states or significant battleships in history.
Quatrain 5
Original:
La grande peste de la cité maritime, Ne cessera que mort ne soit vengée, Du juste sang par pris damne sans crime, De la grande dame par feincte n’outragée.
Translation:
The great plague of the maritime city, Will not cease until death is avenged, Of the just blood taken damned without crime, Of the great lady unoutraged by pretense.
Significance: This quatrain is often associated with epidemics and calamities affecting coastal cities. The references to “just blood” and a “great lady” have led to various interpretations, often linked to specific historical events or figures.
These quatrains, a mere glimpse into the vast and complex world of “Les Prophéties,” illustrate the enduring allure of Nostradamus’s work. They serve as a testament to the intricate tapestry of history, where interpretations and meanings intertwine with the events and characters of our past.
https://www.davidmaiolo.com/wp-content/uploads/2023/11/Nostradamus-in-his-later-years.png10241024David Maiolohttps://www.davidmaiolo.com/wp-content/uploads/2023/11/cropped-David-Maiolo-Logo3b-ICON-300x300.pngDavid Maiolo2023-11-13 04:57:182024-01-13 06:31:55Unveiling the Man Behind the Prophecies: The Life Journey of Nostradamus
When Private Leo Maiolo enlisted in the U.S. Army in 1917, America had just entered the sprawling conflict that had consumed Europe since 1914. A native of Italy, the former chauffeur was among hundreds of thousands of immigrants who joined the swelling American Expeditionary Forces headed for the Western Front. After training stateside, Private Maiolo was assigned to Company A, 9th Infantry Regiment, a component of the vaunted 2nd Infantry Division, known as the “Indianheads.”
In the spring of 1918, now part of the battle-ready 2nd Division, Private Maiolo and his comrades landed in France. They entered the trenches at a pivotal moment in the Great War. That March, the German Army had unleashed its massive Spring Offensive, seeking victory before more American troops could deploy. Private Maiolo spent months engaging in bloody trench warfare, defending against relentless German attacks. Shelled constantly amid the mud and vermin, he learned the realities of combat.
By summer 1918, the Allies halted the German advance. Now on the offensive, Private Maiolo participated in the Second Battle of the Marne, where his 9th Infantry and the rest of the 2nd Division helped destroy the ragged German salient. They then drove towards the Saint-Mihiel salient, a German-held bulge in the lines. In September, his unit attacked there, wiping out the salient in the first fully American-run operation of the war. The green troops had passed their test.
Private Maiolo’s division stayed on the offensive, moving northwest to join the massive Meuse-Argonne Offensive. It was near here, in the Meuse River valley surrounding the fortress town of Toul, where Private Maiolo’s war would end. His 9th Infantry, battle-tested but depleted after months of grueling combat, moved up to the entrenched positions outside Toul. Just 600 feet from the enemy lines, Private Maiolo manned his post, awaiting orders to continue the advance.
On a fall day in 1918, with victory tantalizingly close after four long years of war, a German hand grenade arced into Private Maiolo’s trench. The blast tore into his body, nearly severing his left leg and slashing his arms and hands. But Private Maiolo had endured for his adopted nation. Dragged to a dugout, he awaited evacuation to a field hospital. Despite infections setting in, he made it to recovery.
For his selfless service, Private Leo Maiolo paid a high price – his left leg and permanent scars. But he helped the inexperienced Americans come of age on the Western Front. His division spearheaded the final American offensives of 1918 that broke the German Army’s resistance. Barely a year after deploying, as Private Maiolo convalesced back home, his efforts culminated in Germany’s surrender that November. For this Italian immigrant, America’s fight had also become his own.
Private Maiolo’s serious wounds entitled him to return home permanently. But despite his sacrifice, he continued serving the nation he had adopted. The Army recognized in him a powerful symbol of the immigrant soldiers who comprised over 10% of the doughboys. After recuperating stateside, Private Maiolo joined a nationwide effort to finance America’s war machine – the Liberty Loan program.
Massive wartime expenditures necessitated these Liberty Bond drives to fund the war effort. Private Maiolo offered living proof of the sacrifices required for victory. Traveling in his uniform, walking with a cane due to his missing limb, his mutilated body spoke more eloquently than any speech.
For the 3rd Liberty Loan in September 1918, Private Maiolo toured towns throughout the Upper Midwest. Appearing at rallies and bond drives, he put a human face on the sacrifices being made by troops abroad. His presence reminded citizens at home of their duty to financially support the men in uniform who were giving life and limb on their behalf.
Though America had quickly raised vast armies, she had to rely on her industrial and agricultural might to sustain them. Private Maiolo’s solemn figure reinforced how every dollar loaned or donated could spare soldiers from deprivation and death. The bonds purchased would put machine guns in doughboys’ hands, bandages on the wounded, and food in empty bellies.
After months of carnage, with war-weariness setting in, the visceral evidence of Private Maiolo’s sacrifice helped reenergize citizens. His mangled frame embodied the urgent need to furnish funds so America’s citizen-soldiers could finish the fight.
Though likely not a skilled orator due to his Italian roots, Private Maiolo’s example spoke louder than stirring speeches. He needed few words to convey that, even with victory in sight, the nation must stay the course until the bitter end. Until the German war machine was smashed and Kaiser Wilhelm deposed, money must continue flowing across the Atlantic, whether to heal broken bodies or for fresh regiments to feed the guns.
Private Maiolo’s presence periodically revived flagging spirits. Mothers gazing at his empty pants leg were reminded of their own boys in harm’s way. His silence amid cheering crowds rendered more eloquent testimony than any slogan. Halting on his cane before audiences, injuries untreated so all could see, Private Maiolo personified resilience and quiet courage.
When the guns fell silent in November 1918, Private Maiolo had given two pounds of flesh to help purchase victory. Though America had entered the war late, the doughboys like him ensured Germany’s defeat. His journey reflected the hundreds of thousands who traded tranquility and health for trench foot, poison gas, and shrapnel. Over 50,000 Americans never returned, giving the ultimate sacrifice.
For those who survived, scars concealed and unconcealed served as lifelong reminders. Private Maiolo bore his sacrifices quietly, returning to civilian life in Watertown, NY with his head held high. His Liberty Loan service showed that though battle may end, dedicated veterans continue serving their country in other ways.
After the war, Private Maiolo worked for over 30 years at General Crushed Stone in Watertown, NY. He married Esther Constantine, born in Alexandria Bay, NY, and they raised three children together – Leon, Jody, and Fanny. He became a proud American citizen, living on Central Avenue in Watertown. Known for his thick Italian accent, Private Maiolo loved gardening and was an active member of the Northside Improvement League community group.
Though he saw brutal combat, Private Maiolo lived to age 72, passing away in 1965. The elder Maiolo’s son, Leon Maiolo Sr. followed in his footsteps, serving in World War II, as did his son in law Karl Hammond who fought together in the same unit as Leon Maiolo Sr. Additionally, Leon Maiolo Sr.’s son, Leon Maiolo Jr. served in the Army Honor Guard in Washington DC. Despite the passage of time, three generations of the Maiolo family did their duty when called.
In the 1920s, the era’s prosperity let America turn inward once more to isolationism. But in Europe, poppies continued to bloom between the scarred battlefields where a generation lay buried. As those fiery days faded from memory, it was up to veterans like Leo Maiolo to remind his adopted land of its trials in the Great War. Thanks to the sacrifices of doughboys on the Western Front, America earned its place at the table of powers. From the trenches of Toul to the hometown parades on Armistice Day, he and his comrades had represented their nation with honor. Their enduring legacy helped inspire the next generation to liberate humanity once again when liberty’s trumpet called.
https://www.davidmaiolo.com/wp-content/uploads/2023/10/20231123_175821-scaled.jpg25601920David Maiolohttps://www.davidmaiolo.com/wp-content/uploads/2023/11/cropped-David-Maiolo-Logo3b-ICON-300x300.pngDavid Maiolo2023-10-02 02:48:562023-11-25 19:25:14Private Leo Maiolo’s service in World War I and his work with the Liberty Loan campaign back home
The Evolutionary History of Stars and the Synthesis of Heavy Elements
Stars have existed for nearly the entire history of the universe, evolving through different generations as the chemical composition of the cosmos changed over billions of years. Understanding the distinctions between these generations provides insight into stellar evolution, supernovae, and the origins of elements.
A Universe in Three Acts: Population III, II, and I Stars
Population III Stars:
The earliest stars formed around 100-250 million years after the Big Bang out of primordial gas containing only hydrogen, helium, and traces of lithium. Without heavier elements, the gas could collapse under gravity into massive stars up to 300 times the mass of our Sun.
These first-generation Population III stars relied solely on the proton-proton chain and carbon-nitrogen-oxygen cycles to power hydrogen fusion in their cores, building up helium. Their extreme mass and luminosity made them short-lived, exhausting their fuel in under 10 million years.
When sufficiently massive Population III stars died as supernovae, they dispersed the first heavier elements into the universe, providing the ingredients for the next generation of stars. But many questions remain about the properties and origins of the first stars.
Formation of Population III Stars
In the early universe, dark matter provided gravitational potential wells that allowed gas to accumulate and form the first stars. But without metals, gas could not efficiently cool and fragment into lower mass units. The initial mass function of Population III stars is uncertain, but simulations suggest a top-heavy distribution biased toward high stellar masses up to the theoretical limit of 300 solar masses.
The first stars likely formed individually, each in its own minihalo of dark matter and primordial gas. As they ignited, their UV radiation ionized and reheated the surrounding gas, suppressing nearby star formation. This helped Population III stars form in isolation or wide binary pairs, rather than large clusters.
Protostellar Evolution and Main Sequence Lifetimes
As primordial gas clouds collapsed, the initial protostellar phase was governed by H2 molecular cooling. Once sufficient mass accumulated and core densities and temperatures rose, H2 dissociated, slowing cooling. At this stage, contraction proceeded quasi-statically along the Hayashi track.
When the core reached approximately 2000 K, deuterium burning began, re-igniting collapse towards the main sequence. Models suggest Population III stars reached the main sequence at masses around 100 solar masses.
On the main sequence, Population III stars converted hydrogen to helium via the proton-proton chain and CNO cycle. Energy generation was proportional to the mass dependence of these fusion processes. Their high surface temperatures of 100,000 K produced a peak blackbody emission in the UV.
Stellar evolutionary models estimate Population III lifetimes ranging from 2.5 million years for a 300 solar mass star to 10 million years for one around 100 solar masses. More massive stars burned faster and thus had shorter main sequence phases. Radiative losses also increased with stellar mass.
Late Stages and Supernovae
Following hydrogen exhaustion in their cores, Population III stars transitioned to shell burning and contraction. Helium burning initiated as the core contracted and heated up further. Stars above 100 solar masses ignited carbon fusion as well.
The most massive Population III stars shed their outer envelopes via pulsational mass loss episodes. This exposed hot, blue cores which then underwent collapse and exploded as supernovae. Stars from 140-260 solar masses likely met this fate as luminous blue variable supernovae. Above 260 solar masses, they totally collapsed into black holes.
In slightly less massive stars between 65-140 solar masses, oxygen and silicon burning occurred before the core collapsed, leading to extremely energetic hypernovae. Meanwhile, stars below 65 solar masses ended as iron core-collapse supernovae.
The Role of Supernovae in Chemical Enrichment
When sufficiently massive Population III stars died as supernovae, they dispersed the first heavier elements into the universe, providing the ingredients for the next generation of stars.
During stellar burning phases, Population III stars built up helium, carbon, oxygen, neon, magnesium, silicon, sulfur, and some calcium in their cores. Explosive burning during supernovae then synthesized elements from silicon to iron via neutrino interactions and neutron capture processes.
The extreme temperatures and neutron fluxes of Population III supernovae could also produce some r-process elements heavier than iron, up to uranium and plutonium. Their asymmetric, jet-driven explosions may have enabled stronger r-process production.
Precise yields calculations are uncertain due to the complexity of modeling supernova physics. But it is clear that the first supernovae played a pivotal role in enriching the early universe with an initial burst of new elements dispersed into the intergalactic medium.
Population II Stars:
The gas clouds that gave birth to second-generation Population II stars were slightly enriched by the newly synthesized elements from Population III supernovae. These included small quantities of carbon, oxygen, silicon, iron, and other trace metals.
With metals available, the gas could cool and collapse into smaller, longer-lived stars occurring in clusters and galaxies. The enriched gas also allowed for fragmentation into multiple stars with a range of lower masses.
Properties of Population II Stars
The metallicity of Population II stars is estimated to range from 0.1% to 1% of the solar value based on observations of metal-poor halo stars in the Milky Way. Old globular clusters contain some of the most pristine Population II stars known.
With scant metals, the initial mass function was still biased toward larger stars than today, with a peak around 10-50 solar masses. Average lifetimes were several million years on the main sequence.
The oldest Population II stars had enhanced abundances of alpha process elements (carbon, oxygen, neon, magnesium, silicon, sulfur) relative to iron peak elements. This supports origins from Population III supernovae yields.
Stellar Evolution and Death
Fusion of helium into carbon and oxygen occurred in Population II stars over 10 times the mass of the Sun. Those between 0.5-10 solar masses later formed planetary nebulae and white dwarfs. Higher mass stars fused advanced stages up to iron (if above 8 solar masses) before exploding as core-collapse supernovae.
The properties of these supernovae were different than modern ones due to lower mass loss from weaker stellar winds in low metallicity stars. They retained more mass until death and exploded more vigorously as Type Ib, Ic, and II supernovae.
Contributions to Chemical Enrichment
Population II supernovae continued the buildup of elements beyond helium, producing magnestum, silicon, sulfur, calcium, and iron group elements. The ejected material contained perhaps 10% of the metal content found in the Sun.
Some r-process elements were formed in Population II stars. Lower metallicity leads to more neutron-rich environments favoring the r-process. Evidence comes from old stars enhanced in europium, produced via the r-process.
With each generation of stars, the cosmic abundance of metals gradually increased. The cycle of star birth, fusion nucleosynthesis, death, and the dispersal of material back into the interstellar medium collectively enriched galaxies over billions of years.
Transition to Population I
After several cycles of Population II and III star formation, death, and chemical enrichment, the composition of gas in galaxies had built up sufficient metals for the formation of modern stellar populations.
The Sun’s metallicity represents the cumulative history of nucleosynthesis from all past generations of stars. Higher overall metallicity allowed efficient cooling, leading to lower stellar masses, longer lifetimes, and more complex chemistry.
Population I Stars:
Modern Population I stars like our Sun formed more recently from interstellar gas enriched with a full range of metals. This allowed for further cooling and fragmentation of gas clouds, producing the stellar populations and distributions we observe in the Milky Way today.
While the Population II mass distribution peaked around the tens of solar masses, Population I stars show a peak closer to 1 solar mass. Our Sun itself has a mass of 1.0 solar masses.
The high metallicity of Population I stars also enabled the formation of extensive planetary systems around them. Elements like iron, silicon, magnesium, oxygen, and carbon provide the building blocks for rocky terrestrial planets and the cores of gas giants.
Stellar Properties and Lifespans
Our Sun currently fuses hydrogen into helium via the proton-proton chain in its core, and will continue normal hydrogen burning for 10 billion years. As intermediate-mass stars with longer lifetimes, Sun-like stars enrich the Milky Way with elements up to iron through stellar winds.
More massive Population I stars have shorter lifespans of a few million to a few hundred million years. The upper mass limit for main sequence stars today is around 120-150 solar masses, above which they become unstable due to radiation pressure.
Our Sun will eventually exhaust its core hydrogen and expand into a red giant phase. As it evolves, the Sun will fuse helium, carbon, neon, oxygen, and silicon, producing elements up to iron in its interior.
Fates of Low and High Mass Stars
Low mass Population I stars below 8-10 solar masses will form planetary nebulae and white dwarfs once they evolve off the main sequence. This includes stars like our Sun. The ejected outer layers enrich the interstellar medium with lighter elements built up during hydrogen and helium fusion. In the process they will expand and likely envelope the inner planets. We suspect this is what will happen to earth.
More massive stars end their lives explosively as core-collapse supernovae, dispersing elements from oxygen up to the iron group. Above 8 solar masses, neon and oxygen burning occur before collapse. Stars above 10 solar masses also fuse silicon. The most massive stars experience complete collapse to a black hole.
Origin of the Heaviest Elements
While light elements up to iron can form through fusion in stellar interiors, the origin of elements heavier than iron requires extremely energetic environments. Elements from cobalt to uranium are created through neutron capture processes.
The slow neutron capture process, or s-process, occurs in lower mass stars and produces about half of elements beyond iron over multiple red giant phases. But the more significant rapid neutron capture process, or r-process, requires supernovae or neutron star mergers.
In core-collapse supernovae of massive stars, neutron-rich ejecta enables rapid capture of neutrons onto seed nuclei, building up heavy r-process elements. Neutron star collisions also provide suitable conditions for robust r-process element production.
Impact on Chemical Evolution of Galaxies
Over the 13.8 billion year history of stars in our universe, stellar nucleosynthesis has progressively built up the periodic table by fusing lighter nuclei into heavier elements.
The unique conditions in each generation of stars and their deaths as supernovae contributed to element production:
Population III stars produced carbon, oxygen, neon, magnesium, silicon, sulfur, and calcium, along with some iron peak and r-process elements.
Population II stars generated magnesium, silicon, sulfur, calcium, and more iron peak elements, adding to the enrichment from earlier generations.
Our Sun and other Population I stars continue producing carbon, oxygen, and nitrogen, along with iron peak elements up to nickel through stellar winds and low mass supernovae.
Heavier r-process elements originate from neutron star mergers and deaths of the most massive stars as supernovae. Together, this produces the full elemental abundance distribution observed in stars and gas today.
The different stellar generations over 13.8 billion years of cosmic expansion and evolution have collectively generated all the elements that make up the planets, stars, galaxies, and the lifeforms composed of stellar byproducts.
Implications for Planet and Life Formation
The elemental enrichment from billions of years of stars facilitated the formation of rocky worlds and life. Without metals, the galaxy would contain only hydrogen, helium, and lithium.
Metals provide the building blocks for terrestrial planets. Silicon, magnesium, and iron make up Earth’s mantle and core. Oxygen combines with silicon and metals to form silicate minerals in the crust. Carbon, nitrogen, sodium, potassium, and other elements are essential for biochemistry and life processes.
Longer-lived lower mass stars like the Sun also allow for stellar and planetary stability required for life to evolve. More massive stars have much shorter lifetimes, limiting prospects for habitability around them.
By starting with just three light elements and gradually enriching galaxies with metals, stars provided the foundation for cosmic chemical complexity. This richness of elements allowed for worlds as diverse as the planets of our solar system and perhaps life across the universe.
Conclusion
The successive generations of stars over cosmic history have collectively generated the elements that compose our world and bodies. Each phase of stellar evolution leaves its imprint on the chemical evolution of galaxies and the universe at large.
Population III stars first enriched the primordial universe with carbon, oxygen, and metals. Population II stars continued this buildup to higher levels. Our Sun and other modern Population I stars now form planetary systems and sustain life with their rich abundance of elements.
Understanding the distinctions between stellar generations provides insight into the lifecycle of stars, the origins of elements, and how galaxies chemically evolved over billions of years to create the conditions suitable for planets and life.
https://www.davidmaiolo.com/wp-content/uploads/2023/09/history_of_stars_small-1.jpg301300David Maiolohttps://www.davidmaiolo.com/wp-content/uploads/2023/11/cropped-David-Maiolo-Logo3b-ICON-300x300.pngDavid Maiolo2023-09-23 05:28:332024-01-11 02:46:43The Evolutionary History of Stars and the Synthesis of Heavy Elements
This website uses cookies to ensure you get the best experience on our website.
By continuing to use our site, you consent to our use of cookies. To learn more about how we use cookies and your choices regarding our use of cookies, please click 'Learn More'.
We may request cookies to be set on your device. We use cookies to let us know when you visit our websites, how you interact with us, to enrich your user experience, and to customize your relationship with our website.
Click on the different category headings to find out more. You can also change some of your preferences. Note that blocking some types of cookies may impact your experience on our websites and the services we are able to offer.
Essential Website Cookies
These cookies are strictly necessary to provide you with services available through our website and to use some of its features.
Because these cookies are strictly necessary to deliver the website, refusing them will have impact how our site functions. You always can block or delete cookies by changing your browser settings and force blocking all cookies on this website. But this will always prompt you to accept/refuse cookies when revisiting our site.
We fully respect if you want to refuse cookies but to avoid asking you again and again kindly allow us to store a cookie for that. You are free to opt out any time or opt in for other cookies to get a better experience. If you refuse cookies we will remove all set cookies in our domain.
We provide you with a list of stored cookies on your computer in our domain so you can check what we stored. Due to security reasons we are not able to show or modify cookies from other domains. You can check these in your browser security settings.
Other external services
We also use different external services like Google Webfonts, Google Maps, and external Video providers. Since these providers may collect personal data like your IP address we allow you to block them here. Please be aware that this might heavily reduce the functionality and appearance of our site. Changes will take effect once you reload the page.
Google Webfont Settings:
Google Map Settings:
Google reCaptcha Settings:
Vimeo and Youtube video embeds:
Privacy Policy
You can read about our cookies and privacy settings in detail on our Privacy Policy Page.