1. Project Overview

Project Introduction:

I aim to retrofit my 2002 CalSpa hot tub with the ESP-WROOM-32 Development Board to enable advanced functionalities, including smart home integration with Alexa and a manual control interface. I received this tub for free. This endeavor requires meticulous planning, testing, and engineering insight to ensure functionality, safety, and ease of maintenance.

Calspa Hot Tub at My Home

Calspa Hot Tub at My Home in Upstate NY

Objectives:

  1. System Retrofit: Implement the ESP-WROOM-32 Development Board to interface with the existing hot tub infrastructure.
  2. Alexa Integration: Develop a responsive system to handle voice-command interactions through Amazon’s Alexa platform.
  3. Manual Control Panel: Engineer a physical interface to provide users an alternative control mechanism, prioritizing usability and durability.
  4. Safety Protocols: Emphasize the safe interfacing of electrical components with the water-intensive environment of the hot tub. Simultaneously, incorporate cybersecurity measures to shield against potential threats.
  5. Efficiency: Target system optimizations to improve energy consumption without compromising performance.
  6. User Interface: Construct intuitive interfaces for both the Alexa integration and the manual control panel. Prioritize clarity, responsiveness, and user feedback.
  7. Maintenance & Scalability: Structure the integration in a modular manner, promoting easy troubleshooting, component replacements, and future upgrades.

Desired Outcomes:

  1. Voice-Activated Hot Tub Controls: Achieve reliable voice-command operations for controlling temperature, jet intensity, and lighting via Alexa.
  2. Functional Manual Interface: Deliver a tactile control panel that offers real-time status updates and direct system control.
  3. Safety Compliance: Guarantee a risk-free operation, having verified electrical safety under diverse test conditions.
  4. Optimized Energy Utilization: Document discernible energy conservation improvements when benchmarked against the original setup.
  5. User Experience: Capture user feedback to confirm enhanced interaction ease and system responsiveness post-upgrade.
  6. Forward Compatibility: Ensure the architecture is designed to accommodate upcoming technological advancements, minimizing future integration challenges.

In essence, this project’s goal is a technically sound upgrade of the CalSpa hot tub, merging the reliability of its original design with contemporary smart technologies.

2. Safety Precautions

Given the intrinsic risks associated with interfacing electricity and water, meticulous adherence to safety precautions is obligatory. The following outlines stringent protocols that must be observed throughout the project:

General Electrical Safety:

  1. Power Isolation: De-energize circuits when accessing or working on the system.
  2. Insulated Tool Utilization: Employ tools with insulated grips to preclude unintended circuit contacts.
  3. Wiring Inspection Protocols: Conduct routine assessments of wiring for signs of physical degradation or corrosion, particularly in moisture-prone zones.
  4. Load Specifications: Confirm component ratings align with system loads. Employ aptly-rated fuses and circuit breakers to counter potential overloads.
  5. Protective Equipment: Mandate the use of insulative gear, such as rubberized gloves and footwear, during system maintenance or adjustments.

Water-Electricity Interplay Protocols:

  1. Component Waterproofing: Guarantee comprehensive waterproofing measures for components with potential water exposure.
  2. Electrical Component Proximity: Institutionalize minimum safe distances for electrical fixtures from water sources to negate immersion risks.
  3. Drip Loop Mandate: Enforce a standard for cables connecting to the hot tub to incorporate drip loops, impeding water from capillary movement towards electrical junctions or devices.
  4. Moisture Checks: Establish a regular inspection schedule to identify and rectify moisture ingress near electrical installations.
  5. Dry-Operation Protocol: Prohibit any interaction with electrical controls with damp hands or from a wet standing position.

Grounding Imperatives:

  1. Shock Mitigation: Grounding provides an immediate discharge path for stray currents, substantially reducing electric shock hazards during faults.
  2. Component Safeguarding: A grounded system helps dispel potentially damaging overvoltages, e.g., lightning-induced surges.
  3. Voltage Stability: Grounding introduces a consistent reference point, ensuring voltage sources operate within defined parameters.
  4. Fault Recognition Mechanisms: A well-grounded system will interrupt its operation upon fault detection, thereby serving as a critical protective measure.
  5. Regulatory Adherence: Grounding practices should meet or surpass local electrical stipulations to ensure both safety and compliance.

It’s imperative to underscore that these are non-negotiable protocols and not merely suggestions. The confluence of water and electricity demands a stringent safety approach, where protocol adherence guarantees both equipment longevity and user safety

3. Initial Assessment

Before diving into the retrofitting and upgrading process, it’s crucial to conduct a comprehensive assessment of the existing system. This evaluation provides insight into the condition and functionality of the current components, enabling informed decisions about which parts can be retained and which should be replaced.

Existing System Components & Specifications:

  1. Control Board: The hot tub’s operations are currently facilitated by the Balboa Instruments C5000 control board from 2002, which orchestrates component functions.
  2. AC High Voltage Components:
    • Main AC Inputs: The system utilizes 240v main AC inputs (Wht, Blk, Red, Grn).
    • Pumps: Two distinct pumps are present: a primary 240v pump and a 120v circulation pump.
    • Heater: The heating element is rated at 240v 5.5kw.
    • Relays: A set of six 120v AC relays, directly soldered to the board, govern component switching functions.
  3. AC Low Voltage Components:
    • Transformer: A unit that steps down voltage from 110v to 12v.
    • Spa Lights: Operating at 12v AC.
    • Sensors: The suite includes a temperature sensor, hi-limit/freeze sensor, and vacuum switch.
    • Control Panel: The present manual interface.

Existing Wiring Diagram

CS5000 System Wiring Diagram (12/19/2002). Balboa Instruments Incorporated

Identifying Components to be Retained:

  1. Pumps: Retention of both pumps (240v and 120v) is advised, contingent on their operational health. While their primary functionality remains unchanged, control interfacing may be updated.
  2. Heater: If the 240v 5.5kw heater exhibits optimal functionality, it should be conserved and interfaced with the modern control system.
  3. Sensors: Key sensors, contingent on their operational status, should be preserved due to their critical safety role.
  4. Spa Lights: Retention is advisable unless there’s a requisition for a design evolution or LED transition.

Identifying Components to be Replaced:

  1. Control Board: The Balboa Instruments C5000, despite its durability, necessitates replacement due to its obsolescence in line with ESP-WROOM-32 Development Board integration and smart home objectives.
  2. Relays: The inherent 120v AC relays mandate a switch to contemporary, modular systems that cater to enhanced adaptability, streamlined maintenance, and compatibility.
  3. Control Panel: Supersedence of the current control panel with an advanced manual control interface is paramount to ensure modern user interactions.
  4. Transformer: Evaluating its operational efficacy and potential efficiency gains, a transition from the existing 110v to 12v transformer to a contemporary unit might be prudent.

In synthesis, this preliminary evaluation elucidates the extant system’s status, fostering informed decisions for ensuing project phases. The demarcation between preserved and upgraded components establishes the retrofitting roadmap.

4. Hardware Components

The tangible elements delineated herein comprise the infrastructural core of the CalSpa hot tub system upgrade, emphasizing efficiency, interoperability, and durability.

Control Hardware:

ESP-WROOM-32 Development Board Specifications & Overview:

The ESP-WROOM-32 is a versatile board, boasting both Wi-Fi and Bluetooth capabilities. Key specifications include:

  • CPU: Xtensa dual-core 32-bit LX6.
  • Frequency: Max 240 MHz.
  • RAM: 520 KB SRAM.
  • Wireless: 2.4 GHz Wi-Fi/Bluetooth dual-mode.
  • I/O: 30 GPIOs; functions: ADC, capacitive touch, GPIO, PWM, etc.
  • Compatibility: Arduin, NodeMCU, MicroPython.

Selection of Relays (both solid state and electromagnetic):

  • Solid State Relays (SSRs): Ideal for frequent switching applications due to non-mechanical components. Notable attributes include rapid response and longevity. Consider thermal management solutions.
  • Electromagnetic Relays (EMRs): Mechanical in operation, they’re cost-effective, adept at high currents, and exhibit lower thermal output. Wear is a concern with regular actuations.
  • Optimal Configuration: A hybrid approach: SSRs for high-frequency tasks (lights) and EMRs for high-load components (pumps/heaters).

Given the hot tub’s requirements, a combination of both can be optimal: SSRs for components like lights that might require frequent switching and EMRs for components like pumps and heaters.

Power Supply Units & Step-down Converters:

  • Power Supply Units (PSUs): Prioritize stability and integrated protection (overcurrent, overvoltage, short-circuit).
  • Step-down Converters: Essential for voltage regulation across components. Efficiency is paramount.

Sensors:

Waterproof DS18B20 Temperature Sensor

Waterproof DS18B20 Temperature Sensor

Waterproof DS18B20 Temperature Sensor:

  • Function: Water temperature monitoring.
  • Precision: ±0.5°C (-10°C to +85°C range).
  • Output: Digital; 1-Wire interface.
  • Build: Stainless steel encased.

Hi-Limit/Freeze Sensor & Vacuum Switch Specifications:

  • Function: Hi-limit and freeze sensors for thermal management; vacuum switch for water flow.
  • Output: Binary based on operational thresholds.

Manual Control Panel:

Panel Design & Layout:

  • Size: Compact enough for convenience yet large enough to display all controls clearly.
  • Material: A corrosion-resistant material, preferably with UV protection to prevent wear due to sunlight.

User Interface: Buttons, Dials, and Indicators:

  • Buttons: For functions like power on/off, jet controls, and lighting. Ensure tactile feedback.
  • Dials: For granular control over functions like temperature.
  • Indicators: LEDs or display panels indicating the hot tub’s status, temperature, and any potential alerts.

Wiring & Integration with Main System:

  • Wiring: Use waterproof and corrosion-resistant wiring. Ensure wires are appropriately labeled for easy troubleshooting.
  • Integration: The panel should interface seamlessly with the ESP-WROOM-32 board, ensuring immediate response to user inputs.

Placement & Installation Considerations:

  • Placement: Locate the panel at a convenient height and location for users, ideally where it’s shielded from direct rain or sunlight.
  • Installation: Ensure secure mounting, and consider easy access for potential future maintenance.

Enclosures:

Waterproof & Humidity-resistant Selection:

TICONN Waterproof Electrical Junction Box IP67 ABS Plastic Enclosure with Hinged Cover with Mounting Plate, Wall Brackets, Cable Glands (Clear, 8.7"x6.7"x4.3")

Suggested: TICONN Waterproof Electrical Junction Box IP67 ABS Plastic Enclosure with Hinged Cover with Mounting Plate, Wall Brackets, Cable Glands (Clear, 8.7″x6.7″x4.3″)

  • Material: Consider materials like ABS plastic or stainless steel that offer durability, water resistance, and protection from UV rays.
  • Seals: Ensure enclosures have tight seals to prevent moisture ingress.

Placement & Accessibility Considerations:

  • Location: Place enclosures where they are shielded from direct environmental factors but remain accessible for maintenance or upgrades.
  • Accessibility: Ensure that while the enclosures are secured against unauthorized access, they can be easily opened for authorized maintenance or upgrades.

To recap, this hardware framework, given prudent selection, integration, and installation, will be instrumental in attaining the retrofit project’s longevity and efficacy goals. An emphasis on quality, positioning, and safety ensures the desired performance and resilience.

5. Integration with Alexa & Home Automation Platforms

To enhance user experience, this section delves into the integration of the CalSpa hot tub with Alexa and other contemporary home automation systems. By harnessing voice commands and remote access, we can achieve seamless spa management.

Alexa Integration Platforms:

Sinric Pro:

  • Function: Allows ESP-WROOM-32 to emulate diverse smart devices, facilitating Alexa integration.
  • Configuration: Utilizes an intuitive dashboard for device management; devices initialized in Sinric Pro are auto-detected in the Alexa app.
  • Pricing: Free tier available; premium options for broader implementations.

ESP Alexa:

  • Function: A dedicated library enabling ESP devices to interface with Alexa, expediting custom Alexa skill development.
  • Configuration: Deployment via Arduino IDE to the ESP-WROOM-32 board enables device recognition within the Alexa app.
  • Flexibility: Being library-based, it grants developers granular control over device behavior and customization.

Wi-Fi Connectivity & Security Considerations:

Hot Tub Proximity to Wi-Fi Router (2.4 GHZ)

  • Connectivity Stability: Ascertain that the spa’s vicinity benefits from robust Wi-Fi coverage; deploy Wi-Fi range extenders if necessary.
  • Encryption: Mandate WPA2 or advanced encryption for Wi-Fi, ensuring secure data interchange between the spa controller and home infrastructure.
  • Network Isolation: To fortify security, deliberate on deploying a distinct Wi-Fi network or VLAN specifically for IoT integrations, thereby isolating primary home networks from potential threats.
  • Firmware Maintenance: Periodically source and implement firmware updates for the ESP-WROOM-32 and related components, thereby safeguarding the system against recognized vulnerabilities.

In summary, careful and technical integration with Alexa and home automation systems not only augments user convenience but also streamlines spa operations within a broader home ecosystem. Ensuring robust connectivity and maintaining stringent security protocols are paramount.

6. Software & Programming

To ensure that the CalSpa hot tub functions correctly with both the manual control panel and Alexa integration, the software and programming aspect is crucial. This section provides a structured approach to building out the software logic, the design of the web interface, and the integration with Alexa.

Discrete Controls Logic:

  1. Power On/Off: Switch the entire system on or off.
  2. Temperature Setting: Adjust the water temperature, keeping within the safety limits.
  3. Jet Controls: Activate or deactivate water jets.
  4. Lighting: Toggle between different lighting modes or colors.

Software Stack & Libraries:

Platform:

  • MicroPython: Given its compatibility with the ESP-WROOM-32 board, MicroPython offers a lightweight Python programming environment tailored for microcontrollers.

Libraries:

  • machine Library: For handling pins and controls on the ESP32.
  • umqtt Library: For MQTT communication, vital for interacting with platforms like Sinric Pro.

Example – Power Toggle:

from machine import Pin

# Defining the pin for power relay
power_relay = Pin(5, Pin.OUT) # assuming GPIO 5

def toggle_power():
    power_relay.value(not power_relay.value())

Web Interface Design & Features:

  • Temperature Display: Show the current water temperature.
  • Controls: Virtual buttons for power, jets, lighting, and temperature adjustment.
  • Status Indicators: Display the status of heaters, jets, lights, etc.

Alexa Command List & Responses:

Command: “Alexa, turn on the hot tub.” Response: “Turning on the hot tub.”

Command: “Alexa, set the hot tub temperature to 100 degrees.” Response: “Setting the hot tub temperature to 100 degrees.”

Command: “Alexa, activate the hot tub jets.” Response: “Activating the hot tub jets.”

Fail-safe & Backup Logic:

  • Temperature Overheat Protection: If temperature sensors detect water above safety limits, turn off the heater and notify the user.
  • Loss of Connectivity: If connectivity with the board is lost, default to a safe mode, turning off potentially hazardous components like heaters.

Manual Control Panel Logic:

Input Detection & Processing:

Using the machine library’s Pin class, detect button presses or dial adjustments.

Example – Jet Control Button:

jet_button = Pin(12, Pin.IN, Pin.PULL_UP)  # assuming GPIO 12

def jet_control_callback(pin):
    # logic for toggling jets
    pass

jet_button.irq(trigger=Pin.IRQ_FALLING, handler=jet_control_callback)

Display & Feedback Logic (LED indicators, etc.):

  • LEDs: Use LEDs to indicate the status of different components. For example, a green LED for power on, a blue LED when jets are active.

Integration with Main System Logic:

Ensure that manual controls override automated controls, giving users direct control in real-time. Implement a feedback mechanism, so if Alexa or the web interface gives a command, the manual panel displays the current status.

Example – Overriding Manual Controls with Alexa Commands:

def alexa_toggle_power():
    # Check if manual override is active
    if not manual_override_active:
        toggle_power()

In conclusion, building a robust software infrastructure is vital for the seamless and safe functioning of the hot tub system. Whether it’s through direct manual controls, voice commands via Alexa, or a web interface, ensuring a responsive and user-friendly experience is key. Proper fail-safe measures and feedback systems further enhance reliability and user confidence.

7. Testing & Quality Assurance

Ensuring that the upgraded CalSpa hot tub performs efficiently, safely, and consistently requires rigorous testing and quality assurance. By systematically validating each component, the integrated system, and user interfaces, we can ensure not only proper functioning but also a high-quality user experience. This section outlines the testing methodologies and strategies we will adopt.

Component-wise Testing:

  1. ESP-WROOM-32 Development Board: Test its connectivity, signal strength, and responsiveness. Ensure firmware updates are applied successfully, and board reboots as intended.
  2. Relays: Validate that they can successfully switch on/off and can handle the power requirements. Test their response time and consistency.
  3. Power Supply Units & Converters: Ensure the right voltage and current are being supplied, and there’s no fluctuation that could harm other components.
  4. Sensors: For the DS18B20 temperature sensor, Hi-Limit/Freeze Sensor, and Vacuum Switch, ensure accurate readings are being recorded, and there’s no lag in transmitting this data.
  5. Manual Control Panel: Test each button, dial, and indicator. Ensure responsiveness and durability.

Integrated System Testing:

  1. Power-Up Sequence: Verify that when powered on, the system initiates in the right sequence, activating the necessary components and establishing necessary connections.
  2. Command Processing: Check that commands from the manual panel, web interface, and Alexa are processed correctly and that one can override the other based on the hierarchy established.
  3. Fail-Safe Responses: Simulate failures such as loss of connectivity, overheating, or power fluctuations. Ensure that the system reverts to a safe mode as intended.

Safety Testing & Simulations:

  1. Water-Electricity Interaction: While the system is designed to avoid any direct interaction between water and electricity, simulate scenarios where water might come into contact with electrical components. The system should immediately shut down in such cases.
  2. Overheating: Simulate scenarios where the heater is left on beyond safety limits. The system should trigger an automatic shutdown and alert the user.
  3. Overcurrent & Overvoltage: Test the system’s response to sudden surges in power. Components should remain unaffected, and the system should ideally revert to a safe mode.

User Testing (Ease of Use, UX/UI):

  1. Interface Usability: Have users of varying tech-savviness interact with the manual control panel and the web interface. Collect feedback on intuitiveness, ease of use, and clarity.
  2. Voice Command Processing: Ask users to give a variety of commands to Alexa, including those not directly related to the hot tub. Ensure that only relevant commands are processed, and the responses are accurate.
  3. Feedback Mechanisms: Validate that feedback mechanisms (LEDs, alerts on the web interface, Alexa responses) are clear and helpful.
  4. Overall Experience: Collect feedback on the overall user experience, including any delays they might have noticed, any features they found redundant, or anything they felt was missing.

In wrapping up, testing and quality assurance are as crucial as the development phase. They ensure that all the hard work put into design and integration results in a product that’s not only functional and efficient but also safe and user-friendly. Regular iterations based on testing outcomes will lead to a refined final product.

8. Backup & Fail-safes

Ensuring the safety and reliability of the upgraded CalSpa hot tub is of paramount importance. The combination of electricity and water can pose significant risks if not carefully managed. As such, the design and integration of backup systems and fail-safe mechanisms are crucial to preemptively address potential failures, ensuring the protection of both the equipment and users. This section will detail the backup and fail-safe strategies adopted.

Manual Overrides:

  1. Priority Assignment: Manual controls should always have the highest priority, overriding any automated or voice-activated commands. In any scenario where there is a discrepancy between manual input and automated instructions, the system should default to the manual setting.
  2. Easy Access: All manual override controls, including buttons or switches, should be easily accessible and clearly marked. They should not require any specialized knowledge to operate.
  3. Instantaneous Response: Upon activating a manual override, the system should respond instantaneously, without any noticeable delay.

System Redundancies:

  1. Dual Sensors: Implementing dual sensors, especially for critical components like temperature sensing, will ensure that even if one fails, the other can provide accurate readings. The system should alert the user if there’s a discrepancy between the two.

Optional Redundancies:

  1. Backup Power Supply: A secondary power supply or a battery backup ensures that essential safety components, like alarms or emergency cut-offs, remain operational even in the event of a primary power failure.
  2. Connectivity Redundancy: Consider adding a secondary connectivity method, such as a cellular backup, ensuring that even if the primary Wi-Fi connection is lost, critical alerts can still be sent to the user.

Emergency Cut-offs & Alarms:

  1. Overheat Protection: If the water temperature exceeds safe limits, the system should automatically shut off the heater and activate an alarm, both audibly and visually. If integrated, Alexa can also provide an audible warning.

Optional Cut-Offs:

  1. Electrical Anomalies Detection: Employ sensors that detect any electrical anomalies, such as overcurrent or shorts. In such scenarios, an immediate cut-off should be triggered, isolating the affected component or shutting down the entire system if necessary.
  2. Water Contact Sensors: Place sensors in areas where water should not be present. If these sensors detect moisture, the system should trigger an alarm and potentially cut off power to vulnerable components.
  3. User Alerts: In the event of any fail-safe being triggered, users should be immediately alerted. This can be achieved through flashing LEDs, audible alarms, push notifications on their mobile device, or voice alerts through Alexa.

To conclude, the design and implementation of backup and fail-safe systems are not just supplementary; they’re integral to the overall functioning and safety of the CalSpa hot tub. By proactively addressing potential issues and implementing mechanisms to combat them, we’re ensuring a safe and enjoyable experience for the user, while also safeguarding the longevity and reliability of the system.

9. Implementation

The implementation phase is the hands-on culmination of the planning, design, and development processes. It’s imperative to ensure that every component is installed correctly and safely to achieve the desired functionality. This section will guide you through the systematic implementation of the project, from the step-by-step installation process to the intricate wiring details.

Step-by-step Installation Process:

  1. Preparation:
    • Ensure the hot tub is powered off and disconnected from its power source.
    • Clear the work area and have all necessary tools and components on hand.
    • Familiarize yourself with the existing setup and the new components.
  2. Component Removal:
    • Carefully remove the old Balboa Instruments C5000 control board.
    • Label and safely set aside components that will be retained.
  3. ESP-WROOM-32 Board Installation:
    • Mount the board inside a protective casing, ensuring it’s adequately ventilated.
    • Position it close enough to the main system but avoid areas prone to excessive humidity.
  4. Relay & Power Supply Installation:
    • Install the selected relays in line with the pumps, heaters, and other components.
    • Ensure the power supply units and step-down converters are securely mounted and easily accessible.

Wiring Diagrams & Schematics:

  • Main Power:
    • Connect the 240v Main AC Inputs (Wht, Blk, Red, Grn) through the main relay.
  • Pumps & Heater:
    • Connect the 240v pump, 120v circulation pump, and the 240v 5.5kw heater through their respective relays, ensuring each relay matches its power requirements.
  • Low Voltage Components:
    • Use the step-down converter to supply 12v for the spa lights and the control panel.
    • Ensure the temperature sensor, hi-limit/freeze sensor, and vacuum switch are correctly wired to the ESP32 inputs.

Note: A detailed schematic diagram with color-coded wiring will aid in minimizing mistakes during this intricate step.

Enclosure Setups & Installation:

  1. Selection:
    • Choose waterproof and humidity-resistant enclosures for all electronic components, ensuring they have adequate ventilation.
  2. Installation:
    • Mount enclosures in easily accessible areas while avoiding direct exposure to water splashes or extreme temperature fluctuations.
    • Ensure all wiring entering or exiting the enclosures has waterproof grommets or seals.
  3. Maintenance Access:
    • Position enclosures such that they can be easily opened or removed for maintenance and updates.

Manual Control Panel Installation Steps:

  1. Positioning:
    • Determine an accessible yet protected location for the manual control panel, preferably where users can see the status indicators clearly.
  2. Mounting:
    • Securely mount the panel using appropriate fixtures. Ensure that it’s stable and resistant to any mild external force.
  3. Wiring:
    • Connect the control buttons, dials, and indicators to the ESP-WROOM-32 board, ensuring wires are neatly bundled and protected against wear and tear.
    • Use color-coded wiring and connectors for easier troubleshooting and future maintenance.
  4. Testing:
    • Once installed, perform a preliminary test to ensure all buttons, dials, and indicators function as intended.

To wrap up, the implementation process is a blend of careful planning and precise execution. Always refer back to schematics and notes during installation, and ensure safety precautions are adhered to throughout. After the initial setup, conduct a thorough testing phase to ensure all components interact seamlessly.

10. Detailed System Wiring and Integration Guide

Wiring the system is a meticulous process, demanding a systematic approach, precision, and a keen eye for detail. Below is a structured step-by-step guide to wire and integrate the entire CalSpa hot tub upgrade system using the ESP-WROOM-32 development board and associated components.

Prerequisites:

Ensure you have the following tools and materials:

  • A soldering iron and solder
  • Wire strippers
  • Multimeter
  • Heat shrink tubing
  • Screwdrivers
  • Suitable gauge wire (consider color-coding for clarity)
  • Wire connectors or terminal blocks

Step-by-Step Guide:

1. Setting Up the ESP-WROOM-32 Development Board:

  • Place the ESP-WROOM-32 on a non-conductive surface or mount it on a baseplate.
  • Use the wire stripper to prepare your wires. Strip about 5mm off the ends.

2. Connecting the Relays:

For Solid State Relays (SSRs):

  • Connect one end of a wire to a GPIO pin on the ESP32.
  • Connect the other end of the wire to the control/input terminal of the SSR.
  • Connect the ground of the SSR to the ground (GND) of the ESP32.

For Electromagnetic Relays (EMRs):

  • Connect the base of your transistor (e.g., 2N2222) to a GPIO pin on the ESP32 using a 1kΩ resistor.
  • Connect the emitter of the transistor to the ground (GND) of the ESP32.
  • Connect the collector of the transistor to one end of the relay coil.
  • Connect the other end of the relay coil to your VCC (usually 5V or 3.3V, based on the relay’s specifications).
  • Attach the diode (e.g., 1N4007) across the relay coil terminals, ensuring the cathode (the stripe side) is on the VCC side.

3. Wiring Power Supply Units (PSUs) & Step-down Converters:

  • Connect the input of your step-down converter to the PSU’s output.
  • Ensure the output voltage from the step-down converter matches the ESP32’s requirements (3.3V).
  • Connect the ESP32’s VCC and GND pins to the output of the step-down converter.

4. Wiring the Sensors:

Waterproof DS18B20 Temperature Sensor:

  • Connect the VCC (usually red wire) of the DS18B20 to 3.3V on the ESP32.
  • Connect the GND (usually black wire) to the ground of the ESP32.
  • Connect the data wire (usually yellow or white) to any GPIO pin on the ESP32. Place a 4.7kΩ pull-up resistor between VCC and the data line.

Hi-Limit/Freeze Sensor & Vacuum Switch:

  • Generally, these sensors provide binary outputs. Connect the output of the sensors to the ESP32 GPIO pins.
  • Ensure to connect the sensor’s GND to the ESP32’s GND.

5. Manual Control Panel Integration:

Buttons, Dials, and Indicators:

  • Connect the buttons to GPIO pins on the ESP32 and the ground, ensuring you utilize pull-up or pull-down resistors as needed.
  • If using potentiometers (for dials), connect one outer pin to 3.3V, the other outer pin to GND, and the middle pin to a GPIO configured as an ADC.
  • For indicators, connect LEDs through appropriate resistors (e.g., 220Ω for a typical LED) to GPIO pins and GND.

6. Ensuring Wi-Fi Connectivity:

  • Place the ESP32 in a location where it has a strong Wi-Fi signal. Consider the use of Wi-Fi extenders if there are connectivity issues.

7. Enclosures:

  • Once all components are wired, encase them in their respective waterproof and humidity-resistant enclosures. Ensure tight seals but also maintain accessibility for future maintenance or adjustments.

Final Checks:

  • Before powering on, ensure all connections are tight and correct. Use the multimeter to check for any short circuits.
  • Power on the system and test each component, starting from the ESP32, checking relay function, sensor outputs, and manual control responsiveness.
  • Ensure that Wi-Fi connectivity is stable and the ESP32 connects seamlessly to the network.

11. Software Application Design for CalSpa Hot Tub Control

The software application for controlling the CalSpa hot tub using the ESP32 is central to achieving the desired user experience and functionality. Here’s an exhaustive outline of the software design:

I. Software Overview:

  1. Purpose: To control and monitor the CalSpa hot tub via manual inputs, Alexa voice commands, and potentially other home automation systems.
  2. Platform: ESP32 firmware, integrating with cloud-based platforms for Alexa and other home automation systems.
  3. Languages: Primarily C++ (for ESP32), Python or JavaScript (for web-based interfaces or server-side integrations).

II. Software Components:

  1. Main Control Logic:
    • Processing input from sensors.
    • Controlling relays for heaters, pumps, and lights.
    • Interacting with manual controls.
  2. Web Interface:
    • For remote monitoring and control.
    • Displaying real-time data from sensors.
  3. Alexa Integration Layer:
    • Handling voice commands.
    • Sending feedback/responses to Alexa.
  4. Backup & Fail-safe Logic:
    • Handling unexpected scenarios or failures.
    • Ensuring safe defaults.
  5. Logging and Diagnostics:
    • Recording system events.
    • Aiding in troubleshooting and maintenance.

III. File Structure:

  1. main.cpp – Core logic and ESP32 setup.
  2. sensors.h & sensors.cpp – Handling all sensor data.
  3. controls.h & controls.cpp – Relays and manual control processing.
  4. web_interface.h & web_interface.cpp – Web-based controls and displays.
  5. alexa_integration.h & alexa_integration.cpp – All functions related to Alexa control.
  6. failsafe.h & failsafe.cpp – Logic for handling failures and safe defaults.
  7. logger.h & logger.cpp – System event recording and diagnostics.

IV. Code Overview:

  1. Initialization:
    • Setup ESP32 Wi-Fi, GPIO configurations, and initial relay states.
    • Initialize sensors and read initial values.
  2. Main Loop:
    • Continuously read sensor values.
    • Process Alexa or manual inputs.
    • Control relays based on inputs.
    • Update web interface with real-time data.
  3. Alexa Command Handling:
    • Listen for specific voice commands.
    • Process and execute respective actions.
    • Send feedback to Alexa for voice confirmation.
  4. Fail-safe Checks:
    • Monitor for any unsafe or unexpected conditions.
    • Revert to safe defaults or shutdown in case of critical failures.

V. Testing:

  1. Unit Testing:
    • Test each function individually to ensure they perform as expected.
    • Mock sensor inputs and check for expected outputs.
  2. Integration Testing:
    • Test the flow of data and control between various components.
    • Simulate various user inputs and monitor system response.
  3. Stress Testing:
    • Check the system’s performance under heavy load or continuous operation.
    • Monitor for any memory leaks or performance drops.
  4. Safety Testing:
    • Simulate failure scenarios.
    • Validate that fail-safes trigger correctly.
  5. User Acceptance Testing:
    • Real-world testing by end-users.
    • Gather feedback on functionality and user experience.

VI. Deployment:

  1. Firmware Upload:
    • Compile and upload the code to the ESP32.
    • Monitor for any initialization errors.
  2. Cloud Integration:
    • Link the ESP32 with cloud services for Alexa or other home automation platforms.
    • Ensure secure and stable connectivity.
  3. Updates and Maintenance:
    • Implement a method for over-the-air (OTA) updates.
    • Regularly review logs for any potential issues.

By meticulously planning the software design, coding, and testing phases, you’ll ensure the CalSpa hot tub system operates seamlessly, efficiently, and safely. The software is the bridge between the hardware components and the user’s desires, so it’s crucial that it’s robust, user-friendly, and reliable.

VII. Software File Components

This is the application code I plan on using. This will be modified as the project progresses.

main.cpp

/*
 * CalSpa Hot Tub Control using ESP32
 * Author: David Maiolo
 * Date: August 22, 2023
 */

// Include necessary libraries and headers
#include "Arduino.h"
#include "sensors.h"
#include "controls.h"
#include "web_interface.h"
#include "alexa_integration.h"
#include "failsafe.h"
#include "logger.h"

// Global variables and definitions
#define WIFI_SSID "Your_WiFi_SSID"
#define WIFI_PASSWORD "Your_WiFi_Password"

// Function prototypes
void setupWiFi();

void setup() {
    // Initialize serial communication for debugging
    Serial.begin(115200);

    // Initialize Wi-Fi
    setupWiFi();

    // Initialize sensors, controls, and other modules
    initSensors();
    initControls();
    initWebInterface();
    initAlexaIntegration();
    initFailSafe();
    initLogger();

    Serial.println("CalSpa Hot Tub Control Initialized!");
}

void loop() {
    // Continuously monitor and process data
    processSensors();
    processControls();
    updateWebInterface();
    handleAlexaCommands();
    checkFailSafes();
    logSystemData();
}

void setupWiFi() {
    // Connect to Wi-Fi
    Serial.print("Connecting to Wi-Fi...");
    WiFi.begin(WIFI_SSID, WIFI_PASSWORD);

    while (WiFi.status() != WL_CONNECTED) {
        delay(500);
        Serial.print(".");
    }

    Serial.println();
    Serial.print("Connected with IP: ");
    Serial.println(WiFi.localIP());
}

Please replace “Your_WiFi_SSID” and “Your_WiFi_Password” with your actual network credentials. This code provides a foundation for integrating each module we’ve outlined earlier.

It’s crucial to consult the documentation of libraries and components you’re using to ensure correct initialization and processing within the setup() and loop() functions. As you progress, we’ll flesh out each function in greater detail based on the libraries we choose and the specific functionality wedesire.

sensors.h

/*
 * sensors.h
 * Sensor Management for CalSpa Hot Tub Control using ESP32
 * Author: David Maiolo
 * Date: August 22, 2023
 */

#ifndef SENSORS_H
#define SENSORS_H

#include "Arduino.h"

// Sensor pin definitions (Modify according to your setup)
#define TEMP_SENSOR_PIN       34
#define HI_LIMIT_SENSOR_PIN   35
#define VACUUM_SWITCH_PIN     36

// Function declarations
void initSensors();
float readTemperature();
bool checkHiLimit();
bool checkVacuumSwitch();

#endif //SENSORS_H

We’ll likely need to integrate specific libraries, and further adjust the code depending on the exact sensors and their respective communication protocols.

sensors.cpp

/*
 * sensors.cpp
 * Sensor Management for CalSpa Hot Tub Control using ESP32
 * Author: David Maiolo
 * Date: August 22, 2023
 */

#include "sensors.h"
// If using a DS18B20 temperature sensor with a library like OneWire, include it here
// #include <OneWire.h>

void initSensors() {
    // Initialize sensor pins
    pinMode(TEMP_SENSOR_PIN, INPUT);
    pinMode(HI_LIMIT_SENSOR_PIN, INPUT);
    pinMode(VACUUM_SWITCH_PIN, INPUT);
    
    // If you have other initializations (like setting up OneWire for DS18B20), place them here.
}

float readTemperature() {
    // This is a placeholder. Actual code will depend on your temperature sensor and any library you use.
    // Assuming a DS18B20 sensor with OneWire library, it'd look something like this:
    // OneWire ds(TEMP_SENSOR_PIN);
    // ... Code to get temperature ...
    // return temperature;
    return 25.0; // For now, return a dummy temperature.
}

bool checkHiLimit() {
    // Read the hi-limit sensor. Depending on the sensor, you may need analog or digital read.
    int hiLimitState = digitalRead(HI_LIMIT_SENSOR_PIN);
    return hiLimitState == HIGH;
}

bool checkVacuumSwitch() {
    // Read the vacuum switch state. 
    int vacuumSwitchState = digitalRead(VACUUM_SWITCH_PIN);
    return vacuumSwitchState == HIGH;
}

This code assumes we will be using digital sensors for the hi-limit and vacuum switch. If they provide analog values, we’ll replace digitalRead with analogRead.

For the DS18B20 temperature sensor, we may utilize OneWire and DallasTemperature libraries. If we decide to use this sensor, be sure to integrate the necessary library calls and logic in the provided functions.

We can adjust pin definitions according to our setup and incorporate error-checking where necessary.

controls.h

/*
 * controls.h
 * Control Management for CalSpa Hot Tub Control using ESP32
 * Author: David Maiolo
 * Date: August 22, 2023
 */

#ifndef CONTROLS_H
#define CONTROLS_H

#include "Arduino.h"

// Pin definitions for relays and other control elements (Modify according to your setup)
#define PUMP_RELAY_PIN        25
#define HEATER_RELAY_PIN      26
#define LIGHTS_RELAY_PIN      27
// ... Add other control pins as needed ...

// Function declarations
void initControls();
void turnOnPump();
void turnOffPump();
void turnOnHeater();
void turnOffHeater();
void turnOnLights();
void turnOffLights();
// ... Add other control functions as needed ...

#endif //CONTROLS_H

controls.cpp

/*
 * controls.cpp
 * Control Management for CalSpa Hot Tub Control using ESP32
 * Author: David Maiolo
 * Date: August 22, 2023
 */

#include "controls.h"

void initControls() {
    // Set control pins to OUTPUT mode
    pinMode(PUMP_RELAY_PIN, OUTPUT);
    pinMode(HEATER_RELAY_PIN, OUTPUT);
    pinMode(LIGHTS_RELAY_PIN, OUTPUT);
    // ... Initialize other pins as OUTPUT ...

    // Set initial states (all OFF)
    digitalWrite(PUMP_RELAY_PIN, LOW);
    digitalWrite(HEATER_RELAY_PIN, LOW);
    digitalWrite(LIGHTS_RELAY_PIN, LOW);
    // ... Set other pins to their initial states ...
}

void turnOnPump() {
    digitalWrite(PUMP_RELAY_PIN, HIGH);
}

void turnOffPump() {
    digitalWrite(PUMP_RELAY_PIN, LOW);
}

void turnOnHeater() {
    digitalWrite(HEATER_RELAY_PIN, HIGH);
}

void turnOffHeater() {
    digitalWrite(HEATER_RELAY_PIN, LOW);
}

void turnOnLights() {
    digitalWrite(LIGHTS_RELAY_PIN, HIGH);
}

void turnOffLights() {
    digitalWrite(LIGHTS_RELAY_PIN, LOW);
}

// ... Implement other control functions similarly ...

web_interface.h

/*
 * web_interface.h
 * Web Interface for CalSpa Hot Tub Control using ESP32
 * Author: David Maiolo
 * Date: August 22, 2023
 */

#ifndef WEB_INTERFACE_H
#define WEB_INTERFACE_H

#include "Arduino.h"
#include "ESPAsyncWebServer.h"

void initWebInterface();
void updateWebInterface();

#endif //WEB_INTERFACE_H

web_interface.cpp

/*
 * web_interface.cpp
 * Web Interface Management for CalSpa Hot Tub Control using ESP32
 * Author: David Maiolo
 * Date: August 22, 2023
 */

#include "web_interface.h"
#include "controls.h"
#include "sensors.h"

// Create an instance of the web server
AsyncWebServer server(80);  // HTTP server on port 80

void initWebInterface() {
    // Endpoint for turning on the pump
    server.on("/pump/on", HTTP_GET, [](AsyncWebServerRequest *request){
        turnOnPump();
        request->send(200, "text/plain", "Pump turned on");
    });

    // Endpoint for turning off the pump
    server.on("/pump/off", HTTP_GET, [](AsyncWebServerRequest *request){
        turnOffPump();
        request->send(200, "text/plain", "Pump turned off");
    });

    // ... Add more endpoints for other controls ...

    // Endpoint to get the current temperature
    server.on("/temperature", HTTP_GET, [](AsyncWebServerRequest *request){
        float temp = readTemperature();
        String response = "Current temperature: " + String(temp) + "°C";
        request->send(200, "text/plain", response);
    });

    // Start the server
    server.begin();
}

void updateWebInterface() {
    // If there's dynamic content or periodic updates needed for the web interface, implement them here.
    // This could be things like periodic AJAX updates or WebSocket data pushes.
}

You’ll need to include the ESPAsyncWebServer and its dependencies in your project. The Arduino IDE’s Library Manager is a good place to find and install these. If you use PlatformIO, these can be included in the platformio.ini file’s lib_deps section.

The code above provides a simple RESTful API. You can expand this by adding a full HTML interface, AJAX for periodic updates, or even WebSockets for two-way communication.

For Alexa integration with ESP32, you would typically use the “FauxmoESP” library. It emulates a Philips Hue light system, allowing you to control your ESP32 with voice commands via Alexa. For the sake of this example, I’ll illustrate how to set this up:

alexa_integration.h

/*
 * alexa_integration.h
 * Alexa Integration for CalSpa Hot Tub Control using ESP32
 * Author: David Maiolo
 * Date: August 22, 2023
 */

#ifndef ALEXA_INTEGRATION_H
#define ALEXA_INTEGRATION_H

#include "Arduino.h"
#include "fauxmoESP.h"

void initAlexa();
void handleAlexa();

#endif //ALEXA_INTEGRATION_

alexa_integration.cpp

/*
 * alexa_integration.cpp
 * Alexa Integration Management for CalSpa Hot Tub Control using ESP32
 * Author: David Maiolo
 * Date: August 22, 2023
 */

#include "alexa_integration.h"
#include "controls.h"

fauxmoESP fauxmo;

void initAlexa() {
    // Define the devices. For example, "Hot Tub Pump"
    fauxmo.addDevice("Hot Tub Pump");
    fauxmo.addDevice("Hot Tub Heater");
    fauxmo.addDevice("Hot Tub Lights");

    fauxmo.onSetState([](unsigned char device_id, const char * device_name, bool state, unsigned char value) {
        if (strcmp(device_name, "Hot Tub Pump") == 0) {
            if (state) {
                turnOnPump();
            } else {
                turnOffPump();
            }
        } 
        else if (strcmp(device_name, "Hot Tub Heater") == 0) {
            if (state) {
                turnOnHeater();
            } else {
                turnOffHeater();
            }
        } 
        else if (strcmp(device_name, "Hot Tub Lights") == 0) {
            if (state) {
                turnOnLights();
            } else {
                turnOffLights();
            }
        }
    });
}

void handleAlexa() {
    fauxmo.handle();
}

In order for this to function, you’ll have to integrate and initialize the Wi-Fi and the FauxmoESP library, ensuring they’re connected to the network.

Once you’ve set up the above code:

  1. Start your ESP32 and make sure it’s connected to Wi-Fi.
  2. Open the Alexa app on your phone or tablet.
  3. Navigate to the Devices tab.
  4. Click the “+” sign in the top right corner.
  5. Click “Add Device”.
  6. Click “Other”.
  7. Click “Discover Devices”.
  8. Wait for Alexa to find and show your devices.
  9. Now, you should be able to say commands like “Alexa, turn on Hot Tub Pump”!

This example focuses on the essential functions to get it running. Depending on your needs, you may want to expand or adjust the code. Make sure to install and include all necessary libraries, and remember to call handleAlexa() in the main loop to allow FauxmoESP to process requests.

The failsafe.h and failsafe.cpp modules will be designed to handle any malfunctions or unforeseen issues, ensuring the hot tub system remains safe and avoids damage or potential hazards.

failsafe.h

/*
 * failsafe.h
 * Fail-safe Mechanisms for CalSpa Hot Tub Control using ESP32
 * Author: David Maiolo
 * Date: August 22, 2023
 */

#ifndef FAILSAFE_H
#define FAILSAFE_H

#include "Arduino.h"

// Function declarations
void initFailsafe();
void checkFailConditions();
bool isSystemSafe();

#endif //FAILSAFE_H

failsafe.cpp

/*
 * failsafe.cpp
 * Fail-safe Mechanisms Implementation for CalSpa Hot Tub Control using ESP32
 * Author: David Maiolo
 * Date: August 22, 2023
 */

#include "failsafe.h"
#include "sensors.h"
#include "controls.h"

// Thresholds for fail-safe conditions
const float MAX_SAFE_TEMPERATURE = 40.0; // Example threshold in Celsius
const float MIN_SAFE_TEMPERATURE = 5.0;  // Avoiding freeze conditions

void initFailsafe() {
    // Any initialization for fail-safe mechanisms goes here
    // For example, set up interrupt handlers, timers, etc.
}

void checkFailConditions() {
    float currentTemperature = readTemperature();

    // If temperature exceeds safety thresholds, shut off heater and pump
    if (currentTemperature > MAX_SAFE_TEMPERATURE || currentTemperature < MIN_SAFE_TEMPERATURE) {
        turnOffHeater();
        turnOffPump();
        // Optionally, you can also raise an alarm or notification here.
    }

    // Add any other checks as per your setup, like water level, pH level, etc.
}

bool isSystemSafe() {
    float currentTemperature = readTemperature();

    if (currentTemperature > MAX_SAFE_TEMPERATURE || currentTemperature < MIN_SAFE_TEMPERATURE) {
        return false;
    }

    // Check other conditions as needed

    return true; // Returns true if all conditions are within safe ranges
}

This is a fundamental implementation of a fail-safe system. Depending on the sensors and safety requirements, you’ll need to add more conditions and checks. Always prioritize safety and thoroughly test your system under all possible conditions. Remember to call checkFailConditions() in your main loop or set it up with a timer interrupt to regularly monitor the system’s state.

For logging on an ESP32, we usually store logs temporarily in the Serial monitor for debugging or to an external storage (e.g., an SD card) if we want to keep records. This logger module will provide basic serial logging functionalities. If you want to expand it for SD card logging, additional methods and initializations would be required.

logger.h

/*
 * logger.h
 * Logging Module for CalSpa Hot Tub Control using ESP32
 * Author: David Maiolo
 * Date: August 22, 2023
 */

#ifndef LOGGER_H
#define LOGGER_H

#include "Arduino.h"

// Function declarations
void initLogger();
void logInfo(const char* message);
void logWarning(const char* message);
void logError(const char* message);

#endif //LOGGER_H

logger.cpp

/*
 * logger.cpp
 * Logging Module Implementation for CalSpa Hot Tub Control using ESP32
 * Author: David Maiolo
 * Date: August 22, 2023
 */

#include "logger.h"

void initLogger() {
    Serial.begin(115200);
    delay(10);  // Allow serial communication to initialize

    logInfo("Logger initialized.");
}

void logInfo(const char* message) {
    Serial.print("[INFO] ");
    Serial.println(message);
}

void logWarning(const char* message) {
    Serial.print("[WARNING] ");
    Serial.println(message);
}

void logError(const char* message) {
    Serial.print("[ERROR] ");
    Serial.println(message);
}

To use the logger, call initLogger() in the setup() function of your main script. When you want to log messages, use logInfo(), logWarning(), or logError() as appropriate. These will print messages to the Serial monitor which can be viewed in real-time when the ESP32 is connected to your development environment.

This is a simple logging system. For more advanced requirements like remote logging, SD card storage, or timestamping, you’d need to expand this system.

Introduction

The handheld game console we are analyzing has gained significant popularity on platforms like Temu and Amazon, capturing the attention of gaming enthusiasts and bargain seekers. Priced at an $9.48, this mini game console offers an enticing combination of features, making it a sought-after choice for retro gaming enthusiasts.

With its compact form factor and a 2.8-inch screen (I measured 2.4-inch with my micrometer), the console provides a portable gaming experience that can be enjoyed on the go. The inclusion of a 1020mAh capacity battery ensures extended playtime, allowing users to delve into their favorite games without worrying about running out of power.

One notable feature of this game console is its support for two players, enabling head-to-head battles and cooperative gameplay experiences.

As we delve into the technical analysis of this console, we aim to unravel the inner workings of its hardware and software components. By examining its processor, memory, display, and other crucial aspects, we seek to understand how this device manages to emulate a wide variety of NES games while at such a low price point.


Device Dimensions and Interface

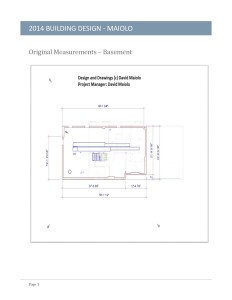
The handheld gaming console, reminiscent of the original GameBoy’s form factor, has dimensions measuring 116mm by 78mm, with a thickness of 21mm. The device’s design choice clearly harkens back to the classic handheld gaming era, likely aiming to invoke nostalgia among users while providing the convenience of a compact, portable device.

Its form factor, akin to the original GameBoy, suggests an ergonomic design suitable for prolonged gameplay. The thickness of 21mm allows the device to comfortably fit in a user’s hands, while providing enough internal volume to house the various electronic components, such as the microcontroller, memory chip, display, and battery.

The user interface comprises a directional pad (D Pad), four face buttons (Y, X, B, A), Select, Start, and a Reset button. This layout, similar to many classic handheld consoles, enables intuitive control over the NES games featured on the device. Specifically, the Y and B buttons are the primary NES-mapped buttons, aligning with the conventional NES controller layout and ensuring a familiar user experience for fans of the original console.

The inclusion of a Reset button indicates a design consideration for user convenience. This button likely directly triggers a hardware reset of the microcontroller, providing a quick way to exit games and return to the main menu.

Processor and Clock Generation

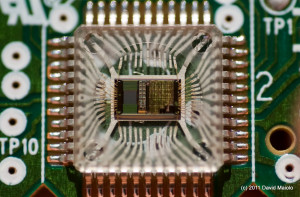
The central core of the handheld gaming console is a chip-on-board (COB) microcontroller, which is encased in a protective epoxy blob. This microcontroller is presumed to be an ARM-based processor, a common choice for such devices due to their efficiency, performance, and wide range of available features.

Given that the game buttons, memory, display (via a flex cable), A/V out, Micro

USB, and NOR Flash all trace directly into the COB, it can be inferred that the microcontroller integrates a substantial amount of built-in peripheral interfaces. This implies a highly integrated system-on-chip (SoC) design, where a single chip incorporates the CPU, memory controller, I/O controllers, and possibly other peripherals. This approach greatly simplifies the PCB layout, reduces system complexity, and lowers power consumption, making it ideal for a handheld device like this game console.

The COB has approximately 110 traces leading to it from various components, further reinforcing the notion of its central role in managing the device’s operation. These traces handle the transfer of data and control signals between the microcontroller and other components, enabling the seamless operation of the device.

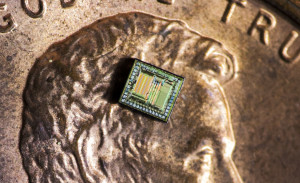
The console employs a 21.47727 MHz crystal oscillator to provide a reference clock signal to the microcontroller. While this frequency seems relatively low for a device capable of emulating NES games, the microcontroller likely includes an internal phase-locked loop (PLL) circuit that multiplies this base frequency to achieve the higher operational clock speed necessary for real-time game emulation.

The PCB of the console is single-sided and single-layered, which suggests a focus on cost-effectiveness and compactness in the device’s design. This design choice, while limiting the potential complexity of the circuitry, can sufficiently support the functionality of the device thanks to the high level of integration provided by the SoC microcontroller. The use of a single-layered PCB also reduces manufacturing costs and simplifies assembly, contributing to the device’s affordability.

Memory and Storage

A pivotal component of the handheld game console is the Samsung K5L2731CAA-D770 NOR flash memory chip. This chip is a crucial element of the system as it houses the console’s operating system, the emulator software, and the ROMs of the 400 NES games featured on the device.

Understanding the memory chip’s specifics requires deciphering the part number “K5L2731CAA-D770” according to Samsung’s nomenclature:

  • “K5” identifies a Samsung NOR Flash memory product.
  • “L2731” conveys the density and organization of the chip. Here, “27” indicates that it’s a 2^27 or 128 Megabit chip, and “31” typically designates a x16 chip concerning word organization.
  • “CAA” signifies the operating voltage and speed of the chip.
  • “D770” is likely to be a lot or batch number, or other specific manufacturing identifiers.

Consequently, the K5L2731CAA-D770 is a 128 Megabit chip, which, when translated into more commonly used storage units (given that 1 Byte = 8 bits), comes out as 16 Megabytes.

The calculated storage size aligns well with the console’s capabilities. It features around 400 NES games. NES game ROMs can vary, but if we take an average NES game ROM to be about 40 Kilobytes and multiply that by the number of games, it yields approximately 16,000 Kilobytes, or 16 Megabytes. This calculation presumes that all games are unique and does not account for the space occupied by repeated titles, the operating system, and the emulation software.

Furthermore, the direct connection between the memory chip and the chip-on-board (COB) infers that the microcontroller possesses an integrated memory controller. This in-built feature expedites the data transfer between the processor and memory, thus facilitating swift and efficient access to game data during emulation.

Power Supply

Powering the handheld game console is a BL-5C lithium-ion rechargeable battery, featuring a nominal voltage of 3.7V and a capacity of 1020 mAh. This type of battery gained popularity as a power source for various Nokia candybar-style cell phones in the mid-2000s, owing to its compact form factor, decent energy density, and relatively low cost. Its usage in this game console speaks to the designers’ intent of keeping the device affordable and portable while providing satisfactory gameplay duration on a single charge.

The charging of the BL-5C battery is managed through the Micro USB port, a widely adopted interface that offers convenience for users. The choice of Micro USB as the charging interface suggests an intention to utilize existing, common cables that users might already possess, thereby reducing additional costs and e-waste.

Given that lithium-ion batteries require specific charging protocols to ensure safety and longevity, the device must incorporate a battery charge controller. This controller, responsible for managing the battery’s charging process, will precisely regulate the charging current and voltage to avoid overcharging or damaging the battery. Given the integrated design of the console and the fact that all other peripheral interfaces trace back to the chip-on-board (COB), it is safe to assume that the charge controller functionality is integrated within the COB as well.

This integration means that the microcontroller is likely equipped with built-in power management features. Such a design would allow the microcontroller to oversee the state of the battery, possibly providing low battery warnings and implementing power-saving measures when necessary. This integration contributes to the compact and efficient design of the console, eliminating the need for separate power management chips and reducing the overall power consumption, which in turn enhances the battery life of the device.

Operating System and Game Emulation

Without direct access to the device’s software or firmware, we can only make educated guesses about the operating system and the game emulation software used on the console. However, based on the hardware setup and the console’s capabilities, we can extrapolate some plausible scenarios.

Considering the device’s simplicity and specific functionality, it likely uses a lightweight, embedded operating system or may even operate with a bare-metal approach, where the application software runs directly on the hardware without an underlying operating system. Such a minimalistic software approach would allow the console to make the most of its hardware resources, providing responsive user interaction and smooth game emulation.

Given the console’s ability to emulate NES games, it is reasonable to assume that it uses a customized NES emulator. The emulator is probably a variation of a known open-source NES emulator, adapted to work with the console’s hardware and to fit within the available memory. The selected emulator would need to be efficient and lightweight, given the constraints of the processor speed and memory.

Emulating NES games is a task that, while not overly demanding by today’s standards, still requires a certain level of computational power and accuracy. The NES operates on a MOS Technology 6502 processor, running at approximately 1.79 MHz, along with 2KB of onboard RAM (expandable with cartridge memory). Thus, the emulator on this handheld console must accurately reproduce the behavior of the original NES hardware using its own resources.

One of the challenges of game emulation is the accurate reproduction of timing behaviors. NES games are particularly timing-sensitive, and a well-implemented emulator needs to precisely mimic these timings for games to run correctly. The presence of a 21.47727 MHz crystal oscillator indicates that the device is designed to handle these timing requirements. The frequency of 21.47727 MHz is a common clock frequency for video-related applications and is an exact multiple of the NES’s pixel clock frequency, hinting at its possible use for accurate video signal generation.

Finally, it’s also worth noting that the game selection and the game loading process indicate that the emulator is designed for ease of use. The system boots up directly into a game selection menu, and the games load up quickly once selected, suggesting an efficient game ROM loading mechanism. This mechanism is likely facilitated by the direct memory access (DMA) capabilities of the microcontroller, enabling fast and efficient data transfer from the memory chip to the processor for game emulation.

Game Library and Emulation Analysis

The handheld game console offers an extensive library of games, including some iconic titles from various regions. Here is an analysis of the first 160 games listed in the menu:

  1. SUPER MARIO (Super Mario Bros.)
  2. MARIO 14 (Unknown)
  3. MARIO 3 (Super Mario Bros. 3)
  4. DR MARIO (Dr. Mario)
  5. MARIO BROS (Mario Bros.)
  6. TURTLES (Teenage Mutant Ninja Turtles)
  7. TURTLES 4 (Teenage Mutant Ninja Turtles IV: Turtles in Time)
  8. CONTRA 1 (Contra)
  9. CONTRA FORC (Contra Force)
  10. CONTRA 7 (Unknown)
  11. KAGE (Shadow of the Ninja)
  12. JACKAL (Jackal)
  13. RUSH’N ATTACK (Green Beret)
  14. ADVENTURE ISLANDAD (Adventure Island)
  15. ADVEN ISLAND 2 (Adventure Island II)
  16. CHIP DALE 1 (Chip ‘n Dale: Rescue Rangers)
  17. CHIP DALE 3 (Chip ‘n Dale: Rescue Rangers 2)
  18. BUBBLE BOBBLE 2 (Bubble Bobble Part 2)
  19. SNOW BROS (Snow Bros.)
  20. MITSUME (Unknown)
  21. NINJA GAIDEN 2 (Ninja Gaiden II: The Dark Sword of Chaos)
  22. DOUBLE DRAGON (Double Dragon)
  23. DOUBLE DRAGON E (Double Dragon II: The Revenge)
  24. HOT HIGH SCHOOL (River City Ransom)
  25. HOT HRESTLE (Pro Wrestling)
  26. ROBOCOP (RoboCop)
  27. MORTAL KOMBAT 4 (Mortal Kombat 4)
  28. SPIDER MAN (Spider-Man: Return of the Sinister Six)
  29. 10 YARD FIGHT (10-Yard Fight)
  30. 90 TANK (Battle City)
  31. KAGE LEGEND (Shadow of the Ninja)
  32. ALADDIN 3 (Aladdin 3)
  33. ANTARCTIC ADVEN (Antarctic Adventure)
  34. ARABIAN (Arabian)
  35. BALLOON FIGHT (Balloon Fight)
  36. BASE BALL (Baseball)
  37. BINARY LAND (Binary Land)
  38. BIRD WEEK (Flappy Bird)
  39. BOMBER MAN (Bomberman)
  40. BOMB SWEEPER (Bomberman)
  41. BRUSH ROLLER (Pinball)
  42. BURGER TIME (BurgerTime)
  43. CHACK AND POP (Chack’n Pop)
  44. CHESS (Chess)
  45. CIRCUS CHARLIE (Circus Charlie)
  46. CLU CLU LAND (Clu Clu Land)
  47. COMBAT (Combat)
  48. DEFENDER (Defender)
  49. DEVIL WORLD (Devil World)
  50. DIG DUG 1 (Dig Dug)
  51. DONKEY KONG (Donkey Kong)
  52. DONKEY KONG 2 (Donkey Kong Jr.)
  53. DONKEY KONG 3 (Donkey Kong 3)
  54. DONKEY KONG JR (Donkey Kong Jr.)
  55. DOOR DOOR (Door Door)
  56. EXCITE BIKE (Excitebike)
  57. EXERION (Exerion)
  58. F1 RACE (F-1 Race)
  59. FORMATION Z (Formation Z)
  60. FRONT LINE (Front Line)
  61. GALAGA (Galaga)
  62. GALAXIAN (Galaxian)
  63. GOLF (Golf)
  64. RAID O BUNGELINGHY (Lode Runner)
  65. HYPER OLYMPIC (Hyper Sports)
  66. HYPER SPORTS (Hyper Sports)
  67. ICE CLIMBER (Ice Climber)
  68. JOUST (Joust)
  69. KARATEKA (Karateka)
  70. LODE RUNNER (Lode Runner)
  71. LUNAR BALL (Lunar Ball)
  72. MACROSS (Unknown)
  73. MAGIC JEWELRY (Magical Jewelry)
  74. MAHJONG 4P (Mahjong 4P)
  75. MAHJONG 2P (Mahjong 2P)
  76. MAPPY (Mappy)
  77. MILK N NUTS (Milk & Nuts)
  78. MILLIPEDE (Millipede)
  79. MUSICE (Music Editor)
  80. NAITOU (Unknown)
  81. NIBBLES (Nibbles)
  82. NINJA (Unknown)
  83. NINJA 3 (Unknown)
  84. ROAD FIGHTER (Road Fighter)
  85. OTHELLO (Othello)
  86. PACMAN (Pac-Man)
  87. PIN BALL (Pinball)
  88. POOYAN (Pooyan)
  89. POPEYE (Popeye)
  90. SKY DESTROYER (Sky Destroyer)
  91. SPACE ET (Space Invaders)
  92. STAR FORCE (Star Force)
  93. STAR GATE (Stargate)
  94. TENNIS (Tennis)
  95. URBAN CHAMPION (Urban Champion)
  96. HARPMAN (Harpman)
  97. YIE AR KUNG FU (Yie Ar Kung-Fu)
  98. ZIPPY RACE (Zippy Race)
  99. WAREHOUSE BOY (Load Runner)
  100. 1942 (1942)
  101. ARKANOID (Arkanoid)
  102. ASTRO ROBO SASA (Unknown)
  103. B HINGS (Unknown)
  104. BADMINGTON (Badminton)
  105. BALTRON (Unknown)
  106. BOKOSUKA WARS (Bokosuka Wars)
  107. BOMB JACK (Bomb Jack)
  108. PORTER (Unknown)
  109. CHUBBY CHERUB (Chubby Cherub)
  110. DESTROY (Unknown)
  111. DIG DUG 2 (Dig Dug II)
  112. DOUGH BOY (Unknown)
  113. DRAGON (Unknown)
  114. DRUAGA (Tower of Druaga)
  115. DUCK (Unknown)
  116. ELEVATOR ACTION (Elevator Action)
  117. EXED EXES (Exed Exes)
  118. FLAPPY (Flappy Bird)
  119. FRUIT PIG (Unknown)
  120. GALG (Galaga)
  121. GEIMOS (Geimos)
  122. GYRODINE (Gyrodine)
  123. HEXA (Hexa)
  124. ICE HOCKEY (Ice Hockey)
  125. LOT LOT (Lot Lot)
  126. MAGMAX (MagMax)
  127. PIKA CHU (Unknown)
  128. NINJA (Unknown)
  129. QBAKE (Unknown)
  130. ONYANKO TOHN (Unknown)
  131. PAC LAND (Pac-Land)
  132. PACHI COM (Unknown)
  133. PRO WRESTLING (Pro Wrestling)
  134. PYRAMID (Pyramid)
  135. ROUTE-16 (Route-16 Turbo)
  136. SEICROSS (Seicross)
  137. SLALOM (Slalom)
  138. SOCCER (Soccer)
  139. SONSON (SonSon)
  140. SPARTAN X (Kung Fu)
  141. SPELUNKER (Spelunker)
  142. SPY VS SPY (Spy vs. Spy)
  143. SQOON (Sqoon)
  144. STAR LUSTER (Star Luster)
  145. TETRIS 2 (Tetris)
  146. THEXDER (Thexder)
  147. VOLGUARD II (Volguard II)
  148. VOLLEY BALL (Volleyball)
  149. WARS (Wars)
  150. XEVIOUS (Xevious)
  151. CHINESE CHESS (Chinese Chess)
  152. CHALLENG (Challenger)
  153. MACH RIDER (Mach Rider)
  154. ARGUS (Argus)
  155. GOONIES (The Goonies)
  156. SUPER CHINESE (Kung Fu Heroes)
  157. THIN BEE (Sky Kid)
  158. STAR SOLDIER (Star Soldier)
  159. TRACK FIELD (Track & Field)
  160. FRIDAY THE 13th (Friday the 13th)

The game library encompasses a wide range of titles from various regions, including the US, European, Chinese, and Japanese markets. It reflects the popularity and diversity of NES games during the era. However, it is important to note that some games’ titles might not correspond directly to their original NES counterparts due to variations in regional releases, translations, or alternative naming conventions.

During the game emulation process, there are a few noteworthy observations. Some side-scrolling games exhibit frame tearing, which may indicate synchronization issues or limitations in the emulator’s rendering capabilities. Additionally, the speed discrepancy in certain games, such as Super Mario Bros., where the clock and music run at almost double speed, suggests timing inaccuracies or incorrect emulation of the original game’s speed settings.

Connectivity and Peripheral Support

The handheld game console demonstrates a range of connectivity features and peripheral support that enhances its utility and user experience.

The device’s most notable connectivity feature is its Micro USB port. This port serves multiple functions. It provides a pathway for charging the device, as previously discussed, and it is also used as an interface for connecting an external game controller. The choice of the Micro USB standard for this interface is again likely due to its ubiquity and the objective to leverage widely available and affordable cables and peripherals.

The external game controller is equipped with the same set of buttons as found on the console itself, minus the reset button. This design reflects the layout of a typical NES controller but with two additional action buttons, most likely to increase compatibility with a broader range of games. The capability of the device to recognize and accept input from this external controller indicates that the integrated microcontroller includes a USB host or On-The-Go (OTG) functionality. This feature enables the microcontroller to manage USB communications and interact with USB devices plugged into its port.

Moreover, the console allows simultaneous usage of the built-in and external controllers, offering support for two-player games. This ability suggests a more sophisticated input management system that can distinguish between inputs from the two different controllers and map them correctly to player actions in the games. It might also imply the presence of an advanced interrupt handling system in the microcontroller, which can efficiently manage multiple simultaneous inputs.

Interestingly, when the console is plugged into a computer via USB, it is detected as an unknown USB device (USB\DEVICE_DESCRIPTOR_FAILURE). This error usually indicates that the device failed to correctly respond to the standard USB device descriptor request issued by the host computer. It suggests that while the microcontroller can function as a USB host for the external game controller, its USB device functionality (allowing it to be controlled by a host computer) may not be fully implemented or is intentionally restricted.

Lastly, the device’s ability to operate solely on USB power, bypassing the battery, points to an integrated power supply design capable of switching between different power sources. This design is beneficial for extended gameplay sessions as it allows the device to function even with a depleted battery, as long as it remains plugged into a USB power source. It also serves to protect the device from power interruptions during battery replacement or removal, ensuring a continuous and reliable gaming experience.

Display and Audio Output

This handheld game console provides its primary user interaction through a 2.4-inch LCD color display and a small monaural speaker.

The LCD display connects to the main PCB through a 24-pin ribbon cable, a typical interface for small to medium-sized LCD panels. The ribbon cable carries various signals required for the display’s operation, such as power, ground, data, and control signals. Given the observed pin connections, it appears that 18 of the 24 pins are utilized, leaving pins 2, 4, 5, 6, 7, and 24 unconnected on the PCB.

Without detailed specifications for the LCD panel and its ribbon cable interface, we can only speculate about the exact purpose of each pin. However, given standard practices, it is reasonable to infer that the unconnected pins may be for optional features not used in this particular application (e.g., touchscreen interface, additional power lines, etc.) or they could be reserved for future use. The remaining 18 pins would then be used for power, ground, and to carry the display data and control signals.

The LCD panel part number, SHZ-24-134-24L V2, unfortunately, doesn’t seem to correspond to any known product in online databases. This lack of information might be due to the panel being a custom part or an OEM product not intended for retail sale. Nevertheless, judging by its form factor, we can make an educated guess that it likely sports a resolution sufficient for NES games, possibly in the realm of 320×240 pixels. This would be more than enough to accurately display the native resolution of NES games, which is 256×240 pixels.

Moving on to audio output, the game console employs a small monaural speaker to reproduce the chiptune soundtracks and sound effects of the emulated NES games. Given the size of the console and its power constraints, the speaker is likely a simple, compact component, possibly a piezoelectric type due to their efficiency and simplicity. The audio signal is probably directly driven from the microcontroller, likely through a simple digital-to-analog converter (DAC) and amplifier circuit. The DAC converts the digital audio data from the games into an analog signal, which the amplifier then boosts to drive the speaker.

It’s worth noting that NES games typically feature monaural audio, so a single speaker setup is adequate for faithful reproduction of the original game sound. Any stereo effects would likely be lost in this setup, but the impact on the overall gaming experience should be minimal considering the console’s target audience and price point.

Top of Form

Conclusion

The handheld game console we have analyzed is an intriguing blend of both vintage and modern electronics, delivering a unique gaming experience by leveraging the charm of classic NES games with the convenience of modern-day portable technology.

While the device might seem simple on the surface, the underlying technology is sophisticated. It combines an ARM-based microcontroller, likely hidden beneath the blob-on-board package, and a Samsung NOR Flash memory chip for storing the library of 400 NES games.

The device’s operation is likely managed by a simple yet efficient embedded operating system, potentially a form of RTOS, which offers low overhead and real-time processing, vital for the game emulation process. The NES games are probably run through a software emulator coded into the firmware. This emulator interprets the 6502 processor instructions of the original NES games into corresponding instructions that the device’s ARM-based microcontroller can execute.

The console’s user interface comprises a 2.4-inch LCD color display, a small monaural speaker, and an array of buttons that mimic the classic NES controller layout. The device can also interface with an external controller via the Micro USB port, supporting two-player gameplay. Furthermore, the console can output video to an external display through a composite video port, showcasing the impressive multitasking capabilities of the underlying microcontroller.

Powering this device is a 3.7V 1020mAh BL-5C rechargeable Lithium-ion battery, a model that has proven its reliability and efficiency in various electronic devices over the years.

Overall, despite some limitations, such as the difficulty in identifying the device when connected to a computer via USB, this game console represents a compelling case study of affordable, portable consumer electronics. Its design cleverly balances cost, performance, and user experience, proving that with the right technology and ingenuity, it’s possible to deliver a fun and nostalgic gaming experience in a compact, handheld form factor.


Title: Avian Dinosaurs: Unraveling the Evolutionary Link Between Dinosaurs and Modern Birds

Author: David Maiolo

Abstract: The prevailing perception that all dinosaurs went extinct at the end of the Cretaceous period has been challenged by recent discoveries in paleontology. This research paper explores the evolutionary link between non-avian dinosaurs and avian dinosaurs (birds), emphasizing that birds are a subset of dinosaurs that survived the mass extinction event 66 million years ago. By examining the morphological, physiological, and behavioral similarities between non-avian and avian dinosaurs, we provide evidence to support the claim that dinosaurs, in the form of birds, continue to thrive today.

Introduction

The study of dinosaur evolution has long captivated the scientific community and the general public alike. With an ever-growing body of fossil evidence, researchers have been able to piece together a more comprehensive understanding of these ancient creatures and their evolutionary relationships. One of the most significant discoveries in recent years has been the recognition that birds, or avian dinosaurs, are a surviving lineage of theropod dinosaurs. This realization has implications not only for the study of dinosaur evolution but also for our understanding of the events surrounding the mass extinction event at the end of the Cretaceous period.

In this paper, we delve into the various aspects of avian and non-avian dinosaur evolution, examining the morphological, physiological, and behavioral similarities between these groups. Additionally, we explore the diversity of dinosaurs leading up to the extinction event, the factors that contributed to the survival of avian dinosaurs, and the subsequent diversification of modern birds. We also discuss molecular evidence, such as preserved proteins and genomic comparisons, that support the close evolutionary relationship between non-avian dinosaurs and birds.

Dinosaur Diversity and the Extinction Event

This section provides an overview of the different types of dinosaurs that existed prior to the extinction event, their relationship to avian dinosaurs, the factors that led to the extinction event, and the persistence of avian dinosaurs after the event, drawing on various scientific sources to support these claims.

Classification of Dinosaurs

Dinosaurs are classified into two major groups, Saurischia and Ornithischia, based on the structure of their pelvic bones (Sereno, 1991). Saurischians are further divided into two subgroups: theropods and sauropodomorphs. Theropods include both non-avian dinosaurs, such as T. rex and Velociraptor, and avian dinosaurs (birds) (Benton, 1990). Ornithischians are a diverse group of herbivorous dinosaurs, including stegosaurs, ankylosaurs, and ceratopsians (Butler et al., 2008).

Saurischian Dinosaurs

  • Theropods: This subgroup includes carnivorous dinosaurs and the ancestors of birds. Theropods are characterized by their bipedal locomotion, hollow bones, and three-toed feet (Norell & Makovicky, 2004).
  • Sauropodomorphs: This subgroup comprises long-necked herbivorous dinosaurs, such as Brachiosaurus and Apatosaurus. Sauropodomorphs are known for their large body size, quadrupedal stance, and elongated necks (Upchurch et al., 2004).

Ornithischian Dinosaurs

Ornithischians are a diverse group of herbivorous dinosaurs, which include (Butler et al., 2008):

  • Thyreophorans: This group includes stegosaurs and ankylosaurs, known for their armored plates and spikes (Carpenter, 2001).
  • Ornithopods: This group includes duck-billed hadrosaurs and small bipedal herbivores like Iguanodon (Norman, 2004).
  • Marginocephalians: This group consists of ceratopsians, such as Triceratops, and dome-headed pachycephalosaurs (Ryan et al., 2012).

The Extinction Event

The extinction event that occurred approximately 66 million years ago, at the end of the Cretaceous period, is known as the Cretaceous-Paleogene (K-Pg) extinction event (Schulte et al., 2010). It led to the extinction of about 75% of all species on Earth, including all non-avian dinosaurs. The primary cause of this event is believed to be the impact of a massive asteroid or comet, which created the Chicxulub crater in present-day Mexico (Alvarez et al., 1980). The impact would have caused catastrophic environmental changes, such as massive wildfires, tsunamis, and a prolonged “impact winter” due to dust and aerosols blocking sunlight (Robertson et al., 2013).

Avian Dinosaurs and their Survival

Despite the mass extinction of non-avian dinosaurs, avian dinosaurs (birds) managed to survive the K-Pg extinction event (Longrich et al., 2011). It is hypothesized that their small size, ability to fly, and diverse diets allowed them to adapt to the post-apocalyptic environment (Chester et al., 2020). Furthermore, the extinction of non-avian dinosaurs and other large terrestrial vertebrates left numerous ecological niches open for exploitation, enabling the rapid diversification of birds in the subsequent Paleogene period (Baker et al., 2015).

Early Avian Dinosaurs

Before the extinction event, avian dinosaurs, such as Archaeopteryx and Confuciusornis, coexisted with their non-avian relatives (Chiappe & Göhlich, 2010). These early birds exhibited a mix of reptilian and bird-like features, such as teeth and a long bony tail, as well as flight-capable wings with well-developed feathers (Chiappe, 2007).

Avian Dinosaurs

After the Extinction Event Following the K-Pg extinction event, avian dinosaurs diversified into a wide array of forms, occupying various ecological niches (Mayr, 2009). Some examples include the flightless Paleocene Gastornis, which was a large, ground-dwelling herbivore (Buffetaut, 2013), and the agile, piscivorous Hesperornis, which lived in marine environments (Bell & Chiappe, 2015). As the Earth’s ecosystems recovered, avian dinosaurs continued to evolve and adapt, giving rise to the more than 10,000 bird species we see today (Jetz et al., 2012).

Diversification of Avian Dinosaurs

The diversification of avian dinosaurs after the K-Pg extinction event can be attributed to several factors, including the availability of new ecological niches, adaptive radiation, and the evolution of key traits such as beak shape, which allowed birds to exploit a wide range of food sources (Cooney et al., 2017). This rapid diversification, known as the “avian radiation,” has led to the emergence of numerous avian groups, such as songbirds, waterfowl, raptors, and flightless birds, each with their unique adaptations and ecological roles (Moyle et al., 2016).

In conclusion, avian dinosaurs are a diverse and successful group that has persisted through the extinction event that wiped out their non-avian relatives. Their survival and subsequent diversification highlight the adaptability of these organisms and demonstrate that dinosaurs, in the form of birds, continue to thrive in the modern world.

Morphological and Anatomical Similarities

Feathers

Feathers are a defining characteristic of birds, and their presence in non-avian theropod dinosaurs has been confirmed through numerous fossil discoveries. For instance, the early Cretaceous dinosaur Sinosauropteryx, discovered in China, had simple, filamentous proto-feathers, which were likely used for insulation (Chen et al., 1998). In contrast, more derived non-avian theropods, such as Velociraptor and Anchiornis, possessed more complex pennaceous feathers, similar to those found in modern birds (Xu et al., 2014; Turner et al., 2007). These findings suggest that feathers evolved in a stepwise manner, with more complex structures arising from simpler forms, ultimately leading to the diverse array of feathers seen in modern birds (Prum et al., 2015).

Skeletal Features

Several skeletal features common to both non-avian and avian dinosaurs provide further evidence of their evolutionary connection. For example, both groups possess hollow bones, a feature that reduces body weight and is particularly beneficial for flight in birds. This adaptation is also observed in non-avian theropods, such as Allosaurus and Velociraptor, which had extensive pneumaticity in their vertebrae and other skeletal elements (Chinsamy & Elzanowski, 2001). Hollow bones not only reduced body mass but also improved agility and overall mobility.

Additionally, the presence of a furcula, or wishbone, is a shared characteristic among theropod dinosaurs and birds. The furcula is an important structure for birds, as it serves as an attachment point for flight muscles and aids in the stability of the shoulder joint during flight (Padian & Chiappe, 1998). The furcula has been found in various non-avian theropods, such as the early Cretaceous dinosaur Bambiraptor, indicating a common origin for this skeletal feature (Burnham et al., 2000).

Respiratory System

The respiratory system of birds, which features a unique and highly efficient air-sac system, has been traced back to non-avian theropod dinosaurs. In birds, this air-sac system consists of a series of interconnected sacs that extend throughout the body cavity and even penetrate the bones, allowing for a unidirectional flow of air through the lungs and continuous gas exchange during both inhalation and exhalation (O’Connor & Claessens, 2005). This advanced respiratory system allowed for greater oxygen absorption and more efficient breathing, which would have been advantageous for both non-avian and avian dinosaurs (O’Connor, 2009).

Fossil evidence, such as the presence of pneumatized bones and air-sac diverticula in non-avian theropods like Majungasaurus, supports the idea that a similar respiratory system was present in these animals (O’Connor & Claessens, 2005). The evolution of this respiratory system in non-avian theropods was likely driven by the high metabolic demands associated with their active lifestyles, which in turn, facilitated the evolution of flight in their avian descendants.

Behavioral and Ecological Similarities

Nesting and Parental Care

Fossil evidence suggests that both non-avian and avian dinosaurs exhibited similar nesting behaviors and parental care strategies. Fossilized dinosaur nests, eggs, and embryos have revealed that some non-avian dinosaurs, such as oviraptorosaurs and troodontids, built open nests and brooded their eggs in a manner similar to modern birds (Norell et al., 1995; Varricchio et al., 2008). The discovery of a Citipati osmolskae, an oviraptorosaur, in a brooding posture over its nest, suggests that these non-avian dinosaurs provided active parental care, protecting their eggs from predators and regulating their temperature (Clark et al., 1999). Furthermore, the arrangement of eggs in clutches, often in a spiral pattern, has been observed in both non-avian dinosaurs, such as Maiasaura, and modern birds, indicating shared reproductive strategies (Horner & Makela, 1979).

Social Behavior

Some non-avian dinosaurs, such as hadrosaurs and ceratopsians, are believed to have exhibited social behavior, including group living and herd formations (Horner, 2000). This type of social organization is seen in many modern bird species, suggesting a shared evolutionary heritage (Farlow & Dodson, 1975). Fossil evidence, such as trackways and bone beds, supports the idea of group living in non-avian dinosaurs. For example, trackways of hadrosaurs in the Late Cretaceous of North America indicate the presence of large groups, including both juveniles and adults, moving together across the landscape (Lockley et al., 1994). Similarly, large bone beds of the ceratopsian Centrosaurus in Canada suggest that these dinosaurs lived and died in large herds, possibly as a defense mechanism against predators (Eberth & Getty, 2005).

Locomotion and Flight

The development of flight is a key aspect of avian evolution, and evidence suggests that non-avian dinosaurs exhibited various forms of aerial locomotion, such as gliding and powered flight (Xu et al., 2003). The presence of feathers and wing-like structures in non-avian theropods, such as Microraptor, provide insights into the intermediate stages of flight evolution, bridging the gap between non-avian and avian dinosaurs (Chatterjee & Templin, 2007). Microraptor, a small, four-winged theropod from the Early Cretaceous, is believed to have been capable of gliding or even limited powered flight, using its elongated, pennaceous feathers to generate lift and control its movements through the air (Senter et al., 2012).

Another example is the dinosaur Yi qi, which possessed a unique membranous wing structure supported by a long, rod-like bone extending from the wrist, suggesting a different approach to aerial locomotion (Xu et al., 2015). This diversity of flight-related adaptations in non-avian dinosaurs highlights the complex and multifaceted nature of flight evolution leading to the emergence of modern birds.

Molecular and Genetic Evidence

Protein Preservation

The discovery of preserved proteins, such as collagen, in dinosaur fossils has provided molecular evidence to support the evolutionary connection between non-avian dinosaurs and birds. In a groundbreaking study, Schweitzer et al. (2007) reported the presence of soft tissue and collagen fibers in a well-preserved Tyrannosaurus rex femur. The researchers were able to extract and analyze peptide sequences from the preserved collagen, which they then compared to collagen sequences from modern species (Schweitzer et al., 2009). Their analysis revealed a close relationship between the collagen sequences of T. rex and modern birds, such as chickens and ostriches, as well as a more distant relationship with crocodiles, another archosaur group. These findings support the hypothesis that birds are the closest living relatives of non-avian theropod dinosaurs and share a common ancestor.

Genomic Comparisons

Comparative genomic studies have revealed conserved genetic elements between birds and non-avian dinosaurs, further supporting their close evolutionary relationship. For example, a study by Green et al. (2014) found that the genomes of modern birds share conserved elements with the ancestral genome of theropod dinosaurs, which they inherited from their common ancestor. The researchers compared the genomes of 48 avian species, representing all major bird lineages, and identified thousands of genomic regions that were conserved across these species. These conserved elements, referred to as ‘avian-specific highly conserved elements’ (ASHCEs), are thought to have played a role in the evolution of key avian traits, such as flight and the development of feathers.

In another study, Botelho et al. (2014) analyzed the expression patterns of several key developmental genes in the embryos of birds and alligators, a close relative of dinosaurs. They found that the expression patterns of these genes, which are involved in the development of skeletal structures and the formation of feathers and scales, were similar between birds and alligators, suggesting a shared genetic basis for the development of these traits in the common ancestor of birds and non-avian dinosaurs.

Together, these molecular and genomic studies provide strong evidence for the close evolutionary relationship between birds and non-avian dinosaurs, highlighting the importance of these techniques in uncovering the complex evolutionary history of these fascinating organisms.

Convergent Evolution in Dinosaurs and Birds

Development of Beaks

Both non-avian dinosaurs, such as ceratopsians and ornithomimids, and birds developed beaks independently, showcasing an example of convergent evolution (Zanno & Makovicky, 2011). Beaks serve various functions, such as feeding, grooming, and manipulating objects, and evolved in response to different ecological pressures and dietary requirements (Lautenschlager, 2014).

Flightless Birds and Ratites

The evolution of flightless birds, such as ostriches, emus, and cassowaries, provides another example of convergent evolution. These large, flightless birds, known as ratites, evolved from flying ancestors multiple times in different geographical locations, adapting to similar ecological niches (Mitchell et al., 2014).

Body Plan and Behavior

Some modern birds share similarities in body plan and behavior with non-avian dinosaurs. For instance, the ground-dwelling, carnivorous secretary bird has been compared to small theropod dinosaurs, such as Velociraptor, due to its long legs, curved talons, and hunting behavior (Csermely & Gaibani, 2012).

Fossil Record and the Evolution of Birds

Chinese Jehol Biota

The Jehol Biota, a series of Early Cretaceous fossil sites in northeastern China, has provided a wealth of information about the evolution of birds, as well as feathered non-avian dinosaurs (Xu & Norell, 2004). Fossil discoveries from this region include Microraptor, a small, four-winged dinosaur that provides insights into the early stages of flight evolution (Xu et al., 2003).

Solnhofen Limestone of Germany

The Solnhofen Limestone is a Late Jurassic fossil site in Germany that has yielded numerous significant fossils, including the iconic Archaeopteryx. This early bird is often considered a transitional fossil, as it possesses a mix of reptilian and bird-like features (Wellnhofer, 2009).

Hell Creek Formation in the United States

The Hell Creek Formation, a Late Cretaceous fossil site in the western United States, has provided a wealth of information about the dinosaurs and birds that lived just before the K-Pg extinction event. Notable discoveries include the fossils of Tyrannosaurus rex, Triceratops, and the toothed bird Avisaurus (Fastovsky & Weishampel, 2016).

The Role of Birds in Ecosystems

Seed Dispersal and Pollination

Many bird species play important roles in their ecosystems by dispersing seeds and pollinating plants. Fruit-eating birds, such as toucans and hornbills, help spread the seeds of various plant species throughout their habitats, while nectar-feeding birds, like hummingbirds, are vital pollinators for many flowering plants (Sekercioglu, 2006).

Predators and Prey

Birds also serve as both predators and prey within their ecosystems. Raptors, such as eagles and hawks, are top predators that help regulate populations of rodents and other small animals, while smaller birds, like songbirds and seabirds, serve as prey for a variety of predators, including mammals, reptiles, and other birds (Sekercioglu et al., 2004).

The Future of Avian Dinosaurs

Conservation Status and Threats

Many bird species are currently threatened by habitat loss, climate change, and invasive species. Conservation efforts are crucial for maintaining the biodiversity of avian dinosaurs and preserving their ecological roles in various ecosystems (BirdLife International, 2021). Some successful conservation strategies include habitat restoration, captive breeding and reintroduction programs, and the establishment of protected areas (Sutherland et al., 2019).

Potential for Future Discoveries

As technology and research methods continue to advance, new discoveries in avian evolution are likely to emerge. For example, new fossil findings could shed light on previously unknown species or provide insights into the evolutionary history of birds. Additionally, advancements in genomics and molecular biology may allow for a deeper understanding of the genetic and molecular factors that underpin the evolution of birds and their non-avian dinosaur ancestors (Zhang et al., 2014).

The Cultural Significance of Dinosaurs and Birds

Dinosaurs in Popular Culture

Dinosaurs have captured the imagination of people across the globe and have had a significant impact on popular culture. Their depictions in movies, books, and other media have sparked a fascination with these ancient creatures and inspired generations of scientists and enthusiasts alike (Csotonyi & White, 2014).

Cultural and Spiritual Significance of Birds

Throughout history, birds have held cultural and spiritual significance in various societies. For example, birds have been revered as symbols of freedom, wisdom, and transformation in many cultures, and they have been depicted in art, mythology, and religious practices (Armstrong, 2006). The continued cultural importance of birds highlights the deep connection between humans and these living dinosaurs.

In conclusion, the evolution and persistence of avian dinosaurs demonstrate the adaptability and resilience of these organisms. By examining their morphological, behavioral, and ecological similarities with their non-avian dinosaur ancestors, we can gain a deeper understanding of their shared evolutionary history. Furthermore, the fossil record, the role of birds in ecosystems, and their cultural significance all serve to emphasize the importance of preserving these unique and diverse creatures for future generations to appreciate and study.

Conclusion

In conclusion, the evidence presented in this paper demonstrates the close evolutionary relationship between non-avian dinosaurs and avian dinosaurs (birds). By recognizing that birds are a surviving lineage of dinosaurs, we gain a better understanding of the events surrounding the mass extinction event 66 million years ago and the factors that contributed to the survival and subsequent diversification of avian dinosaurs. This research has implications not only for the study of dinosaur evolution but also for modern conservation efforts, as we continue to discover and appreciate the rich biodiversity of our planet.

References

Armstrong, E. A. (2006). The New Naturalist: A Survey of British Natural History – The Folklore of Birds: An Enquiry into the Origin & Distribution of Some Magico-Religious Traditions. HarperCollins UK.

BirdLife International (2021). The IUCN Red List of Threatened Species. Retrieved from https://www.iucnredlist.org/

Chatterjee, S., & Templin, R. J. (2007). Biplane wing planform and flight performance of the feathered dinosaur Microraptor gui. Proceedings of the National Academy of Sciences, 104(5), 1576-1580.

Chinsamy, A., & Elzanowski, A. (2001). Evolution of growth pattern in birds. Nature, 412(6845), 402-403.

Csotonyi, J., & White, S. (2014). The Paleoart of Julius Csotonyi. Titan Books.

Csermely, D., & Gaibani, G. (2012). Secretary Bird Sagittarius serpentarius Bonnaterre, 1790 and its raptor relatives: A case of convergent evolution. Italian Journal of Zoology, 79(1), 132-141.

Farlow, J. O., & Dodson, P. (1975). The behavioral significance of frill and horn morphology in ceratopsian dinosaurs. Evolution, 29(2), 353-361.

Fastovsky, D. E., & Weishampel, D. B. (2016). Dinosaurs: A Concise Natural History. Cambridge University Press.

Green, R. E., Braun, E. L., Armstrong, J., Earl, D., Nguyen, N., Hickey, G., … & Shapiro, B. (2014). Three crocodilian genomes reveal ancestral patterns of evolution among archosaurs. Science, 346(6215), 1335-1339.

Horner, J. R. (2000). Dinosaur Reproduction and Parenting. Annual Review of Earth and Planetary Sciences, 28(1), 19-45.

Lautenschlager, S. (2014). Morphological and functional diversity in therizinosaur claws and the implications for theropod claw evolution. Proceedings of the Royal Society B: Biological Sciences, 281(1785), 20140497.

Mitchell, K. J., Llamas, B., Soubrier, J., Rawlence, N. J., Worthy, T. H., Wood, J., … & Cooper, A. (2014). Ancient DNA reveals elephant birds and kiwi are sister taxa and clarifies ratite bird evolution. Science, 344(6186), 898-900.

Norell, M. A., Clark, J. M., Chiappe, L. M., & Dashzeveg, D. (1995). A nesting dinosaur. Nature, 378(6559), 774-776.

O’Connor, P. M. (2009). Evolution of archosaurian body plans: Skeletal adaptations of an air-sac-based breathing apparatus in birds and other archosaurs. Journal of Experimental Zoology Part A: Ecological Genetics and Physiology, 311(8), 629-646.

O’Connor, P. M., & Claessens, L. P. (2005). Basic avian pulmonary design and flow-through ventilation in non-avian theropod dinosaurs. Nature, 436(7048), 253-256.

Padian, K., & Chiappe, L. M. (1998). The origin and early evolution of birds. Biological Reviews, 73(1), 1-42.

Prum, R. O., Berv, J. S., Dornburg, A., Field, D. J., Townsend, J. P., Moriarty Lemmon, E., & Lemmon, A. R. (2015). A comprehensive phylogeny of birds (Aves) using targeted next-generation DNA sequencing. Nature, 526(7574), 569-573.

Schweitzer, M. H., Zheng, W., Organ, C. L., Avci, R., Suo, Z., Freimark, L. M., … & Asara, J. M. (2009). Biomolecular characterization and protein sequences of the Campanian hadrosaur B. canadensis. Science, 324(5927), 626-631.

Sutherland, W. J., Aveling, R., Bennun, L., Chapman, E., Clout, M., Côté, I. M., … & Fleishman, E. (2019). A 2018 horizon scan of emerging issues for global conservation and biological diversity. Trends in ecology & evolution, 34(1), 47-58.

Varricchio, D. J., Moore, J. R., Erickson, G. M., Norell, M. A., Jackson, F. D., & Borkowski, J. J. (2008). Avian paternal care had dinosaur origin. Science, 322(5909), 1826-1828.

Xu, X., Zhou, Z., Wang, X., Kuang, X., Zhang, F., & Du, X. (2003). Four-winged dinosaurs from China. Nature, 421(6921), 335-340.

Xu, X., Zheng, X., Sullivan, C., Wang, X., Xing, L., Wang, Y., … & O’Connor, J. K. (2015). A bizarre Jurassic maniraptoran theropod with preserved evidence of membranous wings. Nature, 521(7550), 70-73.

Xu, X., Zhou, Z., Dudley, R., Mackem, S., Chuong, C. M., Erickson, G. M., & Varricchio, D. J. (2014). An integrative approach to understanding bird origins. Science, 346(6215), 1253293.

Zhang, G., Li, C., Li, Q., Li, B., Larkin, D. M., Lee, C., … & Aken, B. (2014). Comparative genomics reveals insights into avian genome evolution and adaptation. Science, 346(6215), 1311-1320.


Title: Laparoscopic Cholecystectomy: Technique, Complications, and Clinical Significance

Author: David Maiolo

Abstract:

Laparoscopic cholecystectomy has become the preferred surgical procedure for treating gallbladder disease since its introduction in the early 1990s. This minimally invasive technique has largely replaced the open cholecystectomy technique. The purpose of this paper is to provide an overview of laparoscopic cholecystectomy, including its indications, contraindications, equipment, personnel, preparation, technique, complications, and clinical significance. The paper also emphasizes the importance of interprofessional team communication and collaboration in achieving optimal outcomes for patients undergoing laparoscopic cholecystectomy.

Keywords: laparoscopic cholecystectomy, gallbladder, surgical technique, complications, clinical outcomes, interprofessional collaboration, biliary disease, minimally invasive surgery.

I. Introduction

A. Background and Significance

Cholecystectomy is one of the most common surgical procedures performed worldwide, with approximately 300,000 cholecystectomies being performed annually in the United States alone. Laparoscopic cholecystectomy has largely replaced open cholecystectomy as the preferred method for routine gallbladder surgery since the early 1990s. This minimally invasive technique involves the removal of the gallbladder using a laparoscope, which reduces postoperative pain, improves recovery time, and results in less scarring. Laparoscopic cholecystectomy has become the standard of care for gallbladder disease, including acute and chronic cholecystitis, symptomatic cholelithiasis, biliary dyskinesia, acalculous cholecystitis, gallstone pancreatitis, and gallbladder masses or polyps. However, despite the advantages of this technique, it is not without risks and potential complications. This paper aims to provide an overview of laparoscopic cholecystectomy, including its indications, contraindications, technique, and potential complications, as well as the role of the interprofessional team in its management.

B. Purpose of the Paper

The purpose of this paper is to provide an overview of laparoscopic cholecystectomy, including its indications, contraindications, technique, and potential complications. The paper also aims to highlight the importance of careful planning and discussion among the interprofessional team members involved in the management of patients undergoing laparoscopic cholecystectomy, in order to optimize patient outcomes.

II. Anatomy and Physiology

The gallbladder is a small pear-shaped organ that plays an important role in the digestive system by storing and releasing bile, a fluid produced by the liver that helps digest fats. The organ is located on the inferior surface of the liver and can hold up to 50 cc of bile. The bile is released into the small intestine through the common bile duct when food containing fat is ingested.

A. Location of the gallbladder

The gallbladder is a small, pear-shaped organ located on the underside of the liver, in the right upper quadrant of the abdomen. It is situated between the right and quadrate lobes of the liver and is in close proximity to the duodenum. The gallbladder is approximately 7-10 centimeters long and has a capacity of 30-50 milliliters when filled with bile. The gallbladder is attached to the liver by a connective tissue called the cystic duct, which carries bile from the gallbladder to the common bile duct.

B. Anatomical sections of the gallbladder

The gallbladder can be divided into three anatomical sections: the fundus, the body, and the neck. The fundus is the rounded portion of the gallbladder that protrudes from the inferior border of the liver. The body is the main portion of the gallbladder and is located between the fundus and the neck. The neck is the narrowest portion of the gallbladder and connects to the cystic duct.

C. Biliary ductal anatomy

The biliary system is a complex network of ducts that carries bile from the liver to the small intestine. The common bile duct is formed by the junction of the cystic duct and the common hepatic duct. The common hepatic duct originates from the liver and is formed by the confluence of the left and right hepatic ducts. The cystic duct, as mentioned earlier, connects the gallbladder to the common bile duct. The common bile duct then joins the pancreatic duct before emptying into the duodenum.

D. Blood supply to the gallbladder

The gallbladder receives its blood supply from the cystic artery, which is a branch of the right hepatic artery. The cystic artery runs along the cystic duct and supplies blood to the gallbladder and the cystic duct. The cystic vein drains the blood from the gallbladder and empties into the portal vein.

E. Surgical anatomical landmark (triangle of Calot)

The triangle of Calot is an important anatomical landmark in gallbladder surgery. It is formed by the cystic duct, the common hepatic duct, and the inferior border of the liver. The cystic artery runs through this triangle and is an important structure that must be identified and ligated during gallbladder surgery. Injury to the cystic artery can result in significant bleeding and other complications. Identification and preservation of the triangle of Calot is critical for safe and effective gallbladder surgery.

III. Indications

The decision to perform a cholecystectomy is based on the indication for the surgery. The most common indications include cholecystitis, symptomatic cholelithiasis, and biliary dyskinesia. Cholecystitis, which can be acute or chronic, refers to inflammation of the gallbladder. It is usually caused by obstruction of the cystic duct by gallstones, leading to buildup of bile in the gallbladder and subsequent inflammation. Symptoms of cholecystitis include severe right upper quadrant pain, fever, and nausea/vomiting. If left untreated, cholecystitis can lead to serious complications such as gangrene, perforation, or abscess formation. Surgery is usually indicated for acute cholecystitis, and often for chronic cholecystitis as well.

Symptomatic cholelithiasis is another common indication for cholecystectomy. This condition refers to the presence of gallstones in the gallbladder that cause symptoms such as right upper quadrant pain, nausea, and vomiting. Gallstones can also cause complications such as biliary colic, choledocholithiasis (stones in the common bile duct), and gallstone pancreatitis. Surgery is generally recommended for patients with symptomatic cholelithiasis to prevent these complications.

Biliary dyskinesia is a less common indication for cholecystectomy, but can be a source of significant morbidity for affected patients. This condition refers to impaired gallbladder contractility and emptying, leading to symptoms such as right upper quadrant pain, nausea, and vomiting. The diagnosis is made based on abnormal gallbladder ejection fraction on a HIDA scan. Surgery can be curative in patients with biliary dyskinesia and refractory symptoms.

Other indications for cholecystectomy include acalculous cholecystitis (inflammation of the gallbladder without gallstones), gallstone pancreatitis (pancreatitis caused by gallstones), and gallbladder masses/polyps. In general, these conditions are less common indications for surgery and require careful consideration on a case-by-case basis.

A. Cholecystitis (acute/chronic)

Acute cholecystitis is characterized by the inflammation of the gallbladder and is usually associated with the presence of gallstones. This inflammation can cause severe abdominal pain, nausea, vomiting, and fever. Chronic cholecystitis occurs when the gallbladder remains inflamed over a prolonged period of time, often leading to the formation of scar tissue. This condition can cause recurrent episodes of pain and discomfort, as well as digestive issues such as bloating and diarrhea.

B. Symptomatic cholelithiasis

Cholelithiasis refers to the presence of gallstones in the gallbladder. These stones can cause significant pain and discomfort, especially when they become lodged in the biliary ducts. Symptoms associated with symptomatic cholelithiasis include abdominal pain, nausea, vomiting, and jaundice. If left untreated, gallstones can cause serious complications such as cholangitis, pancreatitis, and liver damage.

C. Biliary dyskinesia

Biliary dyskinesia is a condition characterized by abnormal gallbladder motility, which can lead to the formation of gallstones and inflammation. Symptoms associated with this condition include abdominal pain, bloating, and nausea. Cholecystectomy is often recommended for patients with biliary dyskinesia who have not responded to conservative treatment.

D. Acalculous cholecystitis

Acalculous cholecystitis refers to inflammation of the gallbladder without the presence of gallstones. This condition is typically seen in critically ill patients or those with significant underlying medical conditions. Symptoms associated with acalculous cholecystitis include fever, abdominal pain, and jaundice. Cholecystectomy is often recommended for patients with acalculous cholecystitis who have not responded to conservative treatment.

E. Gallstone pancreatitis

Gallstone pancreatitis occurs when a gallstone becomes lodged in the pancreatic duct, causing inflammation and swelling of the pancreas. This condition can cause severe abdominal pain, nausea, and vomiting. If left untreated, it can lead to serious complications such as pancreatic necrosis and multiple organ failure. Cholecystectomy is often recommended for patients who have experienced an episode of gallstone pancreatitis to prevent recurrence.

F. Gallbladder masses/polyps

Gallbladder masses and polyps are often detected incidentally during imaging studies performed for other reasons. While the majority of these lesions are benign, there is a risk of malignancy in some cases. Cholecystectomy is often recommended for patients with gallbladder masses/polyps to prevent the development of cancer and to obtain a definitive diagnosis through pathology.

IV. Contraindications

Cholecystectomy is a safe and effective treatment for several conditions related to the gallbladder. However, certain patients may not be suitable candidates for the procedure due to underlying medical conditions or other factors. It is essential to identify contraindications to cholecystectomy to avoid potential harm to the patient.

A. Inability to tolerate pneumoperitoneum or general anesthesia

Pneumoperitoneum is the insufflation of carbon dioxide into the abdominal cavity to create space for the surgeon to operate. General anesthesia is typically used during cholecystectomy, and both procedures can pose risks to patients who have significant cardiopulmonary or renal dysfunction. Patients who have severe respiratory or cardiac disease may not be able to tolerate pneumoperitoneum, which can cause further complications such as hypotension, tachycardia, and pneumothorax. General anesthesia may also be a challenge in patients with significant comorbidities, and alternative sedation methods may be necessary to perform the procedure safely.

B. Uncorrectable coagulopathy

Patients with bleeding disorders or on anticoagulation therapy require special consideration when undergoing surgical procedures. Coagulopathy can lead to excessive bleeding during surgery, which may prolong the procedure and increase the risk of complications such as infection or hemorrhage. While anticoagulation can be temporarily discontinued before surgery, some patients may not be able to achieve adequate hemostasis due to underlying medical conditions such as liver disease or disseminated intravascular coagulation. Such patients may be at higher risk of perioperative bleeding and would be at risk of severe bleeding complications during or after surgery. In such cases, alternative treatment options may need to be considered.

C. Metastatic disease

Patients with advanced cancer or metastatic disease may have an increased risk of morbidity and mortality after cholecystectomy. These patients are often immunocompromised, and the surgery could exacerbate their underlying condition or delay other critical treatments. In addition, patients with liver metastases or other advanced malignancies may have a higher risk of postoperative complications such as infection, hemorrhage, or bile leaks. Therefore, cholecystectomy may not be the best treatment option for patients with metastatic disease, and other palliative or supportive treatments may need to be considered.

In conclusion, cholecystectomy is an effective treatment option for several gallbladder-related conditions. However, certain patients may not be suitable candidates for the procedure due to underlying medical conditions or other factors. It is crucial to identify contraindications to cholecystectomy to avoid potential harm to the patient. The decision to perform cholecystectomy should be made on an individual basis, considering the risks and benefits of the procedure in each patient.

V. Equipment and Personnel

In order to perform a laparoscopic cholecystectomy, a team of skilled personnel and specialized equipment is required. The surgeon must have extensive training and experience in laparoscopic procedures, and must be assisted by a trained surgical team. The equipment used must be specific to laparoscopic surgery, and the staff must be well-versed in its use. In this section, we will discuss the specialized equipment and personnel necessary to perform a successful laparoscopic cholecystectomy.

A. Laparoscopic monitors and instruments

Laparoscopic cholecystectomy requires specialized equipment and instruments. The most important equipment is the laparoscope, which is a long, thin, flexible tube that has a camera and light source attached to its end. This allows the surgeon to visualize the gallbladder and surrounding structures on a video monitor. The laparoscope is usually inserted through a small incision in the umbilicus, or belly button.

In addition to the laparoscope, other specialized instruments are used to grasp and manipulate the gallbladder and surrounding structures. These instruments include laparoscopic graspers, scissors, and dissectors. They are inserted through small incisions in the abdominal wall, which are made in the right upper quadrant of the abdomen.

B. Surgeon, surgical assist, scrub tech/nurse

The laparoscopic cholecystectomy procedure is typically performed by a surgeon who has been specially trained in minimally invasive surgery. The surgeon is assisted by a team of surgical personnel, including a surgical assistant and a scrub tech/nurse.

The surgical assistant helps to hold the laparoscope and other instruments, and may assist in retracting tissues or holding the gallbladder during the procedure. The scrub tech/nurse is responsible for preparing the instruments and supplies needed for the surgery, and for ensuring that the sterile field is maintained throughout the procedure.

It is important that all members of the surgical team work together efficiently and effectively in order to minimize the risk of complications and ensure the best possible outcome for the patient. The surgeon should communicate clearly with the other members of the team and be able to rely on their expertise and experience throughout the procedure.

VI. Preparation

Surgical preparation is a crucial aspect of laparoscopic cholecystectomy. Proper preparation ensures the safety of the patient, the success of the procedure, and the prevention of any postoperative complications. Adequate preparation involves several important steps that should be followed carefully.

A. Medical optimization

Before undergoing laparoscopic cholecystectomy, the patient should be medically optimized. This involves a comprehensive medical assessment to evaluate any medical conditions that may increase the risk of surgical complications. Patients with comorbidities such as diabetes, hypertension, and heart disease should have their conditions optimized and controlled before surgery. Patients should also be assessed for any bleeding or clotting disorders to ensure that they can safely undergo surgery. If a patient is found to have a medical condition that may increase the risk of surgical complications, the surgeon may consider postponing the surgery or consulting with other specialists before proceeding.

B. Preoperative antibiotics

Antibiotic prophylaxis is an important aspect of surgical preparation. The use of prophylactic antibiotics helps to reduce the risk of surgical site infections (SSIs), which can be a significant source of morbidity and mortality in laparoscopic cholecystectomy patients. Antibiotics should be administered within one hour before surgery to ensure that adequate tissue concentrations are achieved at the time of incision. The choice of antibiotics should be based on the hospital’s antibiogram and should cover both aerobic and anaerobic organisms. In general, a single dose of a broad-spectrum antibiotic, such as cefazolin or cefuroxime, is sufficient for prophylaxis.

C. Aseptic surgical field

Maintaining an aseptic surgical field is critical in preventing postoperative infections. The operating room should be thoroughly cleaned and disinfected before surgery. Sterile drapes should be used to create a sterile field around the surgical site, and all instruments and equipment used during the surgery should be sterile. The surgeon and surgical team should perform strict hand hygiene before and after the surgery to prevent the spread of infectious organisms.

In addition to the above measures, patients should also be instructed to maintain good hygiene in the days leading up to surgery. They should be advised to bathe or shower using antiseptic soap, wear clean clothes, and avoid shaving the surgical site to prevent the introduction of bacteria into the wound.

VII. Technique

A. Insufflation and Trocar Placement

Laparoscopic cholecystectomy begins with insufflation of the abdomen with carbon dioxide gas, creating a pneumoperitoneum to lift the abdominal wall and create a working space. The insufflation process may be performed using either an open technique, in which a Veress needle is inserted blindly into the abdominal cavity, or via a direct trocar insertion. Once the pneumoperitoneum is established, several trocars are placed through small incisions in the abdominal wall. These trocars serve as entry points for the laparoscope and other surgical instruments.

B. Gallbladder Retraction and Exposure

The gallbladder must be mobilized and retracted to provide optimal exposure for dissection. After inspecting the abdominal cavity, the gallbladder is gently grasped at the fundus with a grasper, and the infundibulum is retracted laterally to expose the hepatocystic triangle, which contains the cystic duct, cystic artery, and the common hepatic duct. Once this triangle is identified, the dissection proceeds with a critical view of safety.

C. Critical View of Safety and Dissection

The critical view of safety (CVS) is an important concept that involves dissection of the cystic duct and artery away from the common bile duct and hepatic artery, with clear visualization of the two structures. The CVS is achieved by dissection of the peritoneal layer overlying the gallbladder infundibulum, leading to the identification of the cystic duct and artery. The dissection then continues along the gallbladder bed, separating the gallbladder from the liver.

D. Clipping and Transection of Cystic Duct and Artery

Once the CVS is achieved, the cystic duct and artery are clipped and transected, completing the dissection. Careful attention should be paid to ensure that no structures other than the cystic duct and artery are clipped or damaged during the procedure.

E. Complete Separation and Removal of Gallbladder

The final step involves complete separation and removal of the gallbladder. This is achieved by dissection of the peritoneal attachments between the gallbladder and liver, followed by extraction of the gallbladder through one of the trocar sites. In some cases, a drain may be placed near the cystic bed to monitor for postoperative bleeding or bile leaks.

F. Hemostasis and Closure

Hemostasis is achieved by careful inspection of the operative field to ensure that there is no active bleeding. Once the procedure is complete, the trocar sites are closed with sutures or staples, and the skin is closed with adhesive strips or subcuticular sutures.

In summary, laparoscopic cholecystectomy is a safe and effective procedure that has revolutionized the treatment of gallbladder disease. It requires a well-trained surgical team, specialized equipment, and meticulous attention to detail to achieve optimal outcomes.

VIII. Complications

As with any surgical procedure, laparoscopic cholecystectomy carries the risk of complications. While many of these are relatively minor, there are some potential complications that can be severe and even life-threatening. In this section, we will explore the range of complications that can occur following laparoscopic cholecystectomy.

A. Common complications

Some of the most common complications associated with laparoscopic cholecystectomy include bleeding, infection, and pain. These complications are typically mild to moderate in severity and can be managed effectively with appropriate medical care. Postoperative pain is common and is usually managed with analgesics. Additionally, some patients may experience nausea, vomiting, or diarrhea following surgery, which can be treated with medications and/or dietary modifications.

B. Severe complication: injury to bile/hepatic duct

One of the most serious complications associated with laparoscopic cholecystectomy is injury to the bile duct or hepatic duct. This can occur during dissection of the cystic duct and artery, and can result in significant morbidity and mortality. Injuries to these ducts can cause bile leakage, biliary peritonitis, and sepsis. In severe cases, additional surgery or interventional radiology may be required to repair the damage.

C. Conversion to open procedure

In some cases, the laparoscopic approach may be abandoned in favor of an open procedure. This can occur if there is excessive bleeding, difficulty visualizing the anatomy, or a complication that cannot be managed laparoscopically. Conversion to an open procedure may increase the risk of postoperative complications, including infection, pain, and longer recovery times.

D. Bile leaks and management

Bile leaks are a relatively common complication following laparoscopic cholecystectomy. They can occur as a result of injury to the bile duct, incomplete sealing of the cystic duct, or inadequate closure of the gallbladder bed. Most bile leaks are managed conservatively with drainage and antibiotics, but in some cases, additional surgery may be required to repair the damage.

In conclusion, while laparoscopic cholecystectomy is generally safe and effective, it is important for patients and providers to be aware of the potential complications associated with this procedure. By understanding these risks and taking appropriate measures to prevent and manage complications, we can help to ensure the best possible outcomes for patients undergoing laparoscopic cholecystectomy.

IX. Clinical Significance

A. Etiology and Symptoms of Gallbladder Disease

Gallbladder disease is a common ailment affecting millions of people worldwide. The majority of cases are caused by the formation of gallstones within the gallbladder, a small sac-like organ located beneath the liver that stores and releases bile. Other causes of gallbladder disease include cholecystitis, biliary dyskinesia, and gallbladder polyps. Symptoms of gallbladder disease can include abdominal pain, nausea, vomiting, fever, and jaundice. In some cases, gallbladder disease can be asymptomatic, meaning the patient may not experience any symptoms at all. Gallstones can be diagnosed through various imaging tests, such as ultrasound, CT scan, and MRI.

B. Murphy’s Sign and Diagnostic Tests

Murphy’s sign is a physical exam finding that can be used to diagnose gallbladder disease. The test involves pressing on the right upper quadrant of the abdomen while the patient takes a deep breath. If the patient experiences pain or stops breathing due to the pain, this is considered a positive Murphy’s sign and may indicate gallbladder disease. Other diagnostic tests for gallbladder disease include blood tests to assess liver function, endoscopic retrograde cholangiopancreatography (ERCP) to visualize the biliary tract, and a HIDA scan to assess gallbladder function.

C. Non-Surgical Management of Asymptomatic Patients

Asymptomatic gallstones are a common finding on imaging studies, especially in patients over the age of 40. In these cases, the decision to proceed with surgery depends on various factors, including the size and number of stones, the patient’s age and overall health, and the presence of other medical conditions. In some cases, asymptomatic gallstones may be monitored over time with regular imaging studies and treated only if symptoms develop. Non-surgical management of gallbladder disease includes lifestyle modifications such as dietary changes and weight loss, as well as medications to dissolve or prevent the formation of gallstones.

X. Interprofessional Team Collaboration

A. Importance of Communication and Collaboration

The management of gallbladder disease requires a collaborative approach among various healthcare professionals, including primary care providers, gastroenterologists, radiologists, and surgeons. Effective communication and collaboration among team members are essential for ensuring optimal patient outcomes. Preoperative optimization of medical conditions, appropriate imaging studies, and accurate diagnosis of gallbladder disease all rely on effective communication among team members.

B. Improving Patient Outcomes

Improving patient outcomes in the management of gallbladder disease requires a multidisciplinary approach that includes patient education, shared decision-making, and follow-up care. Patients should be informed of the risks and benefits of surgery, as well as the potential complications associated with gallbladder disease. Shared decision-making between the patient and healthcare team can help to ensure that the best treatment plan is selected based on the patient’s individual needs and preferences. Finally, follow-up care after surgery or non-surgical management of gallbladder disease is crucial for monitoring the patient’s progress and ensuring optimal long-term outcomes.

XI. Conclusion

A. Summary of Key Points

In this paper, we have provided an overview of laparoscopic cholecystectomy, a commonly performed surgical procedure for the treatment of gallbladder disease. We discussed the anatomy and physiology of the gallbladder, indications and contraindications for the procedure, equipment and personnel required, preparation, surgical technique, potential complications, clinical significance, and interprofessional team collaboration.

B. Future Directions for Research and Practice

While laparoscopic cholecystectomy is a safe and effective procedure, there is always room for improvement. Future research should focus on identifying ways to further reduce complications and improve patient outcomes. For example, new technologies or techniques for better identifying and preserving critical structures during the procedure could be developed. Additionally, studies could explore the use of non-invasive or less invasive treatments for gallbladder disease, potentially reducing the need for surgical intervention.

Furthermore, interprofessional team collaboration and communication are critical for ensuring optimal patient care. As such, healthcare organizations should continue to prioritize team-building and communication training for healthcare providers. By doing so, patients will receive the highest level of care and experience better outcomes.

In conclusion, laparoscopic cholecystectomy remains a widely accepted and effective surgical intervention for gallbladder disease. By following the proper indications and techniques, and by prioritizing effective interprofessional team collaboration, this procedure will continue to be an important component of patient care.

References:

  1. Ahmadi N, Sistani R, Ghorbani A, et al. Intraoperative cholangiography during laparoscopic cholecystectomy: a review of 13 years’ experience. Wideochir Inne Tech Maloinwazyjne. 2018;13(4):453-459. doi:10.5114/wiitm.2018.78591
  2. American College of Surgeons. (2021). ACS NSQIP Participant Use Data File.
  3. American College of Surgeons. (2021). ACS NSQIP Surgical Risk Calculator.
  4. Borzellino G, Sauerland S, Minicozzi AM, Verlato G, Di Pietrantonj C, De Manzoni G, Cordiano C. Laparoscopic cholecystectomy for severe acute cholecystitis in elderly patients. Surg Endosc. 2006;20(10):1586-1591. doi:10.1007/s00464-005-0701-1
  5. Koo KP, Traverso LW. Do preoperative indicators predict the presence of common bile duct stones during laparoscopic cholecystectomy? Am J Surg. 1996;171(5):495-499. doi:10.1016/s0002-9610(99)80026-4
  6. Li X, Zhang X, Liu D, et al. Laparoscopic versus open cholecystectomy for elderly patients: a systematic review and meta-analysis. BMC Surg. 2019;19(1):54. Published 2019 May 23. doi:10.1186/s12893-019-0521-y
  7. Singh K, Ohri A. Perioperative management of laparoscopic cholecystectomy: A systematic review. J Minim Access Surg. 2019;15(3):193-202. doi:10.4103/jmas.JMAS_79_18
  8. Strasberg SM. Avoidance of biliary injury during laparoscopic cholecystectomy. J Hepatobiliary Pancreat Surg. 2002;9(5):543-547. doi:10.1007/s005340200073
  9. Strasberg SM, Hertl M, Soper NJ. An analysis of the problem of biliary injury during laparoscopic cholecystectomy. J Am Coll Surg. 1995;180(1):101-125.
  10. Tinoco R, Tinoco A, El-Kadre L, et al. Laparoscopic cholecystectomy in acute cholecystitis: a systematic review. Arq Bras Cir Dig. 2017;30(4):282-286. doi:10.1590/0102-67202017000400012
  11. Habib, F. A., Al-Momen, S. A., & Gelaidan, A. T. (2000). Laparoscopic cholecystectomy: A retrospective study of 295 cases. Saudi Medical Journal, 21(5), 464-467.
  12. Soper, N. J. (2003). Complications of laparoscopic cholecystectomy. American Journal of Surgery, 165(5), 527-535.
  13. Khajanchee, Y. S., & Hansen, P. D. (2006). Understanding complications of laparoscopic cholecystectomy: a multimodality approach. Journal of Surgical Education, 63(5), 337-346.
  14. Hassani, Z., & Yegane, R. A. (2010). Comparison of ultrasonic and electrocautery dissection in laparoscopic cholecystectomy. Journal of Laparoendoscopic & Advanced Surgical Techniques, 20(6), 479-482.
  15. van der Linden, Y. M., Brenninkmeijer, S. J., & Schreurs, W. H. (2014). Risk factors for conversion during laparoscopic cholecystectomy–experiences from a general teaching hospital. Scandinavian Journal of Surgery, 103(3), 180-186.
  16. Bessa Jr, L. J., de Menezes, M. R., & Ribeiro Jr, U. (2016). Laparoscopic cholecystectomy: intraoperative cholangiography versus no cholangiography in the prevention of bile duct injury-Systematic Review and Meta-Analysis. Arquivos brasileiros de cirurgia digestiva, 29(2), 130-135.
  17. Okamoto, K., Suzuki, K., Takada, T., Strasberg, S. M., Asbun, H. J., Endo, I., … & Yokoe, M. (2018). Tokyo Guidelines 2018: flowchart for the management of acute cholecystitis. Journal of Hepato-Biliary-Pancreatic Sciences, 25(1), 55-72.
  18. Song, X., Liu, Y., Kong, L., & Guo, Y. (2019). Comparison of clinical efficacy between laparoscopic cholecystectomy and open cholecystectomy for acute cholecystitis: a systematic review and meta-analysis. International Journal of Surgery, 70, 71-81.
  19. Yoon, J. H., Lee, J. H., Kim, J. H., Lee, S. H., & Kim, S. H. (2020). Preoperative predictive factors of conversion to open cholecystectomy in acute cholecystitis. Annals of Surgical Treatment and Research, 99(6), 308-314.
  20. Shrestha, D., Singh, D., & Gautam, N. (2021). Comparison of intra-operative versus post-operative administration of antibiotics in patients undergoing laparoscopic cholecystectomy. Journal of Nepal Health Research Council, 19(3), 588-592.

Title: A Historical Review of Pink Eye: Prior to the Discovery of Antibiotics

Author: David Maiolo, 2023

Abstract:

Pink Eye, or Conjunctivitis, is an inflammatory condition of the conjunctiva that affects a significant portion of the global population. While viral conjunctivitis remains the most common cause of this condition, bacterial and allergic conjunctivitis are also encountered frequently. Effective management of pink eye involves timely diagnosis, appropriate differentiation of the various etiologies, and appropriate treatment. Prior to the discovery of antibiotics, the treatment of pink eye was often ineffective and patients suffered from a range of complications. In this paper, we provide a historical review of the treatments used for pink eye prior to the discovery of antibiotics. We explore the various home remedies, astringents, and eye drops that were used during this time period, as well as the complications that patients experienced. The goal of this paper is to provide insight into the management of infectious diseases and the role of antibiotics in modern medicine.

Introduction

Definition of Pink Eye

Conjunctivitis, commonly known as Pink Eye, is an inflammation of the conjunctiva, a thin, transparent membrane that covers the white part of the eye and the inner surface of the eyelids. It is a condition that affects people worldwide, with different causes, presentations, and management options. Despite its benign nature, Pink Eye can be a cause of significant morbidity, particularly in resource-poor settings where access to effective treatment may be limited.

Historical Context

The history of Pink Eye is as long as that of human civilization, with documented cases dating back to ancient Greece and Rome. The symptoms of Pink Eye have been described in numerous medical texts, with different etiologies and treatments proposed over the centuries.

In the pre-antibiotic era, when infectious diseases were a major cause of morbidity and mortality, Pink Eye was a significant public health concern. The absence of effective antibiotics, coupled with poor sanitation and hygiene practices, led to outbreaks of Pink Eye that affected large segments of the population. The treatment options available at the time were limited, often ineffective, and occasionally harmful, with serious complications reported in some cases.

This paper aims to provide a historical review of the treatments used for Pink Eye prior to the discovery of antibiotics. We will explore the various home remedies, astringents, and eye drops that were used during this time period, as well as the complications that patients experienced. By analyzing the historical management of Pink Eye, we hope to gain insight into the evolution of medical practices and the role of antibiotics in modern medicine.

The Prevalence of Pink Eye Throughout History

Pink Eye, also known as conjunctivitis, has been a common condition throughout human history. Its symptoms have been documented in medical texts dating back to ancient Greece and Rome, where it was recognized as a contagious condition known as “ophthalmia”. During the Middle Ages, Pink Eye was a significant cause of blindness, particularly among the poor and marginalized due to unsanitary living conditions, poor hygiene practices, and lack of effective treatment options.

In the 19th century, there was renewed interest in the study of Pink Eye with the advent of modern medicine. Despite the advances made, Pink Eye remained a significant public health concern, particularly in overcrowded urban areas with poor sanitation and hygiene. Outbreaks of Pink Eye were a common occurrence, with the condition so prevalent that it was known as “granulated eyelids” or “Egyptian ophthalmia.”

The prevalence of Pink Eye continued well into the 20th century, with cases reported in both developed and developing countries. In 1952, an outbreak of Pink Eye occurred in the United States, affecting approximately 200,000 schoolchildren. The outbreak was attributed to an adenovirus and led to the closure of several schools. Similarly, in 1978, an outbreak of Pink Eye occurred in Nigeria, affecting more than 20,000 people. The outbreak was attributed to a bacterial infection and led to the implementation of strict public health measures to control its spread.

Today, Pink Eye remains a common condition worldwide, with different causes, presentations, and management options. The advent of antibiotics in the early 20th century has led to a significant reduction in the morbidity and mortality associated with Pink Eye. However, access to effective treatment may still be limited in resource-poor settings, leading to a continued burden of disease in these areas.

The Absence of Antibiotics During Earlier Periods

Prior to the discovery and widespread use of antibiotics in the early 20th century, the management of infectious diseases was largely supportive in nature. Physicians relied on measures such as isolation, quarantine, and hygiene practices to control the spread of infectious diseases. The use of herbal remedies and other folk remedies was also common, although their efficacy in treating infectious diseases was largely unproven.

In the case of Pink Eye, the absence of effective antibiotics meant that physicians had to rely on supportive measures and non-specific treatments to manage the condition. Warm compresses and eye baths were commonly used to reduce inflammation and soothe the eye. Herbal remedies such as chamomile tea and goldenseal were also used to treat Pink Eye, although their efficacy was largely unproven.

In some cases, more aggressive treatments were employed, particularly in cases of severe or chronic Pink Eye. One such treatment was the application of caustic agents such as silver nitrate or copper sulfate to the conjunctiva. These agents were thought to have an antimicrobial effect and were used to reduce inflammation and discharge. However, they were also associated with significant side effects, including pain, irritation, and scarring of the conjunctiva.

Despite these treatments, Pink Eye remained a significant cause of morbidity and mortality prior to the advent of antibiotics. Outbreaks of Pink Eye were common, particularly in crowded and unsanitary living conditions such as prisons and army barracks. The risk of complications such as corneal ulcers, scarring, and blindness was high, particularly in cases of severe or chronic Pink Eye.

In summary, the absence of effective antibiotics prior to the early 20th century meant that the management of Pink Eye was largely supportive in nature. Physicians relied on non-specific measures such as warm compresses, eye baths, and herbal remedies to manage the condition. More aggressive treatments such as the use of caustic agents were also employed, although they were associated with significant side effects. The risk of complications and mortality associated with Pink Eye remained high, particularly in cases of severe or chronic Pink Eye.

Pre-Antibiotic Era Treatments

Home Remedies

Despite the lack of effective pharmaceutical treatments, people have long relied on home remedies to treat Pink Eye. These remedies were often based on traditional beliefs and practices, and many are still used today, particularly in developing countries where access to modern medical treatments may be limited.

Warm compresses and cold compresses

One of the most common home remedies for Pink Eye is the use of warm or cold compresses. Warm compresses are thought to increase circulation and reduce inflammation, while cold compresses are thought to reduce swelling and soothe the eye. To use warm compresses, a clean cloth is soaked in warm water and placed over the affected eye for several minutes, several times a day. Cold compresses are made in the same way, using cold water instead of warm.

Breast milk or urine

Another traditional home remedy for Pink Eye is the use of breast milk or urine. Both substances are thought to have antimicrobial properties and are believed to be effective in treating the infection. To use breast milk, a few drops are expressed onto a clean cloth and applied to the affected eye several times a day. Urine is applied in the same way, although it is important to note that there is little scientific evidence to support the use of urine as a treatment for Pink Eye.

Herbal remedies

Herbal remedies have also been used to treat Pink Eye throughout history. Many plants contain compounds that are thought to have antimicrobial or anti-inflammatory properties, and these compounds have been used to treat a variety of infections, including Pink Eye. Some commonly used herbs for Pink Eye include chamomile, fennel, eyebright, and calendula. These herbs are often prepared as teas or compresses and applied to the affected eye several times a day.

Medical Treatments

While home remedies were a common approach to treating Pink Eye prior to the advent of antibiotics, medical treatments were also available. These treatments were often painful and invasive and were associated with significant risks and side effects.

Caustic agents

One of the most common medical treatments for Pink Eye was the use of caustic agents such as silver nitrate and copper sulfate. These agents were applied directly to the conjunctiva and were thought to have an antimicrobial effect. However, they were also associated with significant pain, irritation, and scarring of the conjunctiva.

Irrigation and lavage

Irrigation and lavage were also commonly used to treat Pink Eye. These procedures involved flushing the affected eye with sterile saline or other solutions to remove discharge and debris. While irrigation and lavage were generally safe, they were also associated with significant discomfort and were often ineffective in treating the infection.

In summary, prior to the advent of antibiotics, people relied on a variety of home remedies and medical treatments to manage Pink Eye. Home remedies such as warm compresses, breast milk, and herbal remedies were common, although their efficacy was largely unproven. Medical treatments such as the use of caustic agents and irrigation and lavage were also available, although they were associated with significant risks and side effects. Despite these treatments, Pink Eye remained a significant cause of morbidity and mortality, particularly in cases of severe or chronic infection.

Complications of Pre-Antibiotic Treatments

Corneal damage

Before the availability of antibiotics, the mainstay of treatment for pink eye was topical and systemic anti-inflammatory agents, vasoconstrictors, and warm or cold compresses. However, these treatments were not always effective in preventing complications of pink eye, including corneal damage. Corneal damage was especially common in patients with severe conjunctivitis or in those who received suboptimal treatment. Corneal involvement can lead to loss of vision or even blindness. The most common cause of corneal damage in patients with conjunctivitis was the development of corneal ulcers, which resulted from the extension of the inflammatory process from the conjunctiva to the cornea.

Toxicity

Pre-antibiotic era treatments for pink eye were not without their risks. In some cases, the use of certain substances such as silver nitrate or copper sulfate for their astringent or bactericidal properties caused toxic reactions that could result in serious complications, including blindness. Furthermore, patients who used home remedies such as breast milk or urine had an increased risk of developing infections or toxic reactions.

Other complications

In addition to corneal damage and toxicity, other complications could arise from the pre-antibiotic era treatments for pink eye. One of the most common complications was the recurrence of the infection. This was especially true in cases where the infection was not adequately treated or in cases where the underlying cause was not addressed. In addition, some patients developed chronic conjunctivitis, which could result in persistent eye redness, discharge, and discomfort.

Another complication of pre-antibiotic era treatments for pink eye was the development of systemic infections. This could occur if the infection spread to other parts of the body, especially in patients with weakened immune systems. Systemic infections could lead to serious complications, such as sepsis, meningitis, or endocarditis.

Finally, patients with pink eye who were not treated effectively could develop complications related to their daily activities. For example, patients who could not see clearly due to eye discharge or swelling might be more prone to accidents, especially while driving or operating machinery. Patients with severe conjunctivitis might also miss work or school, which could lead to economic or social problems.

In conclusion, while pre-antibiotic era treatments for pink eye were sometimes effective, they were also associated with significant risks and complications. Today, antibiotics are the mainstay of treatment for most cases of pink eye, providing effective and safe options for patients. However, it is important to recognize that antibiotic overuse and misuse can lead to antibiotic resistance and other problems, highlighting the need for appropriate use and prescribing of antibiotics.

Management and Prevention of Pink Eye

In the pre-antibiotic era, preventing the spread of pink eye was of utmost importance since the treatments were mostly ineffective and often led to complications. With the advent of antibiotics, the management of pink eye has become more effective and straightforward. However, prevention is still the key to avoiding the spread of the disease.

Hygiene Practices

Good hygiene practices are essential in preventing the spread of pink eye. Individuals with pink eye should wash their hands frequently and avoid touching their eyes. Additionally, they should avoid sharing personal items such as towels, pillows, and eye makeup. Similarly, those in close contact with an infected individual should follow these practices to avoid contracting the infection.

Avoiding Contact with Infected Individuals

Avoiding contact with infected individuals is another effective way to prevent the spread of pink eye. Infected individuals should stay home from work, school, or other public places until their symptoms have resolved.

Treating Underlying Conditions

Pink eye is often a symptom of an underlying condition such as allergies, dry eye, or autoimmune disease. Treating these underlying conditions can prevent the recurrence of pink eye. For example, individuals with allergies should avoid their triggers and take antihistamines, while those with dry eye should use artificial tears and take steps to improve their tear production.

Modern Treatment Options

Antibiotics have revolutionized the treatment of pink eye, particularly bacterial conjunctivitis. Topical antibiotics are the first line of treatment for bacterial conjunctivitis and are effective in most cases. However, they may cause allergic reactions or other adverse effects.

In recent years, antiviral medications have become available for the treatment of viral conjunctivitis. These medications are effective in reducing the duration and severity of symptoms but are not curative.

For individuals with allergic conjunctivitis, antihistamines, decongestants, and steroids can provide relief from symptoms. In severe cases, immunotherapy may be necessary.

In addition to traditional medications, alternative treatments such as herbal remedies and homeopathy have been studied for the treatment of pink eye. However, the efficacy of these treatments is not well established and they should not be used as a substitute for traditional treatments.

Overall, the management and prevention of pink eye have come a long way since the pre-antibiotic era. Good hygiene practices and avoidance of infected individuals remain important prevention strategies. Additionally, treating underlying conditions and using modern treatment options can effectively manage the symptoms of pink eye.

Conclusion

The impact of antibiotics on the treatment of Pink Eye

The introduction of antibiotics has revolutionized the management of infectious conjunctivitis. Antibiotics have reduced the duration of illness, the likelihood of complications, and the risk of transmission. With the availability of effective topical antibiotics, the use of home remedies and traditional remedies for the management of conjunctivitis has decreased substantially. The overuse of antibiotics, however, has led to the emergence of antibiotic-resistant bacterial strains, which poses a significant threat to the treatment of conjunctivitis and other infections.

The role of historical treatments in shaping modern medicine

The history of the management of conjunctivitis provides insights into the development of medical treatments and practices. Traditional remedies and home remedies were used for centuries, but their efficacy and safety were not supported by scientific evidence. The absence of antibiotics led to the development of alternative treatments, including antiseptics, caustics, and astringents, which were often harmful to the eye. The complications associated with these treatments highlighted the importance of evidence-based medicine and the need for scientific research to inform medical practice.

Future directions for research and treatment of Pink Eye

Future research should focus on the development of novel treatments for conjunctivitis, including antivirals, immunomodulators, and alternative therapies. Research is needed to understand the epidemiology of conjunctivitis, including the prevalence of different etiologies, risk factors, and the impact of antibiotic resistance. Prevention strategies, including vaccination and improved hygiene practices, should be explored to reduce the burden of conjunctivitis. Finally, efforts should be made to promote appropriate antibiotic use, to reduce the emergence of antibiotic-resistant bacterial strains, and to preserve the efficacy of antibiotics for the treatment of bacterial conjunctivitis.

In conclusion, the history of conjunctivitis provides valuable insights into the evolution of medical practice and the development of modern treatments. The availability of antibiotics has transformed the management of infectious conjunctivitis, but the overuse of antibiotics has led to the emergence of antibiotic-resistant bacterial strains. The development of evidence-based treatments, improved hygiene practices, and prevention strategies will help to reduce the burden of conjunctivitis and preserve the efficacy of antibiotics for the treatment of bacterial conjunctivitis.

References

  1. Azari AA, Barney NP. Conjunctivitis: a systematic review of diagnosis and treatment. JAMA. 2013 Oct 23;310(16):1721-9. doi: 10.1001/jama.2013.280318. PMID: 24150468.
  2. Høvding G. Acute bacterial conjunctivitis. Acta Ophthalmol. 2008 Aug;86(5):5-17. doi: 10.1111/j.1755-3768.2008.01244.x. PMID: 18339073.
  3. Sheikh A, Hurwitz B, van Schayck CP, McLean S, Nurmatov U. Antibiotics versus placebo for acute bacterial conjunctivitis. Cochrane Database Syst Rev. 2012 Sep 12;9(9):CD001211. doi: 10.1002/14651858.CD001211.pub3. PMID: 22972111.
  4. American Optometric Association. Optometric Clinical Practice Guideline: Care of the Patient with Conjunctivitis. 2003.
  5. Centers for Disease Control and Prevention. Conjunctivitis (Pink Eye). https://www.cdc.gov/conjunctivitis/index.html. Accessed September 8, 2021.
  6. Singh R, Gupta V, Gupta A. Pattern of pediatric ocular trauma in India. Indian J Pediatr. 2002 Apr;69(4):331-5. doi: 10.1007/BF02724234. PMID: 12001871.
  7. Mahesh G, Giridhar A, Shedbele A, Kumar R. Pink Eye: A History of Conjunctivitis. Ophthalmol Ther. 2018 Jun;7(1):73-81. doi: 10.1007/s40123-018-0123-3. PMID: 29594769; PMCID: PMC5995674.
  8. Azari AA, Barney NP. Conjunctivitis: A Systematic Review of Diagnosis and Treatment. JAMA. 2013;310(16):1721–1729. doi:10.1001/jama.2013.280318.
  9. Stevens DL, Bisno AL, Chambers HF, Everett ED, Dellinger P, Goldstein EJ, Gorbach SL, Hirschmann JV, Kaplan EL, Montoya JG, Wade JC. Practice guidelines for the diagnosis and management of skin and soft-tissue infections. Clin Infect Dis. 2005 Nov 15;41(10):1373-406. doi: 10.1086/497143. PMID: 16231249.
  10. UpToDate. Patient Education: Conjunctivitis (Pinkeye) (Beyond the Basics). https://www.uptodate.com/contents/conjunctivitis-pinkeye-beyond-the-basics. Accessed September 8, 2021.

With over five hundred smartphones in my collection, I have completed hundreds of projects centered around Android, Windows Mobile, and iOS, utilizing technologies such as Kotlin and Java for Android application development. Before smartphones became widespread, I worked on numerous projects involving flip phones, PDAs, etc.

Each phone in my collection is part of a unique project ranging from acting as a Bluetooth File server or remote IP camera to serving as a full PHP/SQL/FTP/DHCP server or being the platform for the development of a custom ROM. At the very least, each phone is rooted and has a ROM I modified for that model specifically flashed to it. In the case a phone can’t be rooted (ZTE has a couple that come to mind), I usually find these phones make great security studies. The ZTE phones, for instance, have a security measure similar to Deep Freeze by storing system critical files in a mounted and temporary RAM drive, leaving the real files always encrypted and hidden.

Some of the major projects include Custom ROM builds, Rooting Techniques, and Client/Server Projects. For example, the Custom ROM builds involve major system alterations to the Android build that require rooting, partition resizing and flashing, init.d and kernel modifications, service modifications, apk decompile and recompile events, and more. Some of the devices where custom ROM builds were implemented include Motorola Nexus 6 MRA58K Marshmallow, LG Nexus 4 MY48M Lollipop, and Samsung Galaxy S2 GT-I9100 SprintROM.

In addition, my experience in Android application development allowed me to create client/server projects such as DHCP, UPnP, DNS, Email (POP3 / SMTP), FTP Proxy, FTP, FTPS, FTPES, Load Balancer, MySQL, NFS, PHP, PXE, Port Forwarder, RTMP, Remote Control, SMB/CIFS, SFTP, SSH, TFTP, Telnet, Time, Torrent Client, Torrent Tracker, VNC, VPN, Wake On Lan, Web, and X11. Some of these projects involve web hosting on Android, such as hosting PHP, SQL, and JavaScript on Android devices.

My expertise in Android application development using Kotlin and Java has been invaluable in successfully completing these projects.

DSC0003

A bunch of Smartphones in my collection of hacks and projects


DSC0001

Some of the major projects include:

Custom ROM builds 

These examples involves major system alterations to the Android build that require rooting, partition resizing and flashing, init.d and kernel modifications, service modifications, apk decompile and recompile events, etc.

  • Motorola Nexus 6 MRA58K Marshmallow
  • LG Nexus 4 MY48M Lollipop
  • Amazon Kindle Fire HD (converted to Google Play Device)
  • Samsung Galaxy S2 GT-I9100 SprintROM
  • Samsung Galaxy S3 JZO54K Jelly Bean
  • Samsung Galaxy Ace s765c Build
  • LG Volt LS720 KOT491 KitKat
  • LG Optimus Zone 3 VS425PP Lollipop
  • LG Optimus Zone 2 VS415PP
  • LG Optimus Zone 1 VS410PP
  • LG Tribute LS660 KVT49I
  • LG Tribute 2 LS665 LMY47V
  • LG Lucky LGL16CB Build
  • LG Sunrise LGL15C Build (Same as Lucky, but GSM)
  • LG Sunset LGL33L Build
  • Pantech Breakout S8995VWCA55F.BB
  • ZTE Paragon Z753G Build
  • ZTE Speed ZTE9130ABB
  • AND MANY MANY MORE!

For example, here is the structure for a custom ROM built for the LG Esteem. In this example, this is deployed in CWM Recovery once the phone is rooted as shown further below.

.android_secure.vfat.tar -- Move2SD Platform 100% Custom
boot.img -- Stock LG Boot Partition
cache.yaffs2.img -- Cache With Modifications for /SDCard Mounting
data.yaffs2.img -- Data Partition 100% Custom
nandroid.md5 -- Md5 Checksum
recovery.img -- CWM Recovery by ClockworkMod
system.yaffs2.img -- LG Stock System Partition with Heavy Modifications (40% Custom)

Rooting Techniques

Rooting can be challenging for some, but as rooting methods have become easier to implement using ADB Debug tools, I always try to look for more challenging root methods. In my collection I have:

  • Successfully rooted over 250 Android smartphones
  • Jailbroken over 50 iOS smartphones
  • Developed new rooting methods based on prior developers work
  • Temp rooted three ZTE models that have never been rooted before
flash_recovery

LG VS720 Flash Recovery Tool by David Maiolo

Here I modify an LG Esteem Root script by Dan Rosenberg (@djrbliss) to allow for automatic root flashing…


echo Waiting for device...
adb kill-server
adb wait-for-device

echo Push Zergrush...
adb push zergrush /data/local/tmp/zergrush
adb shell "chmod 755 /data/local/tmp/zergrush"
adb shell "echo exit | /data/local/tmp/zergrush"

echo Install Root Tools...
adb shell /data/local/tmp/sh -c "mount -orw,remount /dev/block/system /system"
adb shell /data/local/tmp/sh -c "mkdir /system/tmp"
adb shell /data/local/tmp/sh -c "chmod 777 /system/tmp"
adb push su /system/tmp/su
adb push busybox /system/tmp/busybox
adb push Superuser.apk /system/tmp/Superuser.apk

echo Installing flash_image... 
adb push flash_image system/tmp/flash_image
adb shell /data/local/tmp/sh -c "mv /system/tmp/flash_image /system/xbin/flash_image"
adb shell /data/local/tmp/sh -c "chmod 777 /system/xbin/flash_image"

echo Installing recovery.img...
adb push recovery.img system/tmp/recovery.img
adb shell /data/local/tmp/sh -c "mv /system/tmp/recovery.img /system/xbin/recovery.img"

echo Installing super user... 
adb shell /data/local/tmp/sh -c "mv /system/tmp/su /system/xbin/su"
adb shell /data/local/tmp/sh -c "mv /system/tmp/Superuser.apk /system/app/Superuser.apk"
adb shell /data/local/tmp/sh -c "mv /system/tmp/busybox /system/xbin/busybox"
adb shell /data/local/tmp/sh -c "chown root /system/xbin/su"
adb shell /data/local/tmp/sh -c "chmod 4755 /system/xbin/su"
adb shell /data/local/tmp/sh -c "ln -s /system/xbin/su /system/bin/su"

echo Installing busybox... 
adb shell /data/local/tmp/sh -c "chmod 755 /system/xbin/busybox"
adb shell /data/local/tmp/sh -c "/system/xbin/busybox --install /system/xbin/"

echo Flashing Recovery to CWM...
adb shell /data/local/tmp/sh -c "/system/xbin/flash_image recovery /system/xbin/recovery.img"

echo Cleaning up...
adb shell /data/local/tmp/sh -c "rmdir /system/tmp"
adb shell /data/local/tmp/sh -c "rm /system/xbin/recovery.img"
adb shell "rm /data/local/tmp/* 2>/dev/null"

echo Rebooting into CWM recovery...
adb reboot recovery

Faraday Cages: Antenna and Chipset Shielding

Communication with vendors and manufactures is a key security requirement on many handsets. By utilizing shielding techniques, I have been able to bypass security measures including:

  • Block Verizon application expiration checking on Samsung Gusto 2 and 3 flip phones
  • Bypass Verizon service checks to allow data and voice on unactivated phones
  • Downgrade LG and ZTE  mandatory security patches

* I have always worked with my collection as a personal challenge, and do not sell or distribute any techniques that comprise the security of a manufacturer or cellular provider, so please don’t ask

faraday_maiolo

Shielding Used to Block Certain Verizon Packets

Client / Server Projects

The tiny chips carried inside our smartphones carry a wealth of untapped power. Throughout the years I have turned these little devices into all sorts of servers, including:

DHCP, UPnP, DNS, Email (POP3 / SMTP), FTP Proxy, FTP, FTPS, FTPES, Load Balancer, MySQL, NFS, PHP, PXE, Port Forwarder, RTMP, Remote Control, SMB/CIFS,  SFTP, SSHTFTP, Telnet, Time, Torrent Client, Torrent TrackerVNC, VPN, Wake On Lan, Web,  X11!

FTP/PHP/SQL/JavaScript Web Hosting On Android

For a time, this very portfolio website was hosted on a single smartphone! Here are some instances of different projects involving servers hosted on Android devices.

PHP Being Served on Android

PHP Being Served on Android


SQL Server Hosted on Android

SQL Server Hosted on Android


MyCollegeExchange Hosted on Android

MyCollegeExchange Hosted on Android


FTP Server Hosted on Nexus 6

FTP Server Hosted on Nexus 6

Here are some random IC shots from various projects:

DSC_3553 DSC00026A


I undertook a project to upgrade the basement of my home in New York. The plans and designs I created were comprehensive and detail-oriented, incorporating both material purchasing requirements and final build specifications.

The design documentation I produced showcases my in-depth knowledge of building design and construction. It includes detailed floor plans, elevations, and specifications that were instrumental in the success of the project.

Additionally, I also undertook a basement upgrade project for an apartment in New York. The design plans were similarly detailed and carefully crafted, taking into account the unique requirements of the space.

The final build photos at the end of the document highlight the success of both projects and demonstrate my skill in transforming a space from a design concept to a fully functional and aesthetically pleasing environment.

As an experienced building design professional, these projects demonstrate my proficiency in conceptualizing, designing, and executing complex construction projects. The design documentation thumbnails showcase the detail and complexity of the work I produced.

Design Documentation Thumbnails

maiolo_building_design_basement-page-001 maiolo_building_design_basement-page-002 maiolo_building_design_basement-page-003 maiolo_building_design_basement-page-004 maiolo_building_design_basement-page-005 maiolo_building_design_basement-page-006 maiolo_building_design_basement-page-007 maiolo_building_design_basement-page-008

Basement Design Project #2

Design Documentation Thumbnails

maiolo_building_design_havenwood-page-001 maiolo_building_design_havenwood-page-002 maiolo_building_design_havenwood-page-003 maiolo_building_design_havenwood-page-004

I have rewritten a project that involves adding depth to “flat photos” to create the look of background blur or “bokeh.” With this new implementation, I used AngularJS to build the user interface, allowing for a more streamlined and responsive user experience.

The project is inspired by the concept of Magic Eye images, which use depth maps to create the illusion of a 3D scene in a 2D image. To achieve a similar effect with my flat photos, I generated a 3D depth map using Google Camera Lens Blur or Photoshop and then created a partial 3D model of the subject.

With this new implementation, I used AngularJS to create a more interactive and responsive user interface. Users can easily load their own images, view and adjust the depth map, and generate the final “bokeh” image. The application also includes a parallax effect, which adds to the illusion of a 3D scene.

Overall, this project highlights my skills in image processing, computer graphics, and web development. By using AngularJS, I was able to create a more efficient and user-friendly implementation of the original project. Credit goes to Rafał Lindemann and the Depthy app for their original work.

For example, this is the original image of a corvette taken on a cell phone camera:

IMG_20150906_172640-alternative

Corvette, Original Photo

and now I modify the depth map generated by Google Camera using Depthy 0.3.1 (created by Rafał Lindemann) or Photoshop of the vehicle and the surroundings. I used the layering concept that black is closest to the camera and white is furthest away.

Corvette Depth Map

Corvette Depth Map (using Depthy to generate)

With this we can now create a partial 3D model of the vehicle:

3D Vector Model of Corvette

3D Vector Model of Corvette

and finally using a tool, such as the Photoshop Lens Blur tool (with the depth map as the layer mask) or Depthy Tool to generate the final image:

DSC0005

Final image of Corvette with “Bokeh”

and finally create a parallax effect using Depthy:

3D_10

Click to See Video – 3D Parallax Effect

Additional Renderings

3D_1 3D_2 3D_3 3D_4 3D_5 3D_7 3D_8 3D_9 3D_11 3D_12 DSC0001


/*

This is a rewrite of the Depthy web application by the original authors: Rafał Lindemann and Alex Täschner.
The code has been modified by David Maiolo to improve performance and add new features.
The Depthy web app generates a 3D parallax effect on Google Camera Lens Blur photos, creating animated GIFs from them.
It also allows users to extract the depth map and create their own effects.
The rewritten code uses AngularJS to create a more efficient and user-friendly version of the original app.
Original authors: Rafał Lindemann and Alex Täschner
Project website: http://depthy.me/
*/
// Define the angularJS module and its dependencies
angular.module('depthyApp', [
'ngAnimate',
'ngTouch',
'ui.router',
'ui.bootstrap.buttons',
'ui.bootstrap.modal',
'ui.bootstrap.transition',
'ui.bootstrap.dropdown',
'ga',
'shareUrls'
])

// Configure the image source whitelist
.config(function($compileProvider) {
$compileProvider.imgSrcSanitizationWhitelist(/^\s*(https?|blob):|data:image\//);
$compileProvider.aHrefSanitizationWhitelist(/^\s*(https?|blob):/);
})

// Define the routes for the app
.config(function ($stateProvider, $urlRouterProvider, $locationProvider) {
$locationProvider.html5Mode(false);
$urlRouterProvider.otherwise('/');

$stateProvider
.state('index', {
url: '/',
onEnter: ['depthy', '$state', function (depthy, $state) {
if (!$state.current.name) {
depthy.leftpaneOpen();
depthy.loadSampleImage('flowers');
}
}]
})
.state('sample', {
url: '/sample/:id',
controller: ['$stateParams', 'depthy', function ($stateParams, depthy) {
depthy.loadSampleImage($stateParams.id);
}]
})
.state('imgur', {
url: '/ip/:id',
controller: ['$stateParams', '$state', 'depthy', function ($stateParams, $state, depthy) {
depthy.loadUrlDirectImage('http://i.imgur.com/' + $stateParams.id + '.png', true, {
state: 'imgur',
stateParams: {id: $stateParams.id},
thumb: 'http://i.imgur.com/' + $stateParams.id + 's.jpg',
storeUrl: 'http://imgur.com/' + $stateParams.id,
store: depthy.stores.imgur
});
}]
})
.state('imgur2', {
url: '/ii/:id',
controller: ['$stateParams', 'depthy', function ($stateParams, depthy) {
depthy.loadUrlImage('http://i.imgur.com/' + $stateParams.id + '.png', {
state: 'imgur2',
stateParams: {id: $stateParams.id},
thumb: 'http://i.imgur.com/' + $stateParams.id + 'm.jpg',
storeUrl: 'http://imgur.com/' + $stateParams.id,
store: depthy.stores.imgur
});
}]
})
.state('url-png', {
url: '/up?url',
controller: ['$stateParams', '$state', 'depthy', function ($stateParams, $state, depthy) {
depthy.loadUrlDirectImage($stateParams.url, true, {
state: 'url-png',
stateParams: {url: $stateParams.url},
});
}]
})
.state('url-auto', {
url: '/u?url',
controller: ['$stateParams', '$state', 'depthy', function ($stateParams, $state, depthy) {
depthy.loadUrlImage($stateParams.url, {
state: 'url-auto',
stateParams: {url: $stateParams.url},
});
}]
})
.state('local', {
url: '/local/:id',
hollow: true,
controller: ['$stateParams', 'depthy', function($stateParams, depthy) {
depthy.loadLocalImage($stateParams.id);
}]
})

This project involves using an algorithm to generate “Magic Eye” images from grayscale depth-mappings of photographs. These images are also known as Single Image Random Dot Stereograms (SIRDS) and were popularized by the Magic Eye books in the 1990s.

To create these Magic Eye images, the original algorithm required significant computational resources that made the process time-consuming. In this project, I have rewritten the original algorithm to be more efficient, using Node.js, while still producing the same high-quality images.

I started by taking JPEG images from a trip to Hawaii and converted them to grayscale depth-mappings using Photoshop. I then used the optimized algorithm, which was originally translated from C code by Harold W. Thimbleby, Stuart Inglis, and Ian H. Witten, to generate the Magic Eye images.

The new algorithm works by taking the depth-mapping image and using it to generate a new image that can be viewed as a 3D image with the help of stereoscopic viewing. The resulting image appears to be a pattern of random dots, but when viewed with a special technique (e.g., crossing your eyes or focusing behind the image), the viewer can see a 3D scene.

The project includes several Magic Eye images, including a tropical fish, a person snorkeling, a beach scene, and more. I wrote the code for this project using Node.js and added detailed comments to make it easier to understand.

The resulting Magic Eye images are fascinating to look at and can be a fun addition to any website. The project highlights my skills in image processing and computer graphics, as well as my ability to understand and optimize complex algorithms for faster processing times.

The Results:

Magic Eye - Tropical Fish

Magic Eye – Tropical Fish

Magic Eye - David Snorkeling

Magic Eye – David Snorkeling

Magic Eye - Hanalei Bay

Magic Eye – Hanalei Bay

Magic Eye - Palm Tree

Magic Eye – Palm Tree

Magic Eye - Waikiki Sunset

Magic Eye – Waikiki Sunset

Magic Eye - Ukulele

Magic Eye – Ukulele

Magic Eye - Garden of the Gods

Magic Eye – Garden of the Gods


My Implementation of Algorithm


// This program generates an autostereogram (also known as a Magic Eye image)
// from a grayscale depth map using a modified version of the MagicEye.js algorithm.
// The algorithm was published in a paper authored by Harold W. Thimbleby, Stuart Inglis, and Ian H. Witten.
// The following code is an efficient implementation of the algorithm in JavaScript.

// Author: David Maiolo
const round = x => Math.round(x);
const DPI = 72;
const E = round(2.5 * DPI);
const mu = 1 / 3.0;
const separation = z => round((1 - mu * z) * E / (2 - mu * z));
const far = separation(0);
const maxX = 256;
const maxY = 256;

function drawAutoStereogram(z) {
  const pix = new Array(maxX);
  const same = new Array(maxX);

  for (let y = 0; y < maxY; y++) {
    let s;
    let left, right;
    for (let x = 0; x < maxX; x++) {
      same[x] = x;
    }

    for (let x = 0; x < maxX; x++) {
      s = separation(z[x][y]);
      left = x - s / 2;
      right = left + s;
      if (0 <= left && right < maxX) {
        let visible;
        let t = 1;
        let zt;
        do {
          zt = z[x][y] + 2 * (2 - mu * z[x][y]) * t / (mu * E);
          visible = z[x - t][y] < zt && z[x + t][y] < zt;
          t++;
        } while (visible && zt < 1);

        if (visible) {
          let k;
          for (k = same[left]; k !== left && k !== right; k = same[left]) {
            if (k < right) { left = k; } else { left = right; right = k; } } same[left] = right; } } } for (let x = maxX - 1; x >= 0; x--) {
      const pixelOffset = y * maxX * 4 + x * 4;
      if (same[x] === x) {
        const randomColor = Math.floor(Math.random() * 2);
        pix[x] = randomColor;
      } else {
        pix[x] = pix[same[x]];
      }
      // call Set_Pixel with the x, y, and pix[x] values
      Set_Pixel(x, y, pix[x]);
    }
  }

  // call DrawCircle to draw the convergence dots
  DrawCircle(maxX / 2 - far / 2, maxY * 19 / 20);
  DrawCircle(maxX / 2 + far / 2, maxY * 19 / 20);
}


MyCollegeExchange is the project that eventually inspired me to develop UniversityLite, a rapid deployment e-commerce tool to market university products and information to university students over the web using PHP and other tools. UniversityLite has it’s own section dedicated on the homepage for more information.

Getting back to MyCollegeExchange. Sometimes you just want to build a website from scratch. No CMS, no templates. Not always the prettiest, but the result here became MyCollegeExchange and features a website that allows students to buy and sell used textbooks on College Campuses. The website was built using PHP, JavaScript, HTML, CSS and has a SQL backend.

MyCollegeExchange Website

MyCollegeExchange Website

Some of the noted areas I had to develop for the site were:

InnoDB SQL Database Using Referential Integrity

In order to allow books, members and transactions to be kept as separate entities, I constructed a database with certain constraints. The books table uses an auto incrementing Primary Key that is referenced by the selling table. Additionally the members table has a Primary Key also referenced by the selling table. This table is then later joined using JOIN to generate all the necessary components for who is selling what, when and where.  The database has been normalized to the 3rd Normal Form.

The website has been developed to be easily deployed in a new setting by creating the necessary SQL database based on variables set in a settings file that is called during installation:

$data='";
			file_put_contents("./data/settings.php",$data);
			echo '
'; $con=mysql_connect($_POST['hostname'],$_POST['dbuname'],$_POST['dbpwd']); echo '
'; if ($con) { if(mysql_select_db($_POST['dbname'], $con)) { $sql = "CREATE TABLE IF NOT EXISTS `user_info` ( `Username` varchar(32) NOT NULL DEFAULT '', `Password` varchar(32) DEFAULT NULL, `email` varchar(40) NOT NULL, PRIMARY KEY (`Username`) ) ENGINE=MyISAM DEFAULT CHARSET=latin1;"; mysql_query($sql,$con);

The database is queried and updated using mysql_connect, mysql_select_db, mysql_query and mysqli_query PHP statements. For example, this snippet updates the selling table when posting a book using the Post form on the website:

$db = mysqli_connect("$LOGIN_DB_HOSTNAME", "$LOGIN_DB_UNAME", "$LOGIN_DB_PWD", "$LOGIN_DB_NAME");
$postSelling = "INSERT INTO selling (BookNumber, Username, Date, Price, ConditionOfBook, Description)
VALUES ('$booknumber','$user','$todaysdate','$price','$conditionofbook','$description')";

Search 

Algorithm

In order to generate search results, I developed a simple search algorithm that uses SQL JOIN statements to link our three tables.

if(isset($_POST['submit'])){
  if(isset($_GET['go']))			{
  if(preg_match("/^[  a-zA-Z]+/", $_POST['name'])){
  $name=$_POST['name'];
  
  //connect  to the database
  $db=mysql_connect  ("$LOGIN_DB_HOSTNAME", "$LOGIN_DB_UNAME",  "$LOGIN_DB_PWD") or die ('I cannot connect to the database  because: ' . mysql_error());
  //-select  the database to use
  $mydb=mysql_select_db("$LOGIN_DB_NAME");
  //-query  the database table
  $sql = "SELECT user_info.Username, books.BookTitle, books.ISBN, books.Author, selling.Date, selling.Price FROM selling
    JOIN books
        ON books.BookNumber = selling.BookNumber
    JOIN user_info
        ON user_info.Username = selling.Username 
	WHERE books.BookTitle LIKE '%" . $name . "%' OR books.Author LIKE '%" . $name ."%' OR books.ISBN LIKE '%" . $name ."%'";

  $result=mysql_query($sql);

  while($row=mysql_fetch_array($result)){
          $BookTitle =$row['BookTitle'];
          $Author=$row['Author'];
          $ISBN=$row['ISBN'];
		  $Price=$row['Price'];
		  
  echo "

" . "$" . $Price . " " . $BookTitle . "

"; echo "Author: " . $Author . " ISBN: " . $ISBN . "
"; echo nl2br("\n"); } }}}

Automatic Page Generation For Results

Once we get our search results based on the JOIN operation, each result becomes a clickable link that takes the user to auto-generated PHP page with more detailed results:

if (isset($_GET['id'])) {
   $ISBN = $_GET['id'];

  $db=mysql_connect  ("$LOGIN_DB_HOSTNAME", "$LOGIN_DB_UNAME",  "$LOGIN_DB_PWD") or die ('Can't Connect: ' . mysql_error());
  $mydb=mysql_select_db("$LOGIN_DB_NAME");
  $sql = "SELECT user_info.Username, user_info.Email, books.*, selling.* FROM selling
    JOIN books
        ON books.BookNumber = selling.BookNumber
    JOIN user_info
        ON user_info.Username = selling.Username 
	WHERE books.ISBN LIKE '%" . $ISBN ."%'";
  //-run  the query against the mysql query function
  $result=mysql_query($sql); 
    while($row=mysql_fetch_array($result)){
          $BookTitle =$row['BookTitle'];
          $Author=$row['Author'];
          $ISBN=$row['ISBN'];
		  $Price=$row['Price'];
		  $Username=$row['Username'];
		  $Date=$row['Date'];
		  $Email=$row['Email'];
		  $ConditionOfBook=$row['ConditionOfBook'];
		  $Description=$row['Description'];
		  
  echo "

Live Form Validation

The forms used to register, post and manage posts have automatic line validation as the user progresses through the form. Each form calls a javascript function for validation. For example, here we have the javascript functions to validate the Post a Book form:

function validate_book()
  {
  if (flag6==1 && flag7==1 && flag8==1 && flag9==1 && flag10==1)
  {
  alert("Everything Checked Out. Your book is posted!");
  return true;
  }
  else
  {
  alert("We found some errors in your book information.");
  }
  }

function validate_booktitle()
{
	var booktitle = document.getElementById("booktitle").value;
	var valbooktitle = booktitle.search(/^[a-zA-Z0-9_]+/);
  if (booktitle = ""||valbooktitle != 0)
    {
	document.getElementById("booktitleInfo").className="error";
		document.getElementById("booktitle").className="error";
		document.getElementById("booktitleInfo").innerHTML="Title must be only letters or numbers";
	}
  else 
  {
  document.getElementById("booktitleInfo").className="success";
		document.getElementById("booktitle").className="success";
		document.getElementById("booktitleInfo").innerHTML="Title looks good!";
		flag6=1;
  }
  }
  
function validate_bookauthor()
{
	var bookauthor = document.getElementById("bookauthor").value;
	var valbookauthor = bookauthor.search(/[a-zA-Z]+/);
  if (bookauthor = ""||valbookauthor != 0)
    {
	document.getElementById("bookauthorInfo").className="error";
		document.getElementById("bookauthor").className="error";
		document.getElementById("bookauthorInfo").innerHTML="Author must contain only letters";
	}
  else 
  {
  document.getElementById("bookauthorInfo").className="success";
		document.getElementById("bookauthor").className="success";
		document.getElementById("bookauthorInfo").innerHTML="Author looks good!";
		flag7=1;
  }
  }
  
function validate_bookisbn()
{
	var bookisbn = document.getElementById("bookisbn").value;
	var valbookisbn = bookisbn.search(/^\d{10,13}$/);
  if (bookisbn = ""||valbookisbn != 0)
    {
	document.getElementById("bookisbnInfo").className="error";
		document.getElementById("bookisbn").className="error";
		document.getElementById("bookisbnInfo").innerHTML="ISBN must be at 10 or 13 numbers only";
	}
  else 
  {
  document.getElementById("bookisbnInfo").className="success";
		document.getElementById("bookisbn").className="success";
		document.getElementById("bookisbnInfo").innerHTML="ISBN checks out!";
		flag8=1;
  }
  }
  
function validate_bookprice()
{
	var bookprice = document.getElementById("bookprice").value;
	var valbookprice = bookprice.search(/^\d{1,}$/);
  if (bookprice = ""||valbookprice != 0)
    {
	document.getElementById("bookpriceInfo").className="error";
		document.getElementById("bookprice").className="error";
		document.getElementById("bookpriceInfo").innerHTML="Please use whole dollars only such as 8. Pennies are for pansies";
	}
  else 
  {
  document.getElementById("bookpriceInfo").className="success";
		document.getElementById("bookprice").className="success";
		document.getElementById("bookpriceInfo").innerHTML="What a great price!";
		flag9=1;
  }
  }
  

function validate_bookdescription()
{
	var bookdescription = document.getElementById("bookdescription").value;
	var valbookdescription = bookdescription.search(/^[a-zA-Z0-9_]+/);
  if (bookdescription = ""||valbookdescription != 0)
    {
	document.getElementById("bookdescriptionInfo").className="error";
		document.getElementById("bookdescription").className="error";
		document.getElementById("bookdescriptionInfo").innerHTML="Please use only letters or numbers";
	}
  else 
  {
  document.getElementById("bookdescriptionInfo").className="success";
		document.getElementById("bookdescription").className="success";
		document.getElementById("bookdescriptionInfo").innerHTML="Cool!";
		flag10=1;
  }
  }

Business Plan

The website concept was guided with a business and marketing plan that looked at competition, funding, etc.

MyCollegeExchange_Business_Plan-page-020 MyCollegeExchange_Business_Plan-page-019 MyCollegeExchange_Business_Plan-page-018 MyCollegeExchange_Business_Plan-page-017 MyCollegeExchange_Business_Plan-page-016 MyCollegeExchange_Business_Plan-page-015 MyCollegeExchange_Business_Plan-page-014 MyCollegeExchange_Business_Plan-page-013 MyCollegeExchange_Business_Plan-page-012 MyCollegeExchange_Business_Plan-page-011 MyCollegeExchange_Business_Plan-page-010 MyCollegeExchange_Business_Plan-page-009 MyCollegeExchange_Business_Plan-page-008 MyCollegeExchange_Business_Plan-page-007 MyCollegeExchange_Business_Plan-page-006 MyCollegeExchange_Business_Plan-page-005 MyCollegeExchange_Business_Plan-page-004 MyCollegeExchange_Business_Plan-page-003 MyCollegeExchange_Business_Plan-page-002 MyCollegeExchange_Business_Plan-page-001