Building a Chatbot Model with TensorFlow and Seq2Seq

As part of a series of learning guides, this tutorial will walk you through the process of creating a TensorFlow NLP model using sequence-to-sequence (seq2seq) modeling. Specifically, we will focus on building a model for a chatbot application where the input is a question or prompt from the user, and the output is a response generated by the model. This tutorial is designed to help you understand the fundamentals of building a chatbot model using TensorFlow and how it relates to the broader field of natural language processing.
Overview
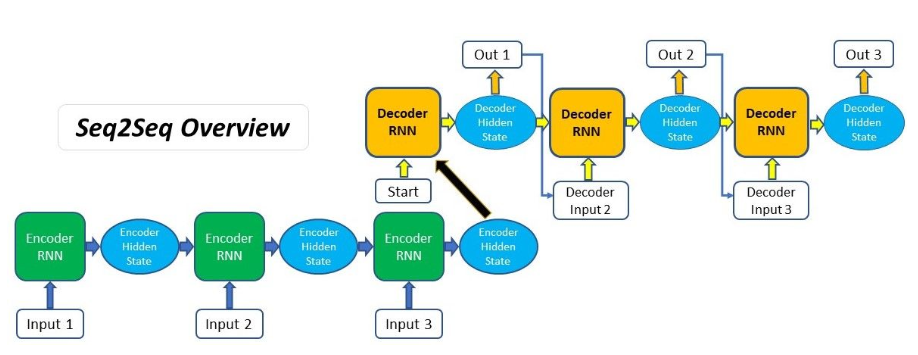
The seq2seq model is a type of neural network that is commonly used for natural language processing tasks like language modeling and text generation. It works by training a network to take in a sequence of words as input and generate a sequence of words as output. The model consists of two parts: an encoder and a decoder.
The encoder takes in the input sequence and processes it, generating a context vector that summarizes the input sequence. The decoder then takes in the context vector and generates the output sequence, word by word.
To train the model, we use a dataset of input/output pairs, where each input is a question or prompt, and each output is a response. We feed the input sequences into the encoder and the output sequences into the decoder, and train the model to generate the correct response given an input sequence.
![]()
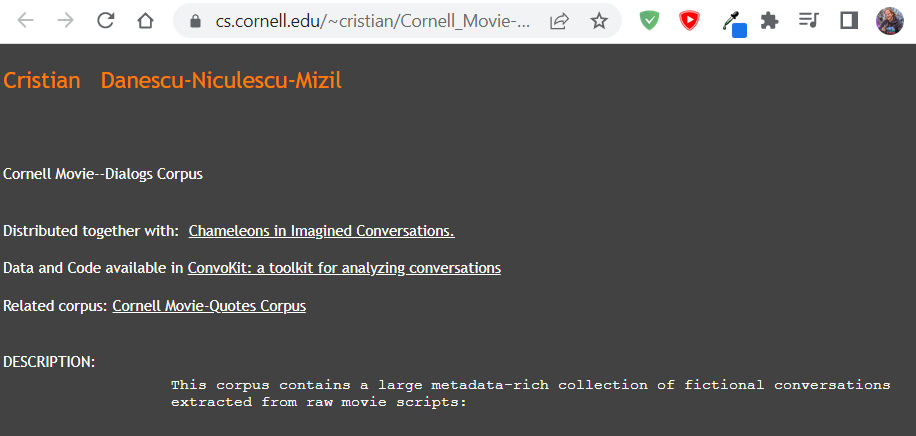
For this tutorial, we will be using TensorFlow to build our seq2seq chatbot model. We will use the Cornell Movie Dialogs Corpus as our dataset, which consists of movie dialogues that can be used to train a chatbot.
Getting Started
Before we can start building our chatbot model with TensorFlow and Seq2Seq, we need to set up our development environment. Here are the steps to get started:
- Install Python: First, you will need to install Python on your machine if it is not already installed. You can download the latest version of Python from the official website: https://www.python.org/downloads/. Make sure to choose the correct version for your operating system.
- Install TensorFlow: Next, you will need to install TensorFlow, which is the deep learning framework that we will be using to build our chatbot model. You can install TensorFlow using pip, the Python package installer. Open a terminal window and run the following command:
pip install tensorflow
This will install the latest version of TensorFlow on your machine.
- Install TensorFlow Text: We will also be using the TensorFlow Text library to preprocess our data. You can install TensorFlow Text using pip by running the following command:
pip install tensorflow-text
- Download the Data: We will be using the Cornell Movie Dialogs Corpus as our dataset for training our chatbot model. You can download the dataset from the following link: https://www.cs.cornell.edu/~cristian/Cornell_Movie-Dialogs_Corpus.html. Make sure to download the movie_lines.txt and movie_conversations.txt files.
- Preprocess the Data: Once you have downloaded the data, you will need to preprocess it to separate the input and output sequences and convert them to a format that can be used by our model. We will cover this step in more detail later in the tutorial.
Once you have completed these steps, you will be ready to start building your chatbot model using TensorFlow and Seq2Seq. In the next section, we will walk through the process of preprocessing our data to prepare it for training.
Step 1: Data preprocessing
The first step in building our chatbot model is to preprocess our data. This involves tasks like tokenization, cleaning, and normalization to prepare the data for training.
For this tutorial, we will be using the Cornell Movie Dialogs Corpus, which is a collection of over 200,000 lines of dialogue from movie scripts. We will be using a small subset of this data for training our model.
The data is provided in a tab-separated format, where each line contains an ID, a character ID, a movie ID, and a line of dialogue. We will need to preprocess the data to separate the input and output sequences and convert them to a format that can be used by our model.
Here is an example of what our preprocessed data might look like:
input: hi, how are you?
output: i’m good, thanks. how about you?
We will use the TensorFlow Text library to tokenize our input and output sequences and convert them to a format that can be used by our model.
Step 2: Building the model
The next step is to build our seq2seq chatbot model using TensorFlow. We will use the Keras API in TensorFlow to define our model architecture.
Our chatbot model will consist of two main components: an encoder and a decoder. These components will be implemented using a type of neural network called a recurrent neural network (RNN), which is well-suited for processing sequences of input data, such as text.
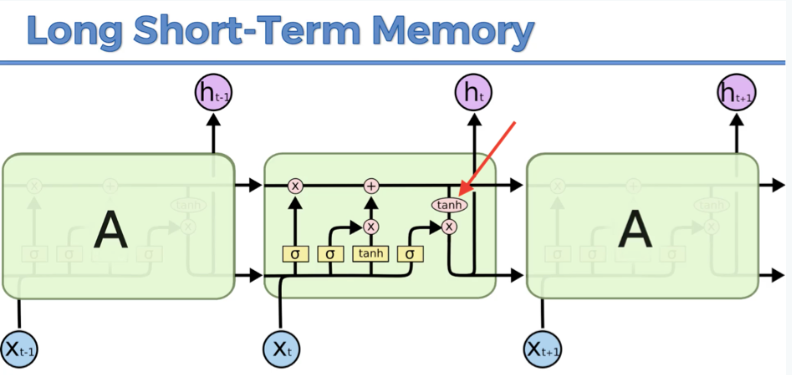
The encoder will take in the input sequence (i.e., the user’s question or prompt) and process it using an RNN with LSTM cells. LSTM cells are a type of RNN cell that are designed to remember information over long sequences of input data. As the encoder processes the input sequence, it will generate a context vector that summarizes the information in the sequence.
The decoder will then take in the context vector generated by the encoder and use it to generate the output sequence (i.e., the chatbot’s response). Like the encoder, the decoder will also use an RNN with LSTM cells to process the output sequence word by word. However, unlike the encoder, the decoder will also take in the context vector as an additional input at each step of the decoding process. This allows the decoder to use the information contained in the context vector to generate a more informed and contextually relevant response.
Here is an overview of our model architecture:
Input sequence -> Encoder -> Context vector -> Decoder -> Output sequence
We will define our model using the following steps:
- Define the input and output sequences.
- Define the encoder LSTM layer and process the input sequence.
- Define the decoder LSTM layer and generate the output sequence.
- Combine the encoder and decoder into a single model.
Here is the code for defining our model:
import tensorflow as tf
from tensorflow import keras
from tensorflow.keras.layers import Input, LSTM, Dense, Embedding

# Define the input and output sequences
encoder_inputs = Input(shape=(None,))
decoder_inputs = Input(shape=(None,))

# Define the embedding layer
embedding_layer = Embedding(input_dim=vocab_size, output_dim=embedding_dim)

# Define the encoder LSTM layer
encoder_lstm = LSTM(units=latent_dim, return_state=True)

# Process the input sequence with the encoder LSTM layer
encoder_embeddings = embedding_layer(encoder_inputs)
encoder_outputs, state_h, state_c = encoder_lstm(encoder_embeddings)
encoder_states = [state_h, state_c]

# Define the decoder LSTM layer

decoder_lstm = LSTM(units=latent_dim, return_sequences=True, return_state=True)

# Process the output sequence with the decoder LSTM layer
decoder_embeddings = embedding_layer(decoder_inputs)
decoder_outputs, _, _ = decoder_lstm(decoder_embeddings, initial_state=encoder_states)

# Define the output layer
output_layer = Dense(units=vocab_size, activation='softmax')

# Generate the output sequence using the output layer
decoder_outputs = output_layer(decoder_outputs)

# Combine the encoder and decoder into a single model
model = keras.Model(inputs=[encoder_inputs, decoder_inputs], outputs=decoder_outputs)
In this code, we first define the input and output sequences as encoder_inputs and decoder_inputs, respectively. We then define the embedding layer using the Embedding class, which maps each word in the input sequence to a dense vector.
Next, we define the encoder LSTM layer using the LSTM class, with the latent_dim parameter specifying the number of units in the LSTM layer. We process the input sequence with the encoder LSTM layer using the encoder_lstm object, and extract the final state of the LSTM layer as encoder_states.
We then define the decoder LSTM layer using the LSTM class, with the return_sequences parameter set to True to indicate that we want the decoder to output a sequence rather than a single value. We process the output sequence with the decoder LSTM layer using the decoder_lstm object, using the encoder_states as the initial state of the LSTM layer.
Finally, we define the output layer using the Dense class, and generate the output sequence using the output_layer object.
We combine the encoder and decoder into a single model using the keras.Model class, with the input and output sequences as the inputs and outputs of the model, respectively.
Step 3: Training the model
Once we have defined our model, the next step is to train it using our preprocessed data. We will use the compile() method to configure the training process, and the fit() method to train the model on our data.
Here is the code for training our model:
# Configure the model for training
model.compile(optimizer='rmsprop', loss='categorical_crossentropy', metrics=['accuracy'])

# Train the model on the preprocessed data
model.fit([encoder_input_data, decoder_input_data], decoder_target_data,
          batch_size=batch_size,
          epochs=epochs,
          validation_split=0.2)
In this code, we use the compile() method to configure the model for training. We specify the optimizer as ‘rmsprop’, the loss function as ‘categorical_crossentropy’, and the metrics as [‘accuracy’].
We then use the fit() method to train the model on our preprocessed data. We provide the input and output sequences as the training data, and specify the batch size, number of epochs, and validation split.
Step 4: Generating responses
Once we have trained our chatbot model, the final step is to use it to generate responses to new input sequences. We will use the Model class in TensorFlow to create a new model that takes in the encoder input sequence and generates the decoder output sequence.
Here is the code for generating responses:
# Define the encoder model
encoder_model = keras.Model(encoder_inputs, encoder_states)

# Define the decoder model
decoder_states_inputs = [Input(shape=(latent_dim,)), Input(shape=(latent_dim,))]
decoder_embeddings2 = embedding_layer(decoder_inputs)
decoder_outputs2, state_h2, state_c2 = decoder_lstm(decoder_embeddings2, initial_state=decoder_states_inputs)
decoder_states2 = [state_h2, state_c2]
decoder_outputs2 = output_layer(decoder_outputs2)
decoder_model = keras.Model([decoder_inputs] + decoder_states_inputs, [decoder_outputs2] + decoder_states2)

# Define a function to generate responses
def generate_response(input_seq):
    # Encode the input sequence
    states_value = encoder_model.predict(input_seq)

    # Generate the initial target sequence
    target_seq = np.zeros((1, 1))
    target_seq[0, 0] = word2idx['<start>']

    # Generate the output sequence
    stop_condition = False
    response = ''
    while not stop_condition:
        output_tokens, h, c = decoder_model.predict([target_seq] + states_value)
        sampled_token_index = np.argmax(output_tokens[0, -1, :])
        sampled_word = idx2word[sampled_token_index]
        response += ' ' + sampled_word

        if (sampled_word == '<end>' or len(response) > max_output_len):
            stop_condition = True

        # Update the target sequence
        target_seq = np.zeros((1, 1))
        target_seq[0, 0] = sampled_token_index

        # Update the states
        states_value = [h, c]

    return response
In this code, we first define the encoder model using the encoder_inputs and encoder_states. We then define the decoder model using the decoder_inputs and decoder_states, and include the output states in the model’s output.
We define a function called generate_response() that takes in an input sequence and generates a response using the encoder and decoder models. The function encodes the input sequence using the encoder model, and then generates the output sequence word by word using the decoder model.
The function stops generating the output sequence when it reaches the <end> token or when the output sequence exceeds the maximum length. It then returns the generated response as a string.
Conclusion
In this tutorial, we walked through the process of creating a TensorFlow NLP model using sequence-to-sequence (seq2seq) modeling. We focused on building a chatbot model, where the input is a question or prompt from the user, and the output is a response generated by the model.
We first preprocessed our data using the TensorFlow Text library, and then built our chatbot model using the Keras API in TensorFlow. Our model consisted of an encoder and a decoder, each implemented using a recurrent neural network (RNN) with LSTM cells.
We trained our model using the compile() and fit() methods in TensorFlow, and then used it to generate responses to new input sequences using the Model class.
While this tutorial provides a basic overview of how to build a chatbot model using TensorFlow, there are many ways to improve and optimize the model’s performance. Some possible next steps include using attention mechanisms to improve the model’s ability to handle long input sequences, incorporating external knowledge sources to improve the model’s response quality, and fine-tuning the model using transfer learning on a larger dataset.
Overall, TensorFlow is a powerful and flexible framework for building NLP models, and the seq2seq approach provides a useful framework for tackling a wide range of natural language tasks. With some additional experimentation and fine-tuning, you can build a chatbot model that can carry on natural conversations with users and provide helpful responses to their questions.

