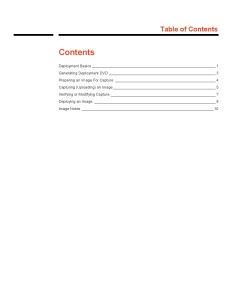
Overview
I created this article to provide an overview of some of the most popular SCCM current, and upcoming components.
SCCM Sites and Scaling

The key driver of the type and count of sites that you use in a hierarchy is usually the number and type of devices you must support. “500 users is not enough numbers to justify a secondary site. The key decision factor is the amount of users involved.”
Stand-alone primary site
This topology is successful when your different geographic locations can be successfully served by this single primary site. To help manage network traffic, you use preferred management points and a carefully planned content infrastructure.
-
SQL Server is required.
-
Additional primary sites provide support for a higher number of clients.
-
Cannot be tiered below other primary sites.
-
Participates in database replication.
Scope of Standalone Site
-
Supports up to 250 distribution points.
-
Supports up to 15 management points
-
175,000 total clients and devices, not to exceed:
-
150,000 desktops (computers that run Windows, Linux, and UNIX)
-
25,000 devices that run Mac and Windows CE 7.0
-
One of the following, depending on how your deployment supports mobile device management:
-
50,000 devices that you manage by using on-premises MDM
-
150,000 cloud-based devices
Central administration site with one or more child primary sites
The recommended location for all administration and reporting for the hierarchy. You would move to this topology if you require more than one primary site to support management of all your devices and users. It’s required when you need to use more than a single primary site.
-
SQL Server is required.
-
Does not process client data.
-
Does not support client assignment.
-
Not all site system roles are available.
-
Participates in database replication.
Scope of Central Administration Site
-
Supports up to 25 child primary sites
-
700,000 desktops (computers that run Windows, Linux, and UNIX)
-
25,000 devices that run Mac and Windows CE 7.0
-
One of the following, depending on how your deployment supports mobile device management (MDM):
-
100,000 devices that you manage by using on-premises MDM
-
300,000 cloud-based devices
Scope of Child Primary Site
-
Supports up to 250 secondary sites
-
Supports up to 250 distribution points.
-
Supports up to 15 management points
-
150,000 total clients and devices
Secondary Site
Manages clients in remote locations where network bandwidth control is required.
-
SQL Server Express or a full instance of SQL Server is required. If neither is installed when the site is installed, SQL Server Express is automatically installed.
-
A management point and distribution point are automatically deployed when the site is installed.
-
Secondary sites must be direct child sites below a primary site, but can be configured to send content to other secondary sites.
-
Participates in database replication.
Scope of Secondary sites
-
Don’t support child sites.
-
Supports 1 management point
-
15,000 desktops (computers that run Windows, Linux, and UNIX)
Other Roles and Scaling
-
Application Catalog web service point: 50,000 per installed instance (can install more than one)
-
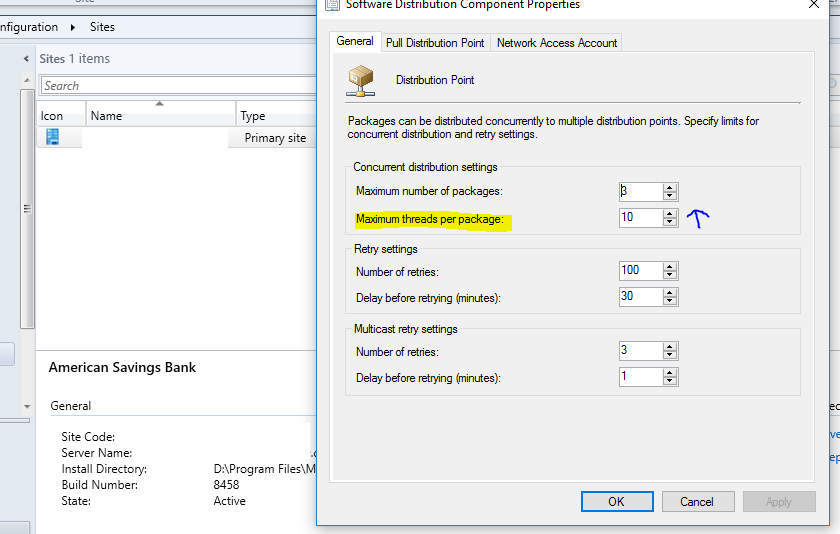
Distribution Point: Connections from up to 4,000 clients. (250 DPs can be installed at each primary site). Supports a combined total of up to 10,000 packages and applications.
-
Fallback status point: Support up to 100,000 clients
-
Software Update Point: can support up to 25,000 clients
-
Management points: 25,000 total clients and devices
SCCM Site System Roles
SCCM uses site system roles to support operations at each site. Servers that host the Configuration Manager site are named site servers, and computers that host the other site system roles are named site system servers. The site server is also a site system server. Although we have only one site, AS1, the principal is the same.
For example, your site server could be SITESERV005PRD and a site system server would be a distribution point such as DIST002DT02.
Site Communication
Site system servers within the same site communicate with each other by using server message block (SMB), HTTP, or HTTPS, depending on the site configuration selections that you make. Because these communications are unmanaged and can occur at any time without network bandwidth control, it is important that you review your available network bandwidth before you install site system servers and configure the site system roles.
Default Site System Roles
These roles are installed automatically on the site system.
- Configuration Manager site server: Automatically installed on the server from which you run setup when you install a central administration site or primary site
- Configuration Manager site system: Assigned during site installation or when you add an optional site system role to another server.
- Configuration Manager component site system role: Required to support other roles, such as a management point.
- Configuration Manager site database server: Runs a supported version of Microsoft SQL Server
- SMS Provider: Interface between the console and the site database
Optional Site System Roles
- Application Catalog web service point: provides software information to the Application Catalog website from the Software Library.
- Application Catalog website point: provides users with a list of available software from the Application Catalog.
- Asset Intelligence synchronization point: connects to Microsoft to download Asset Intelligence catalog information. Can only be installed on the central administration site or a stand-alone primary site
- Certificate registration point: Communicates with a server that runs the Network Device Enrollment Service to manage device certificate requests that use the Simple Certificate Enrollment Protocol (SCEP).
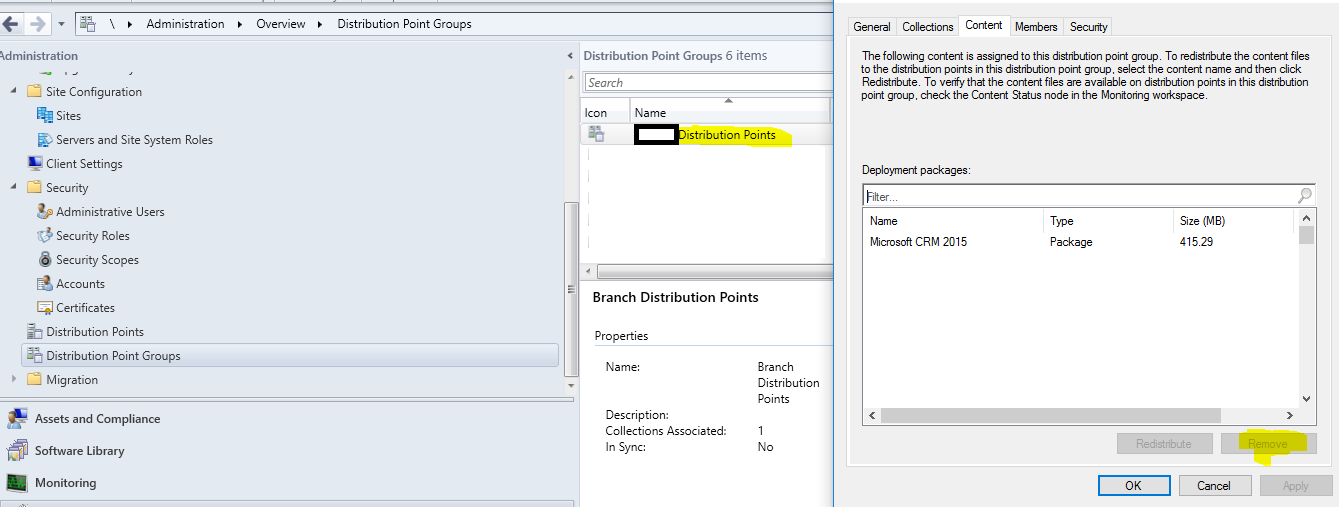
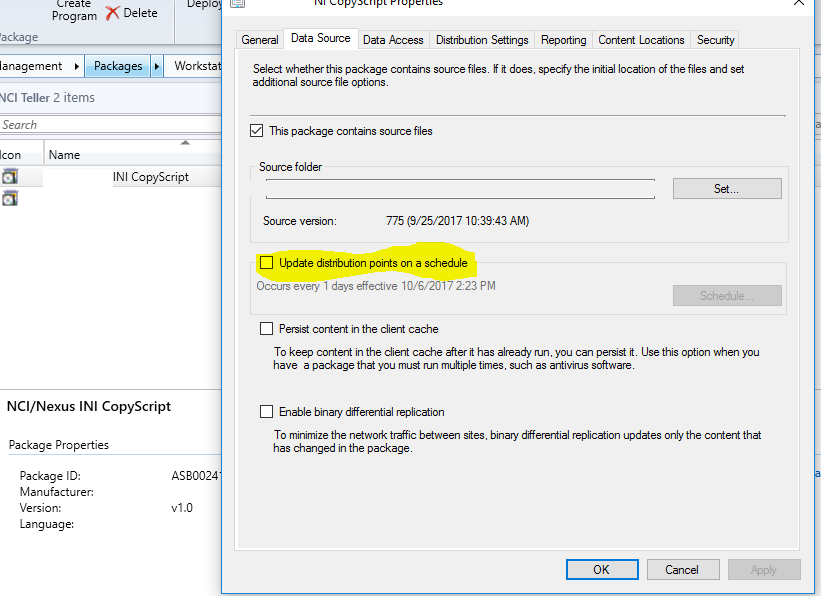
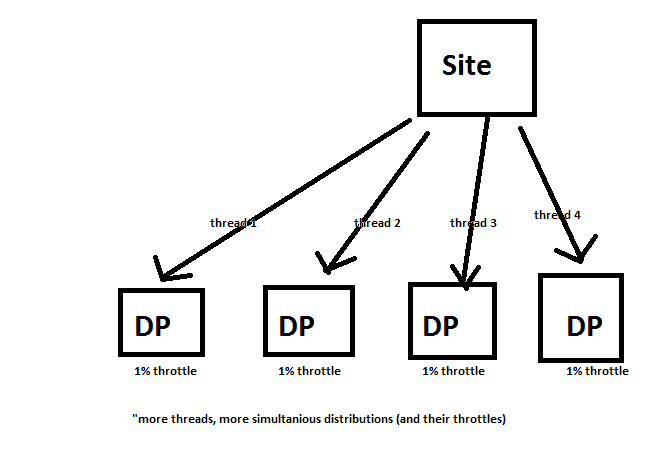
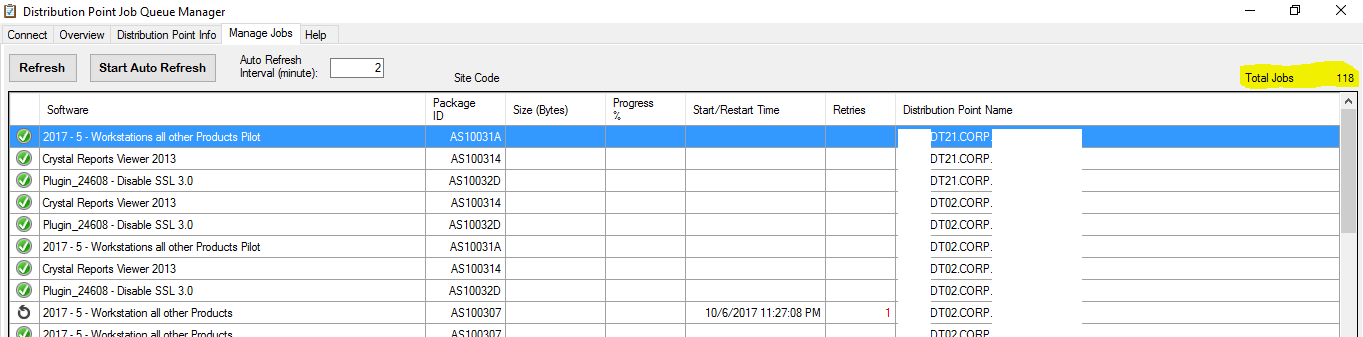
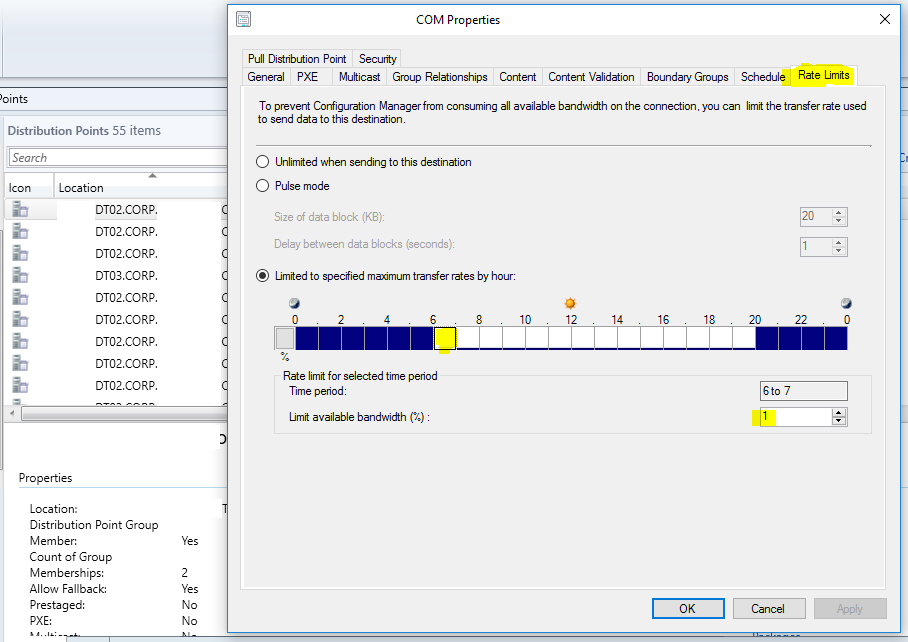
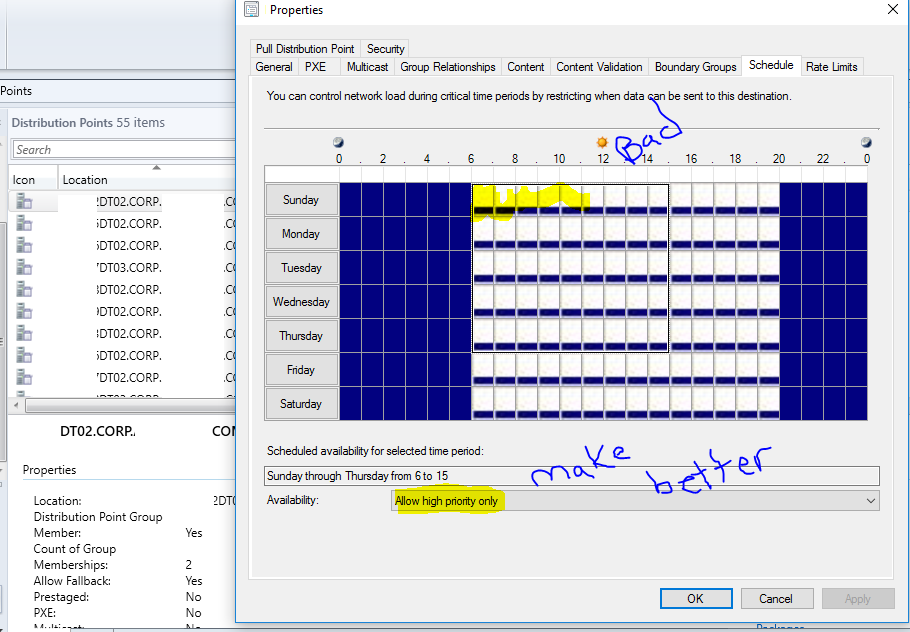
- Distribution point: Contains source files for clients to download, such as application content, software packages, software updates, operating system images, and boot images. You can control content distribution by using bandwidth, throttling, and scheduling options.
- Fallback status point: Helps you monitor client installation and identify the clients that are unmanaged because they cannot communicate with their management point.
- Management point*: Provides policy and service location information to clients and receives configuration data from clients.
- Endpoint Protection point: Accept the Endpoint Protection license terms and to configure the default membership for Microsoft Active Protection Service.
- Enrollment point: Uses PKI certificates for Configuration Manager to enroll mobile devices and Mac computers, and to provision Intel AMT-based computers
- Enrollment proxy point: Manages Configuration Manager enrollment requests from mobile devices and Mac computers.
- Out of band service point: Provisions and configures Intel AMT-based computers
- Reporting services point: Integrates with SQL Server Reporting Services to create and manage reports
- Software update point: Integrates with Windows Server Update Services (WSUS) to provide software updates to clients.
- State migration point: Stores user state data when a computer is migrated to a new operating system.
- System Health Validator point: Validates Network Access Protection (NAP) policies
- Microsoft Intune connector: Uses Microsoft Intune to manage mobile devices
Using the SCCM PowerShell Console
Importing the Configuration Manager PowerShell Module
Open PowerShell as an administrator
CD C:\Program Files (x86)\Microsoft Configuration Manager\AdminConsole\bin\
import-module .ConfigurationManager.psd1 - verbosecd A
Loading PowerShell from the Configuration Manager Console
-
Launch the Configuration Manager console. In the upper left corner, there’s a blue rectangle. Click the white arrow in the blue rectangle, and choose “Connect via Windows PowerShell”.
-
You’ll see a prompt that contains our site code: PS NNN:\>
Optionally you can open PowerShell as administrator and CD NNN:
Update Configuration Manager PowerShell Help File
-
update-help –module configurationmanager
Basic Cmdlets
Get-CMSite
Get-CMManagementPoint
Get-CMDistributionPoint
Get-Command –module ConfigurationManager –noun *managementpoint* #retrieve the cmdlets that have a name that contains “managementpoint.”
Example SCCM Applications that Utilize PowerShell
These are some examples of applications that I have created which utilize different SCCM PowerShell cmdlets:
Unlocking SCCM Objects
Here is a quick example of where SCCM’s cmdlets come to the rescue. Prior to 2012 SP1, objects needed to be unlocked in SQL, via the following procedure.
Unlocking in SQL
- Connect to your SCCM SQL Server via RDP
- SQL Management Studio -> CM_NNN -> New Query!
- select * from SEDO_LockState where LockStateID <> 0
- DELETE from SEDO_LockState where LockID = ‘
Unlocking Via PowerShell
Now, we can easily perform the same task with this PowerShell cmdlet that is designed to unlock objects!
Unlock-CMObject -InputObject $(Get-CMApplication -Name application_name)
Windows Management Instrumentation
Windows Management Instrumentation (WMI) is the infrastructure for management data and operations on Windows-based operating systems.
Exploring WMI on Your SCCM Server
-
Download/Open WMI Explorer and Connect to: \\siteserver\root\SMS
-
Browse away. There are also other namespaces to browse other than what is listed.
Testing Queries
-
Open WBEMTEST
-
Connect to \\siteserver\root\SMS\SITE_NNN
-
Click ‘Query’. Here you can run the same queries that SCCM runs in collections, etc.
-
Click Apply
SMS Provider
The SMS Provider is a Windows Management Instrumentation (WMI) provider that assigns read and write access to the Configuration Manager database at a site:
-
Each central administration site and primary site require at least one SMS Provider. You can install additional providers as needed.
-
The SMS Admins security group provides access to the SMS Provider. Configuration Manager automatically creates this group on the site server, and on each computer where you install an instance of the SMS Provider.
-
Secondary sites do not support the SMS Provider.
Configuration Manager administrative users use an SMS Provider to access information that is stored in the database. To do so, admins can use the Configuration Manager Console, Resource Explorer, tools, and custom scripts. The SMS Provider does not interact with Configuration Manager Clients. When a Configuration Manager console connects to a site, the Configuration Manager console queries WMI on the site server to locate an instance of the SMS Provider to use.
The SMS Provider helps enforce Configuration Manager security. It returns only the information that the administrative user who is running the Configuration Manager console is authorized to view.
Querying SCCM’s WMI through PowerShell
Here is a WMI query snippet to the SCCM database from the Threaded Computer Details Aggregator application I created that returns computer details
$qry = "select * from SMS_R_System inner join SMS_G_System_COMPUTER_SYSTEM on SMS_G_System_COMPUTER_SYSTEM.ResourceID = SMS_R_System.ResourceId inner join SMS_G_System_PC_BIOS on SMS_G_System_PC_BIOS.ResourceID = SMS_R_System.ResourceId inner join SMS_G_System_LOGICAL_DISK on SMS_G_System_LOGICAL_DISK.ResourceID = SMS_R_System.ResourceId where ResourceID = '$ResourceID'"

$objComputerSystemProduct = Get-WmiObject -ComputerName $ProviderMachineName -Namespace $SCCMnameSpace -Query $qry
Endpoint Protection Overview
- Antimalware policies
- Windows Firewall settings
- Windows Defender Advanced Threat Protection (1606+) (Windows 10 1607+)
Download the latest antimalware definition files, Send email notifications, use in-console monitoring, and view reports
Endpoint Protection Client
Windows 10 / Server 2016: Windows Defender is already installed. A management client for Windows Defender is installed when the Configuration Manager client installs.
Windows XP / 7 / 8 / Server 2008: Endpoint Protection client is installed with the Configuration Manager client.
Hyper-V: Endpoint Protection client can be installed on Hyper-V Host and on VM. Actions have a built-in randomized delay
-
Malware and spyware detection and remediation
-
Rootkit detection and remediation
-
Critical vulnerability assessment and automatic definition and engine updates
-
Network vulnerability detection through Network Inspection System
-
Integration with Cloud Protection Service to report malware to Microsoft.
Anti-Malware Policies
-
Assets and Compliance -> Endpoint Protection -> Antimalware Policies
-
Default Client Antimalware Policy OR Create Antimalware Policy
-
Scheduled Scans Settings
-
Scan Settings
-
Default Actions Settings
-
Real-time Protection Settings
-
Exclusion Settings
-
Advanced Settings
-
Threat Overrides Settings
-
Cloud Protection Service
-
Definition Updates Settings
-
Deploy Policy to Collection
Windows Firewall
-
Assets and Compliance -> Endpoint Protection -> Windows Firewall Policies
-
Create Windows Firewall Policy
-
For Every Network Profile:
-
Enable Windows Firewall
-
Block all incoming connections
-
Notify the user when Windows Firewall blocks a new program
-
Deploy Policy to Collection
Windows Defender Advanced Threat Protection
Windows Defender ATP is a service in the Windows Security Center. By adding and deploying a client onboarding configuration file, Configuration Manager can monitor deployment status and Windows Defender ATP agent health.
-
Logon to the Windows Defender ATP online service
-
Endpoint Management -> System Center Configuration Manager -> Download Configuration File.zip
-
Onboard devices for ATP
-
Assets and Compliance > Overview > Endpoint Protection > Windows Defender ATP Policies -> Create Windows Defender ATP Policy
-
Browse to Configuration File.zip
-
Monitor ATP Agent
-
Monitoring > Overview > Security -> Windows Defender ATP
-
Windows Defender Agent Deployment Status
-
Windows Defender ATP Agent Health (Healthy, Inactive, Etc)
Internet Based Client Management (IBCM)
Internet-based client management, or IBCM, allows you to manage clients when they are not connected to your network, but have an Internet connection. Cloud Management Gateways (CMG) and Cloud Distribution Points (CPD) are used as the cloud infrastructure to support IBCM.
IBCM Requirements
-
In order to implement IBCM into your environment, you need an Azure subscription.
-
It also requires clients and the site system servers that the clients connect to use PKI certificates
Not Supported in IBCM
-
Actual Client installation deployment over the Internet (do it manually)
-
Wake-on-LAN
-
OS deployment (you can deploy task sequences that do not deploy an OS)
-
Remote control
-
Software deployment (unless the Internet-based management point can authenticate the user in AD)
-
Roaming
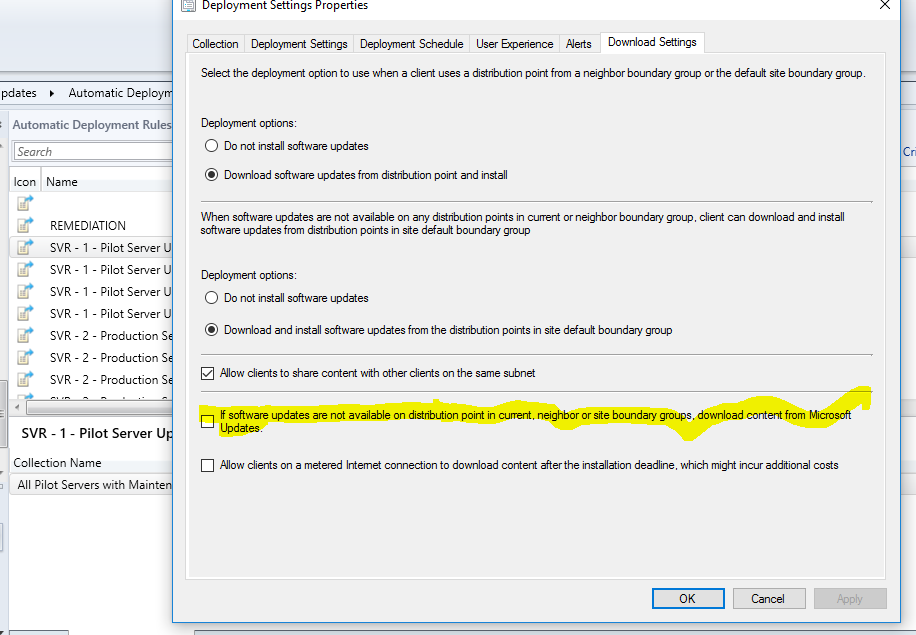
How IBCM Works with a Software Update Point
- Scan:against this software update point.
- Download: from Microsoft Update
Setting up an IBCM
Prerequisites:
-
Site Server Must be in DMZ – UPDATE, now you have CMG (Cloud Management Gateway) and this is no longer necessary.
-
Site systems must be connected to the Internet and must be in AD
-
Distribution point, Software update point, etc
-
The FQDN of site server needs to be on public DNS server as host record
Setup
-
Create 3 certificates
- WEB SERVER (IIS) CERTIFICATE (Web Server Template)
- CLIENT CERTIFICATE (Workstation Authentication Template)
- DISTRIBUTION POINT SITE SERVER CERTIFICATE (Workstation Authentication Template)
-
Issue 3 certificates
-
CA Server -> Certificate Authority -> right-click Certificate Templates, click New, and then click Certificate Template to Issue -> Select all 3
-
Configure 3 certificates
- CLIENT CERTIFICATE
- DISTRIBUTION POINT SITE SERVER CERTIFICATE
- WEB SERVER (IIS) CERTIFICATE
-
Setup in SCCM
-
Administration -> Sites and Servers -> Internet DP
-
General -> Import Cert -> DISTRIBUTION POINT SITE SERVER CERTIFICATE.PFX
-
General -> HTTPS and “Allow Internet-Only connections”
-
Administration -> Sites and Servers -> Internet MP
-
General -> HTTPS and “Allow Internet-Only connections”
-
SCCM -> Administration –> Sites –> Right, properties
-
client computer communication –> Choose use HTTPS or HTTP
-
Check the “Use PKI client certificate when available
-
Import the Root CA certificate
-
Install Client Manually
-
Option 1: manually add the new MP FQDN in the “Network” tab of the client property
-
Option 2: include the Client.msi property of CCMHOSTNAME=<Internet FQDN of the MP>
Office 365 Client Management
The Office 365 client can now be deployed and managed in your SCCM console.
The O365 Dashboard (appeared in 1610)
To enable the dashboard you must first select the Office 365 ProPlus Configurations hardware inventory class:
Administration > Client Settings > Default Client Settings -> Device Settings list, click Set Classes -> Hardware Inventory Classes -> Office 365 ProPlus Configurations.
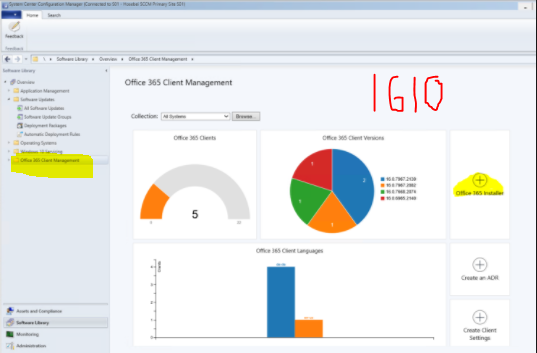
Dashboard Location: Software Library > Overview > Office 365 Client Management -> <CHOOSE COLLECTION>
-
Number of Office 365 clients
-
Office 365 client versions
-
Office 365 client languages
-
Office 365 client channels
How to Deploy Office 365 Apps (started in 1702)
-
Software Library > Overview > Office 365 Client Management.
-
Click Office 365 Installer in the upper-right pane.
-
Give it Name, XML (Optional), Select the Office 365 suite, select the applications
-
Deploy Now or Just Create Application
How to Deploy Office 365 Updates
-
Configure WSUS
-
Administration > Site Configuration > Sites -> WSUS Point -> Classifications tab
-
Classification: Updates
-
Product: Office 365 Client
-
Enable O365 Update Client Setting
-
Administration > Overview > Client Setting -> Software Updates -> Enable management of the Office 365 Client Agent: YES
Office 2016 vs. Office 365
Office 2016 is the traditional Office product, sold for a one-time fee. You pay once to buy a version of Office 2016 you can install on a single PC.
Office 365, on the other hand, requires you to pay a monthly or yearly fee which gives you access to the latest version of Office for as long as you pay the fee.
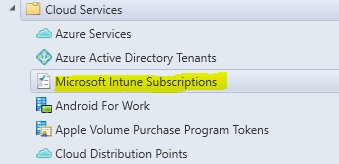
Mobile Device Management (MDM) with Intune
Microsoft Intune is a cloud service that provides mobile device management (MDM). There are two modes of device management, Intune standalone and Hybrid MDM with Configuration Manager.
Intune is managed in SCCM under the Cloud Services node.
In a standalone environment, the devices are managed in the Intune web console. In the hybrid environment, the devices are integrated into SCCM and would automatically be added to the All Mobile Devices collection.
Co-Management Model Released at Microsoft Ignite
A device cannot typically be managed in both. Once the device is managed in Hybrid, the Intune web console is no longer available. An exception to this is in SCCM 1710 where a new mode, co-managed, was released. This allows SCCM and Intune to both manage a Windows 10 device at the same time.
Azure Active Directory (Azure AD)
Azure Active Directory (Azure AD) is Microsoft’s multi-tenant, cloud based directory and identity management service. It can be synchronized with your on-premises AD to provide seamless login credentials while clients are on the web.
Configuration Manager Advanced Dashboard
Available through a custom Microsoft engagement is the ability to add an advanced dashboard to your SCCM reporting console.
The dashboard contains over 160 reports. Included in the dashboard are reports on
-
Asset Inventory
-
Software Update Management
-
Application Deployment
-
Compliance Settings
-
Infrastructure Monitoring
-
Site Replica
-
Content replication
-
Software Distribution
-
Clients Health
-
Servers Heath
-
SCEP
Dashboard Installation
In order to install the dashboard in your environment, the following variables need to be recorded:
A backup should then made of the SQL server database pertaining to reporting services, in addition a snapshot taken on the site server.
To install the dashboard the POPCMAD_Tool.exe was used with the variables above:
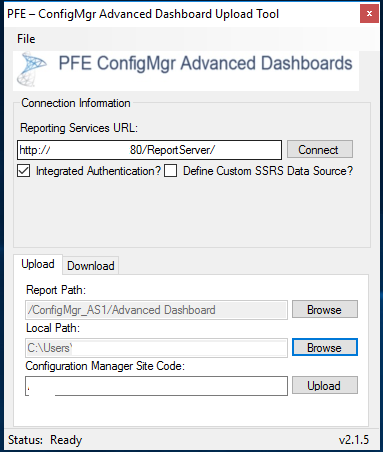
As seen above, the new report path, Advanced Dashboard, would be created which is the new root for the dashboard reports.
As an example, one dashboard now available to you would be the Client Health Statistics dashboard:

Disaster Recovery
A whitepaper for disaster recover, “System Center 2012 Configuration Manager R2 – Disaster Recovery for Entire Hierarchy and Standalone Primary Site” is available.
A copy of the whitepaper can be found here:
https://www.microsoft.com/en-us/download/details.aspx?id=44295
Most Important Disaster Recover Items
Although many topics are discussed and can be viewed in the whitepaper, of most importance to you are the ways in which SCCM can be recovered. Because Microsoft does not officially release SCCM in every release cycle, it is possible you could be on a version that can only be installed by updating an officially released version. Incremental updates can only be found on the site server with a cd.latest directory:
\\siteserver\c$\Program Files\Microsoft System Center Configuration Manager\cd.latest
Therefore, backup of this directory is crucial in order to perform an SCCM recovery. Fortunately, an automated task to backup this folder is now available in SCCM by enable backups in site maintenance at Administration > Overview > Site Configuration> Sites > (Right Click) NNN – Contoso, Inc. > Site Maintenance
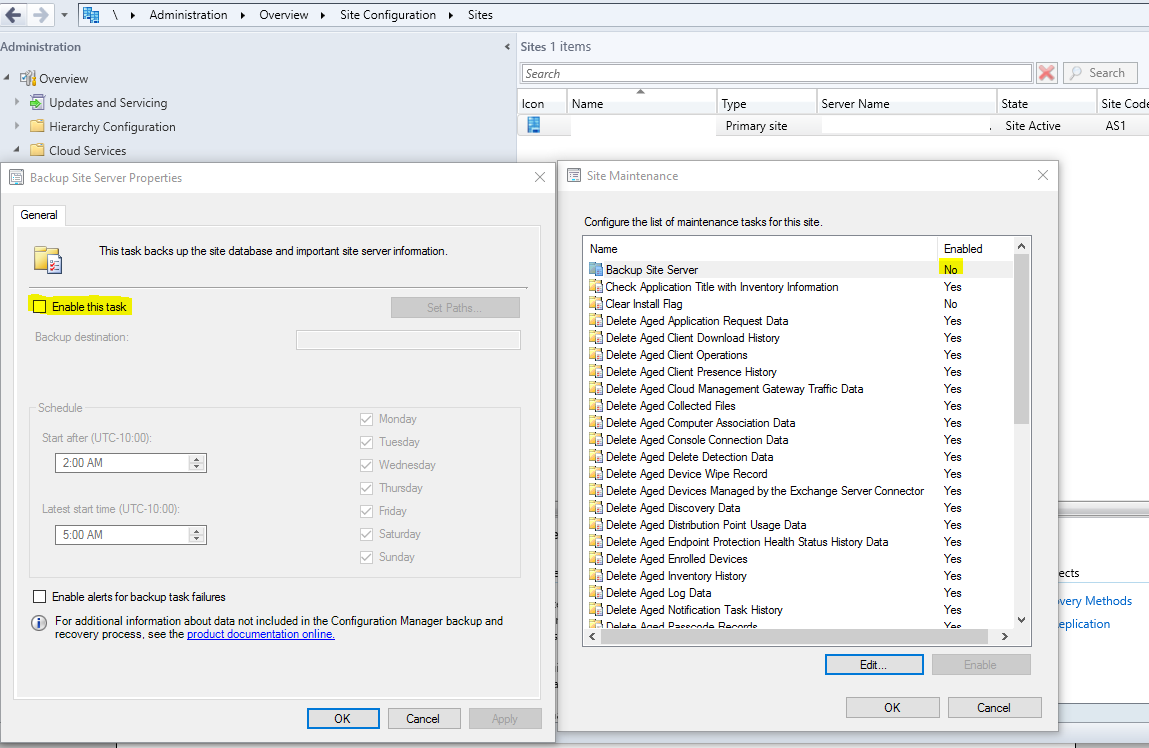
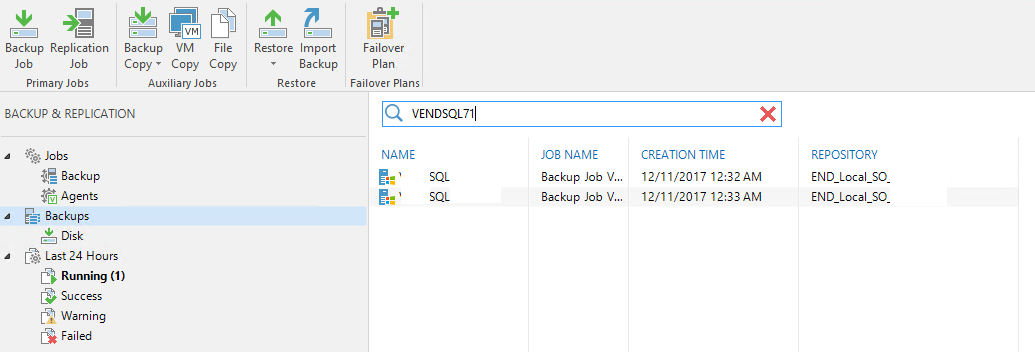
Even if you have not enabled this task, it is important to understand its functionality. If you are handling these disaster recovery efforts outside of SCCM using a different backup solution, you may not need to enable this task in your environment. For example, VEEAM could be used to backup your SCCM site server:
-
SCCM Site Server siteserver: Backed up in VEEAM as the whole server
-
SCCM SQL Servers SQLSERVER1 and SQLSERVER2: Back up your SQL Servers as an application aware backup (via a volume shadow copy writer). This application aware backup allows SQL to gracefully end all SQL transactions before taking the backup.
To restore an SCCM server, open your Veeam Backup & Replication Console on your backup server VEEAMBACKUP would allow the areas to be restored as you see here in with the SQL server backups
Role Based Administration
The role-based administration model in SCCM centrally defines security access settings for all sites and site settings by using the following:
- Security roles are assigned to administrative users to provide those users (or groups of users) permission to different Configuration Manager Objects.
- Security scopes are used to group specific instances of objects that an administrative user is responsible to manage.
- Collections are used to specify groups of user and device resources that the user can manage.
Each of these components are collectively combined to create the necessary security changes for user access.
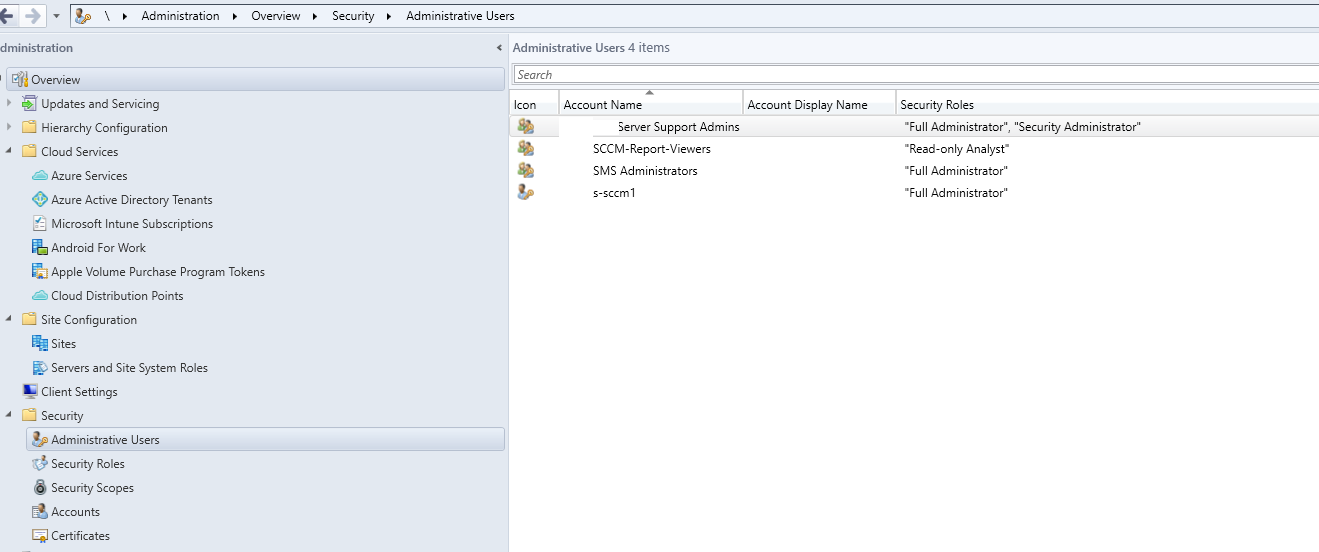
Management of SCCM security is handled in Administration > Overview > Security > Administrative Users
Associating Users, Roles, Scopes and Collections Together
To get started with Role Based Administration, you will add the different user groups to the console at Administration > Overview > Security > Administrative Users. Think of these as the users that you will be dividing permissions amongst.
Next you will add a Security Role to this group. There are built-in security roles and also roles you can create, called custom roles. For this example, let’s add the built-in Read-only Analyst role to the SCCM-Report-Vieyours group:

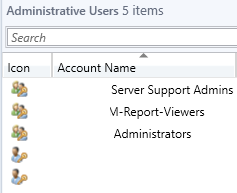
Finally, you will add the security scopes and collections this group can view:
The security scopes are set elsewhere but only represent a name. “Securable objects” throughout SCCM are then configured to either be viewable or not viewable by this security scope.
Securable vs Non-Securable Objects
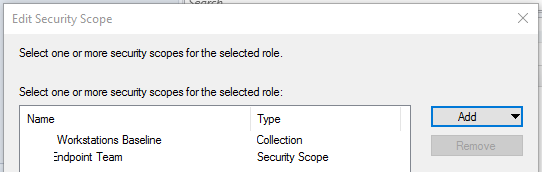
When building the security model for objects in SCCM, the idea of securable objects is important. When clicking certain objects in SCCM, you may notice a lock icon allowing the security scope to be set:

This allows the object to only be viewed by those in certain security scopes. For example, clicking the lock icon while selecting an alert subscription will allow you to limit only a specific team to see this object. Other users would not see this object within their console.
On the other hand, objects such as the alerts are non-securable and must be delineated with a security role. Security roles allows the associate objects to not be entirely hidden from a user, but can customized with what permissions apply to the object as seen in the security role properties for a custom role:
When creating new security roles, it is recommended to take one of the Built-in roles and copy it. This copy will become a custom role:

Built-in roles cannot be modified and are thought of generally as templates for custom roles.
|
Securable Objects managed by Security Scope
|
Non-Securable Objects managed by Security Role
|
|
Alert Subscriptions
|
Active Directory forests
|
|
Antimalware Policies
|
Administrative users
|
|
Applications
|
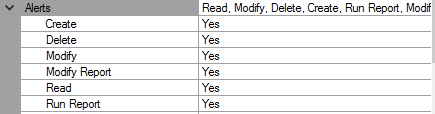
Alerts
|
|
Boot Images
|
Boundaries
|
|
Boundary groups
|
Computer associations
|
|
Configuration items
|
Default client settings
|
|
Distribution points and distribution point groups
|
Deployment templates
|
|
Driver packages
|
Device drivers
|
|
Global conditions
|
Exchange Server connector
|
|
Migration jobs
|
Migration site-to-site mappings
|
|
Operating system images
|
Mobile device enrollment profiles
|
|
Operating system installation packages
|
Security roles
|
|
Packages
|
Security scopes
|
|
Queries
|
Site addresses
|
|
Sites
|
Site system roles
|
|
Software metering rules
|
Software titles
|
|
Software Update Groups
|
Software updates
|
|
Software update packages
|
Status messages
|
|
Task sequence packages
|
User device affinities
|
|
Windows CE device setting items and packages
|
|
Associating Configuration Items to Dynamic Collections for Automated Remediation
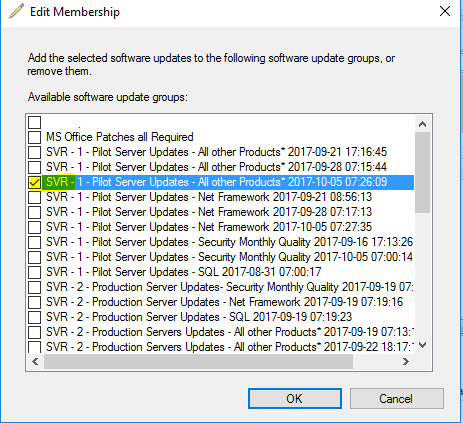
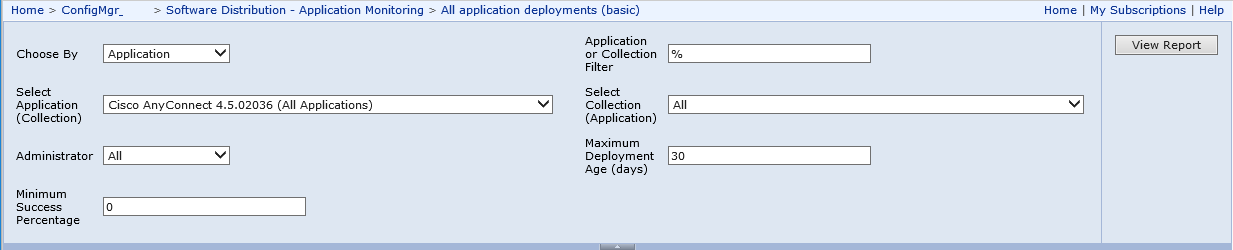
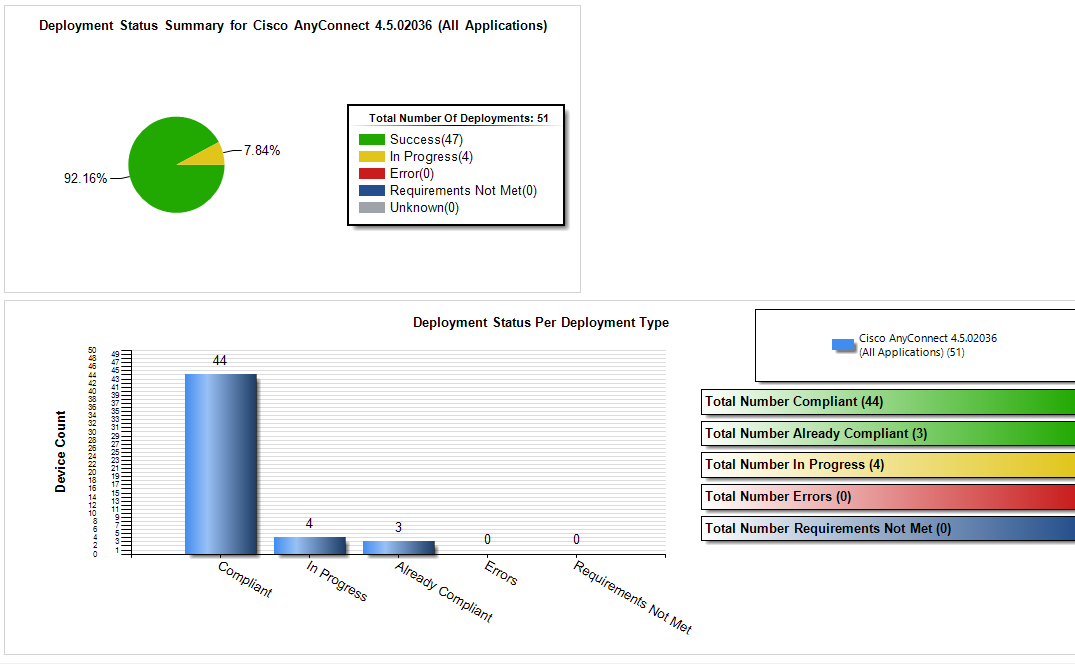
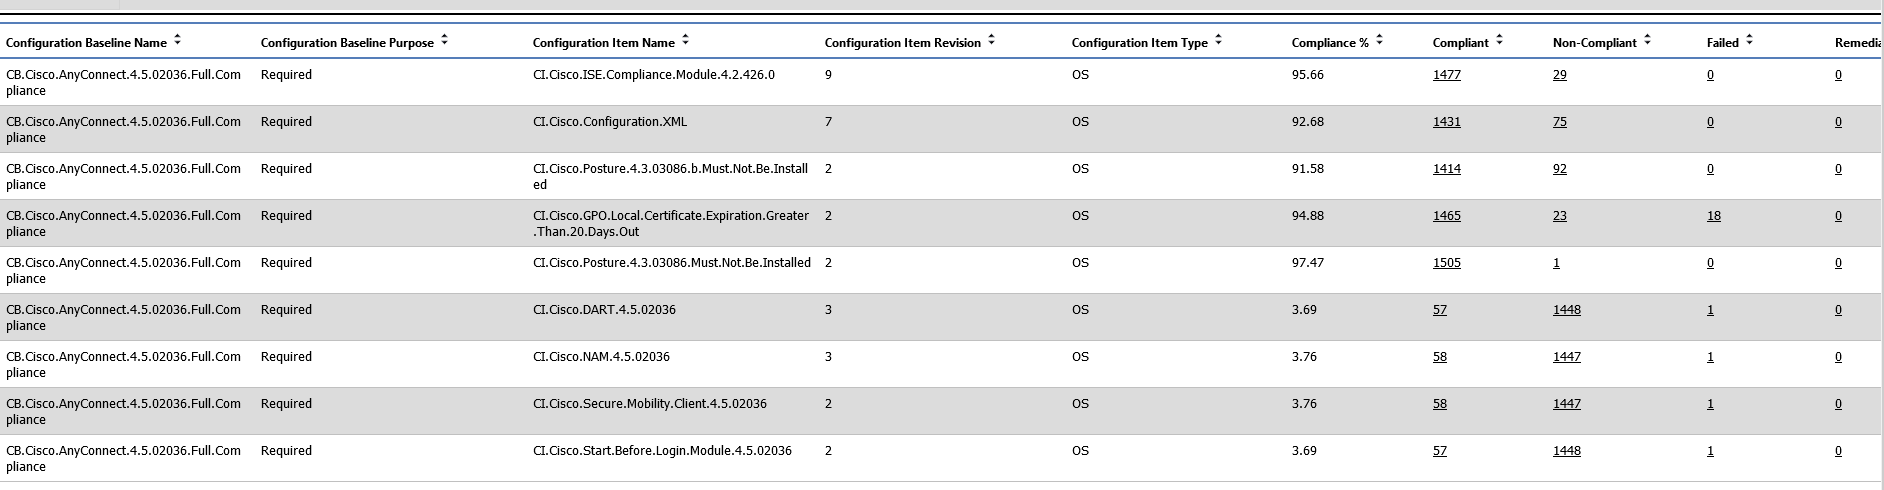
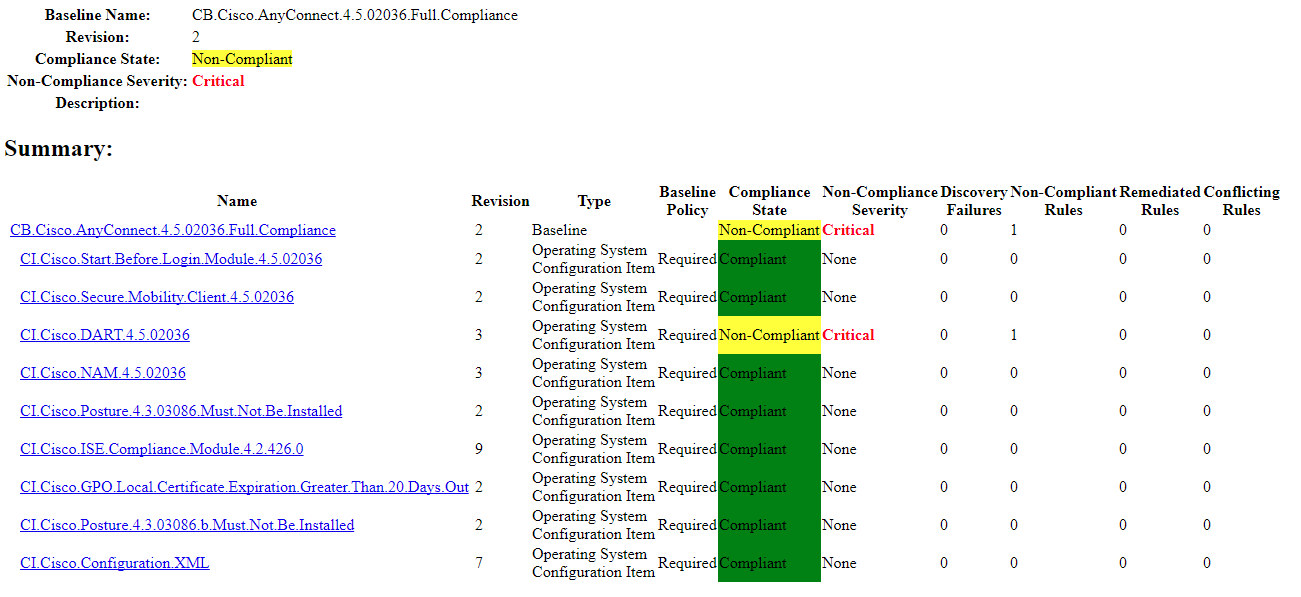
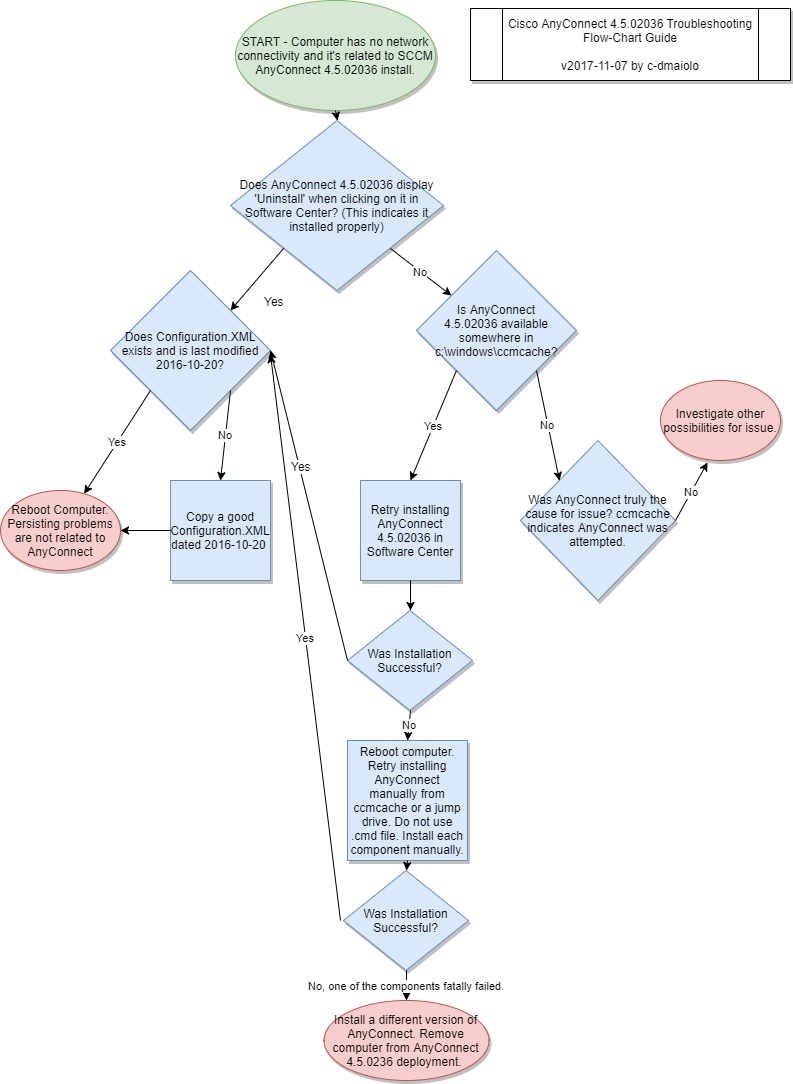
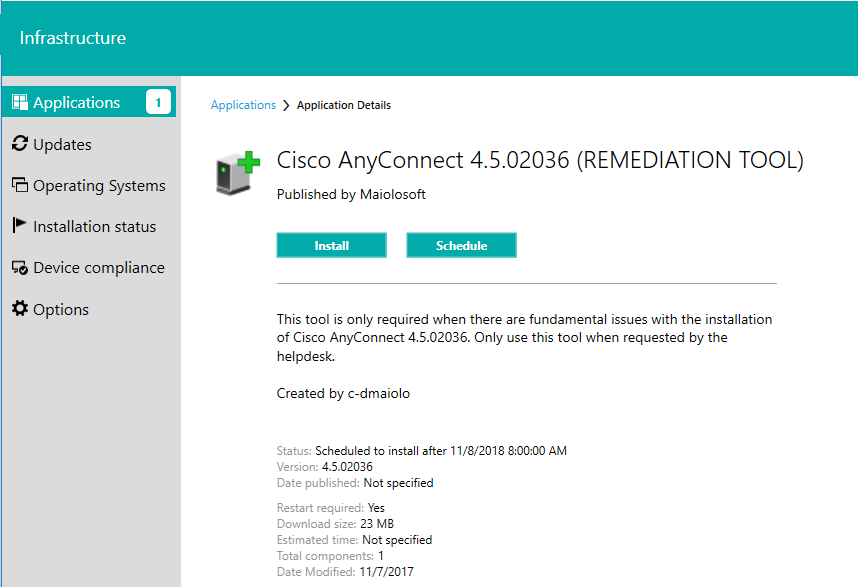
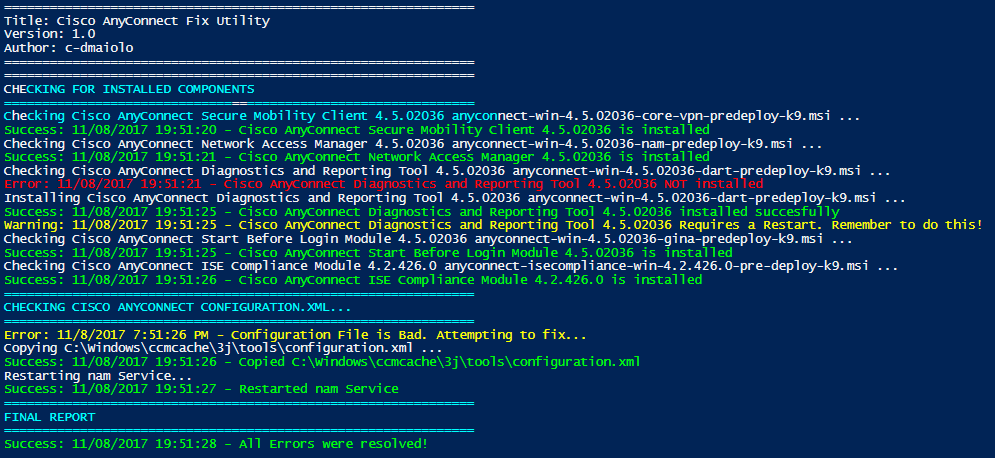
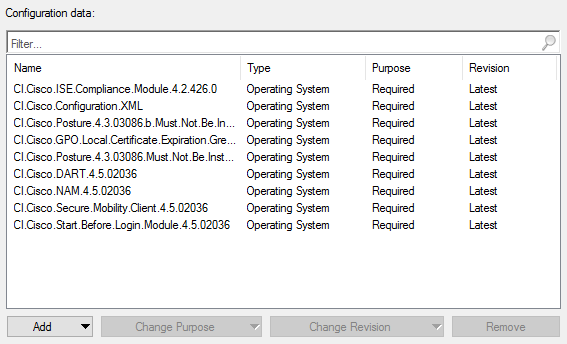
Configuration Items (CI’s) are useful for detecting compliance for a multitude of events and states on the computers within the company environment. For example, configuration items could be created and combined in a Configuration Baseline (CB’s) that detect the all of the required components to be compliant for Cisco AnyConnect:
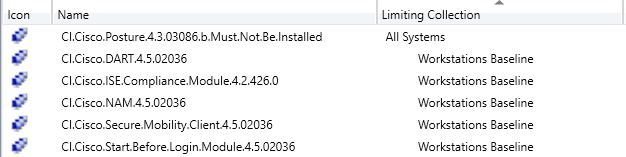
Anyone of these configuration items can be used as the query for a collection. For example, you can create collections that represent the computers that are not compliant for each of these items:
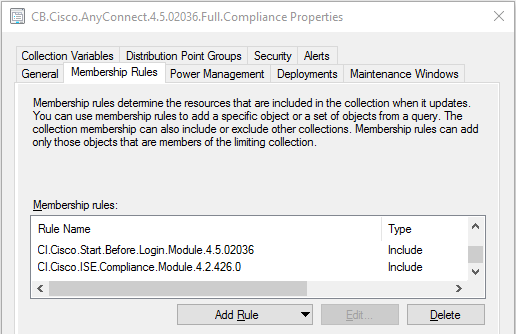
you can then target a remediation deployment to this collection, or in this example, why not combine the configuration item collections into a configuration baseline collection, much like the logic for the actual CI’s and CB’s:
Creating Dynamic Collections Based off Configuration Items
Creating a dynamic collection based off computers that fail compliance for a configuration item is as simple as creating a collection by the same name as the CI and using this custom query to target your CI. Simply replace the area boldened with the name of your CI:
select SMS_R_SYSTEM.ResyourceID,SMS_R_SYSTEM.ResyourceType,SMS_R_SYSTEM.Name,SMS_R_SYSTEM.SMSUniqueIdentifier,SMS_R_SYSTEM.ResyourceDomainORWorkgroup,SMS_R_SYSTEM.Client
from SMS_R_System where SMS_R_System.ResyourceID
in (select SMS_CI_COMP.ResyourceID from SMS_CI_CurrentComplianceStatus
as SMS_CI_COMP inner join SMS_ConfigurationItem
as SMS_CI on SMS_CI.ci_id=SMS_CI_COMP.ci_id
where ((SMS_CI_COMP.DisplayName = "CI.Name.Of.Yyour.CI" and SMS_CI.islatest = 1  and SMS_CI_COMP.ComplianceState != 1) ))
Antivirus Exclusions for SCCM
In order to exclude SCCM from its own System Center Endpoint Protection scans, the following AV policies should be applied under Assets and Compliance > Overview > Endpoint Protection > Antimalware Policies
-
SERVER – SCCM Site Server
-
SERVER– SCCM SQL Servers
These policies should be deployed to collections with their respective names and associated servers. To configure the exclusions, the following Microsoft article can be referenced, which will assist you in targeting SCCM current branch:
https://blogs.technet.microsoft.com/systemcenterpfe/2017/05/24/configuration-manager-current-branch-antivirus-update/
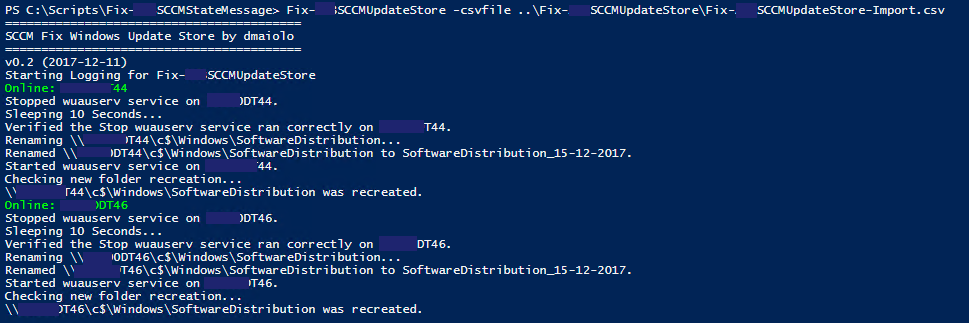
Test-DGMSCEPPathsTool
This tool, Test-DGMSCEPPaths.ps1, was written by David Maiolo which is a small utility to test the paths of folders before adding them to SCEP policies.
The tool requires the –csvfile argument, which is the path to a csv file containing one column, Path, with the paths listed in the column and can be run as in the example below.
This tool can be useful to verify input. Perhaps you find an additional “space” in your default installation directory between “Configuration” and “Manager” as in D:\Program Files\Microsoft System Center Configuration Manager\

Core Function of the Test-DGMSCEPPaths.ps1 tool