Overview
I developed this tool, Run-DGMFireEyeHXCompliance.psm1, to test and confirm a FireEye Endpoint Security (HX) rollout in a corporate environment. Additionally, at the end of this document I have provided you with a FireEye HX Deployment Strategy approach for your corporate environment.
For some background, FireEye Endpoint Security (HX) is an Endpoint Forensics product provided by FireEye and is part of the Endpoint Security (HX Series) of 5th Generation Appliances. It is an endpoint security tool to help an organization monitor indicators of compromise (IOC) on endpoints and respond to cyber-attacks on the endpoint before data loss might occur.
DGMFireEyeHXCompliance Tool
The DGMFireEyeHXCompliance tool remotely invokes a test routine to gather data from an HX endpoint perspective and is intended to be deployed after an HX cloud rollout. Once deployed, it performs the following tasks on your HX endpoint computers:
-
Egress access on port 443 is open to the FireEye HX Cloud Connector
-
Egress access on port 80 is open to the FireEye HX Cloud Connector
-
The FireEye HX xagt service is able to start properly.
-
After a specified wait time, the xagt service is continuing to run. This is to test for incompatibilities with the service on certain workstations.
-
Start a Microsoft Message Analyzer packet capture (Primary Event Trace Log (ETL)) for a specific period of time, restarting the FireEye HX xagt service at the moment of the Primary Event Trace Log (ETL), if stopped.
-
Stop and save Primary Event Trace Log (ETL) results along with packet capture help cab files.
-
Output any Web Proxy PAC configuration file URLs, if configured
-
Generate a FireEye HX troubleshooting log file and save
-
Combine packet capture results, packet capture assist files and xagt troubleshooting log files to a central location of your choosing.
-
Continue testing of the next FireEye HX endpoint computer supplied in the array
The tool runs the test results on each HX endpoint, and aggregates the following results centrally:
-
Test information as shown above during the test routine
-
Microsoft Message Analyzer CAB File (containing many Network Analysis Results inside)
-
Microsoft Message Analyzer Packet Capture Session File (Primary Event Trace Log (ETL))
-
xagt Service Troubleshooting Log
Downloading the DGMFireEyeHXCompliance Tool
To download the tool, download and extract the module below. Inside you will find the single invocation and application module Run-DGMFireEyeHXCompliance.psm1.

Running the DGMFireEyeHXCompliance Tool
Before running the tool, update the values within the Invoke-DGMFireEyeHXCompliance function at the end of the script. First, change the save path you would like the logs and trace results saved. This is the local path on the computer that will initiate the script:
$LocalPath = "c:\Run-DGMFireEyeHXCompliance\"
Next, indicate where you would like the results saved on the HX endpoint computers. These results will be removed automatically once aggregated to the source computer:
$RemotePath = "c:\temp\"
Finally, update the $HXEndpointComputers array to indicate the list of HX endpoint computers you would like to run the test against. You can also pass an array of computers to the application through the pipeline.
$HXEndpointComputers = @("DGM-SITE01-TST","DGM-SITE02-TST","VDGMDFS005VER","VDGMDFS006VER","WORKSTATION001","WORKSTATION002","WORKSTATION003")
Additionally, you will need to update the FireEye HX Cloud Connector address to match the connector in your environment, and additionally any ports you may wish to test. You can find this line at the bottom of the Run-DGMFireEyeHXCompliance function:
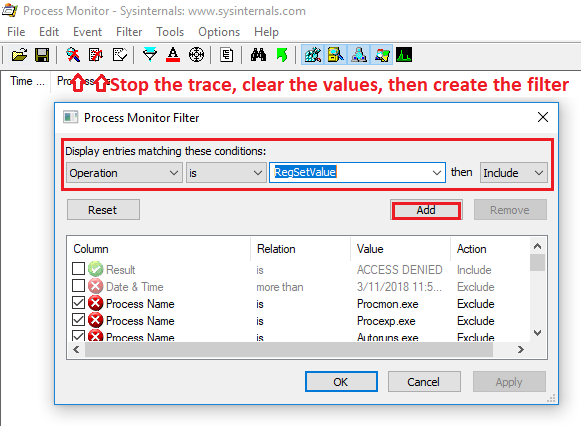
Get-DGMTCPPortOpenResults -tcpports 80,443 -destinationAddress "dgmtest-hxdmz-agent-1.helix.apps.fireeye.com"
To run the application, load the module Run-DGMFireEyeHXCompliance.psm1 in PowerShell ISE and run the invocation function. ***Make sure the PowerShell session is run with an account that has full administrative permissions to each of the endpoint computers*** Failure to do this, will produce errros when attempting to invoke a remote PowerShell session or collect test results.
Invoke-DGMFireEyeHXCompliance
As the tool runs, each of the HX endpoints will loop through the test items, aggregating results to the central source.
Understanding DGMFireEyeHXCompliance Test Results
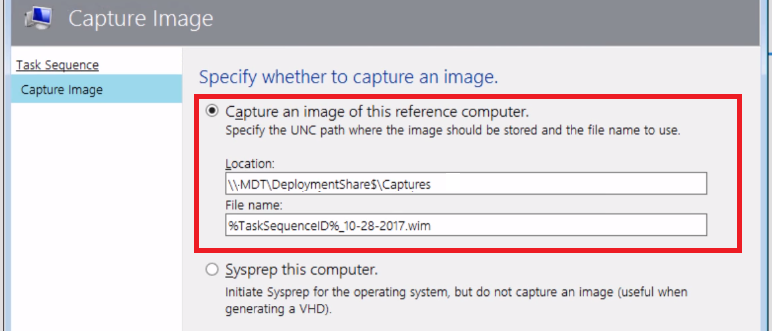
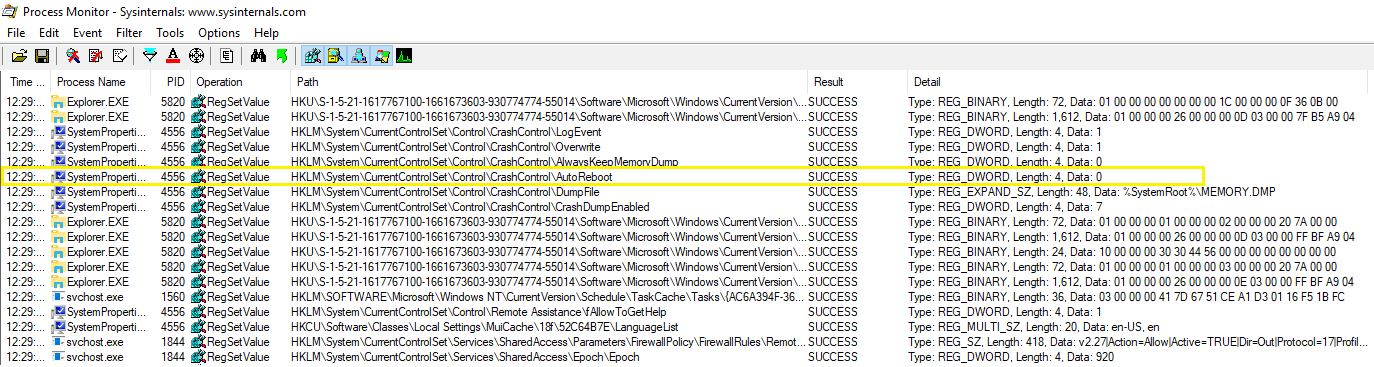
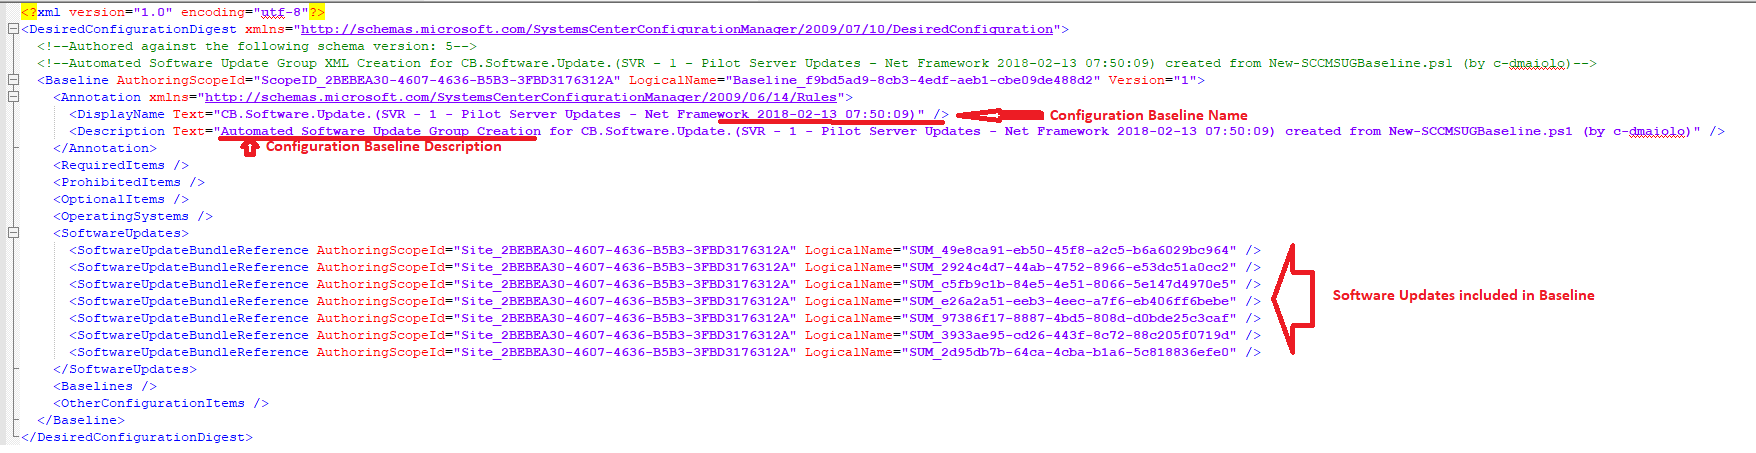
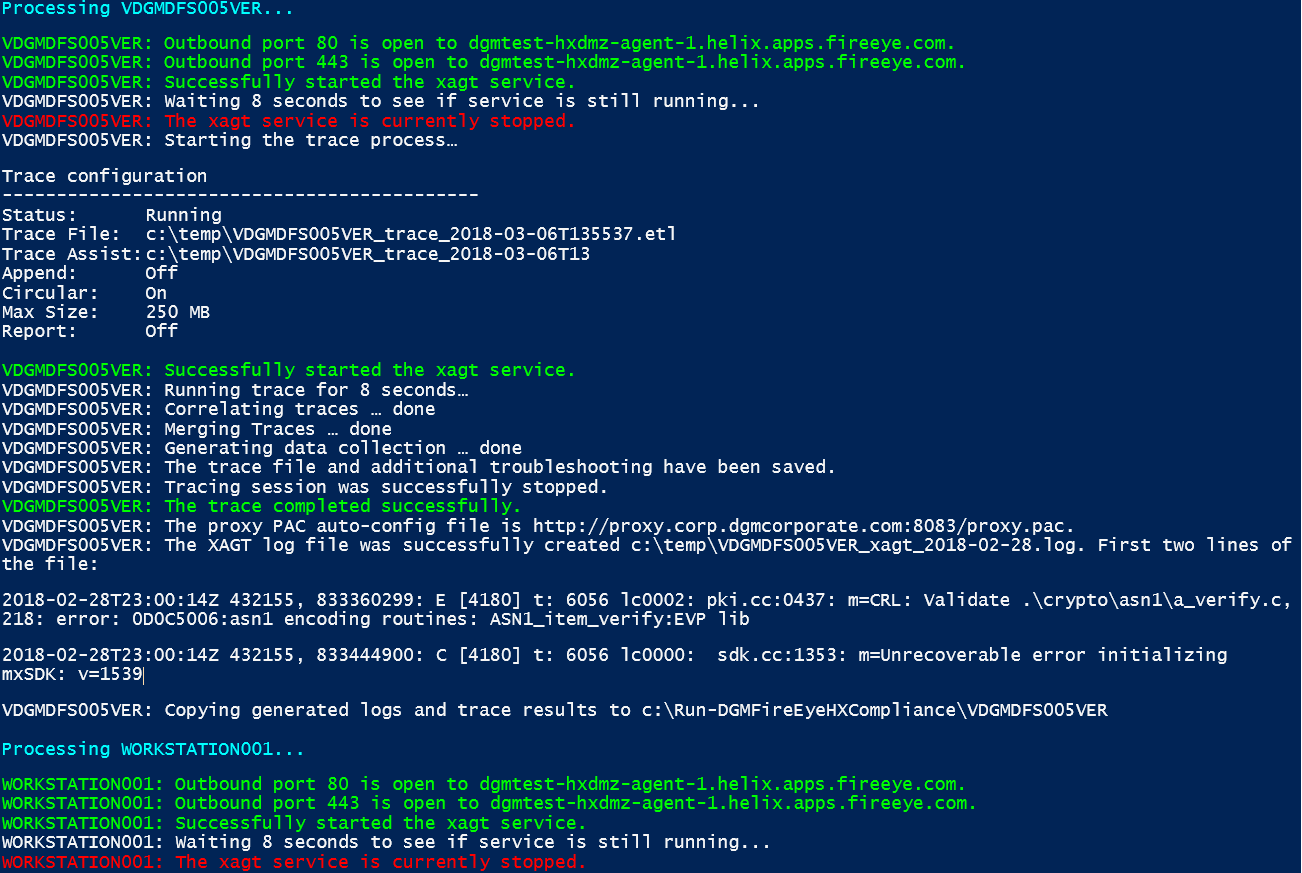
Once the tool has completed, first review the output as it contains some test results that can only be viewed within the console. A sample output set is below. We can see in these results the Cloud Connector can be accessed on 80 and 443, but also we see the FireEye HX xagt service has abruptly stopped after starting it and waiting 8 seconds to see if it is still running. This is a legitimate issue that you may notice on Virtual Machines, and subsequent analysis of packet trace data and xagt log results are necessary.
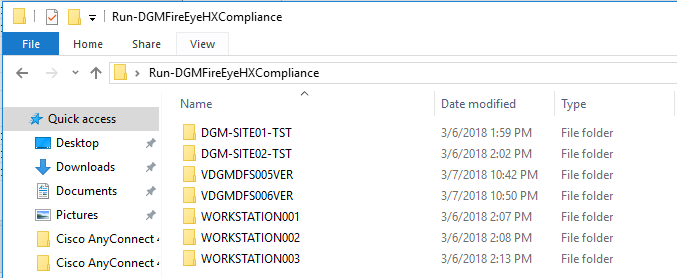
The tool outputs the log and packet capture results to the directory you choose, and separates the results by sub directory of the HX endpoints you specified within the $HXEndpointComputers variable:
FireEye Packet Trace Analysis with DGMFireEyeHXCompliance
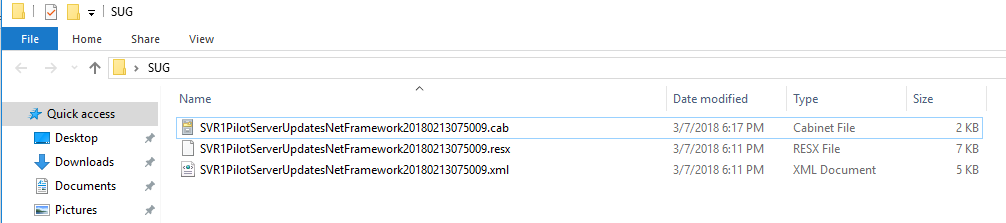
Within each directory, you will find the Microsoft Message Analyzer CAB File, the Microsoft Message Analyzer Packet Capture Session File, and the xagt Service Troubleshooting Log:

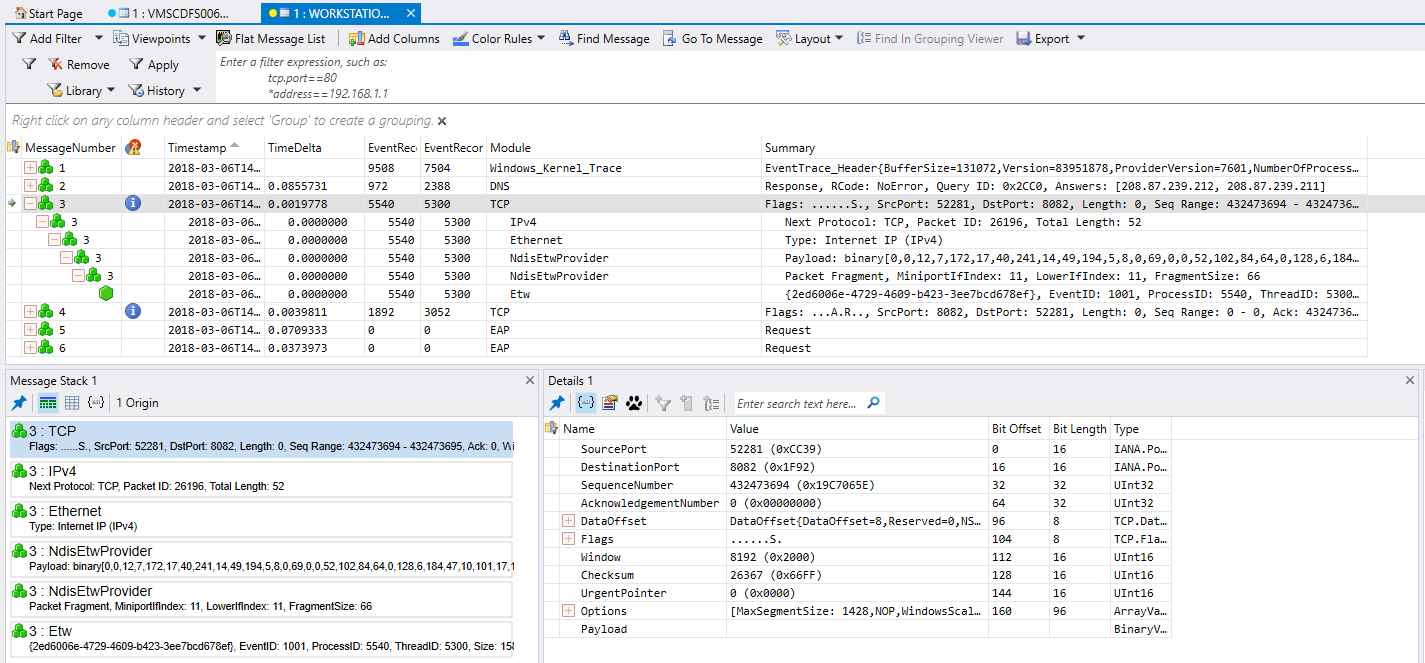
To view the Microsoft Message Analyzer Packet Capture Session File, download Microsoft Message Analyzer from https://www.microsoft.com/en-us/download/confirmation.aspx?id=44226. Open the Primary Event Trace Log (ETL) File in Microsoft Message Analyzer. You can opt to filter by TCP, HTTPS, etc to look into possible network issues between the HX endpoint and the cloud connector.
FireEye Advanced Network Analysis with DGMFireEyeHXCompliance
To view the Microsoft Message Analyzer CAB File, extract the CAB contents. Once extracted, you will notice several files, including another copy of the Primary Event Trace Log (ETL) file.
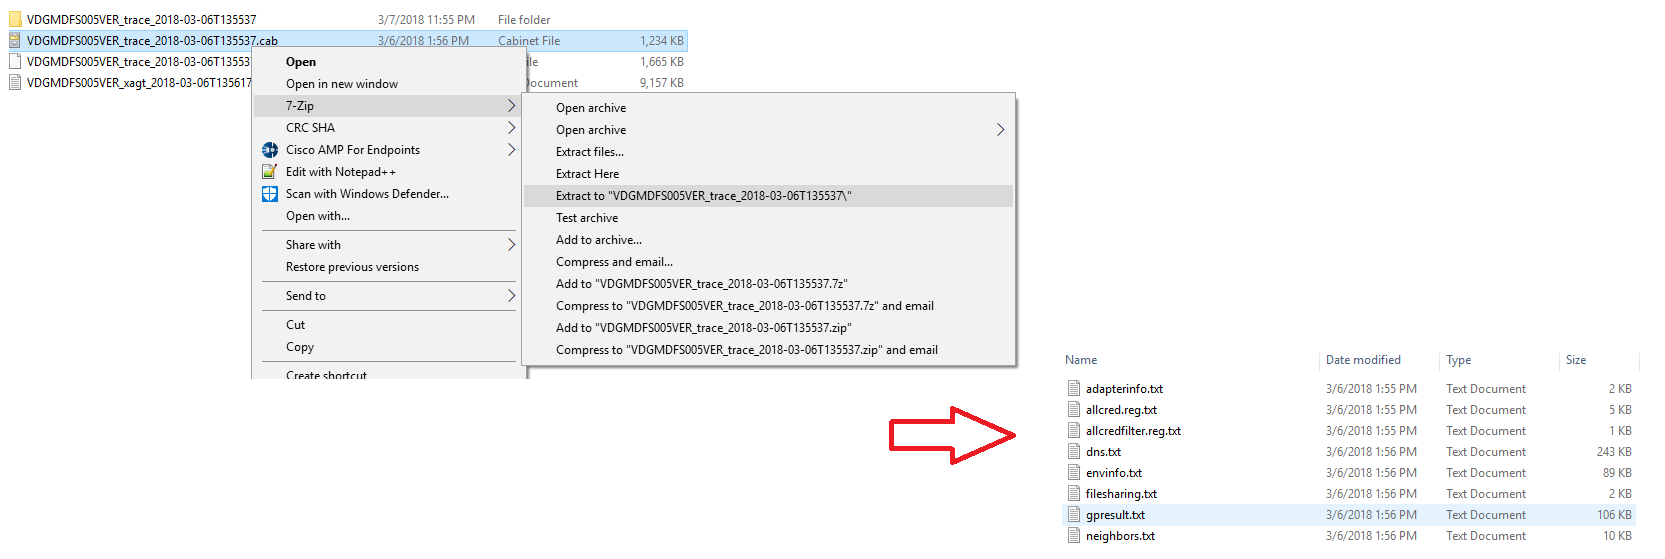
Below are descriptions of each of the files. Use these to diagnose network related issues.
|
General Configuration
|
|
OS Information
|
osinfo.txt
|
|
Credential Providers
|
allcred.reg.txt
|
|
Network Configuration
|
|
Environment Information
|
envinfo.txt
|
|
Adapter Information
|
adapterinfo.txt
|
|
DNS Information
|
dns.txt
|
|
Neighbor Information
|
neighbors.txt
|
|
Wireless Configuration
|
|
WLAN Auto-Config Eventlog
|
WLANAutoConfigLog.evtx
|
|
Windows Connect Now
|
|
WCN Information
|
WCNInfo.txt
|
|
Windows Firewall
|
|
Windows Firewall Configuration
|
WindowsFirewallConfig.txt
|
|
Windows Firewall Effective Rules
|
WindowsFirewallEffectiveRules.txt
|
|
Connection Security Eventlog
|
WindowsFirewallConsecLog.evtx
|
|
Connection Security Eventlog (Verbose)
|
WindowsFirewallConsecLogVerbose.evtx
|
|
Firewall Eventlog
|
WindowsFirewallLog.evtx
|
|
Firewall Eventlog (Verbose)
|
WindowsFirewallLogVerbose.evtx
|
|
Winsock Configuration
|
|
Winsock LSP Catalog
|
WinsockCatalog.txt
|
|
File Sharing
|
|
File Sharing Configuration
|
filesharing.txt
|
|
Registry Key Dumps
|
|
Credential Providers
|
AllCred.reg.txt
|
|
Credential Provider Filters
|
AllCredFilter.reg.txt
|
|
API Permissions
|
APIPerm.reg.txt
|
|
WlanSvc HKLM Dump
|
HKLMWlanSvc.reg.txt
|
|
WinLogon Notification Subscribers
|
Notif.reg.txt
|
|
Network Profiles
|
NetworkProfiles.reg.txt
|
|
Trace Files
|
|
Primary Event Trace Log (ETL)
|
report.etl
|
FireEye XAGT Service Log Analysis with DGMFireEyeHXCompliance
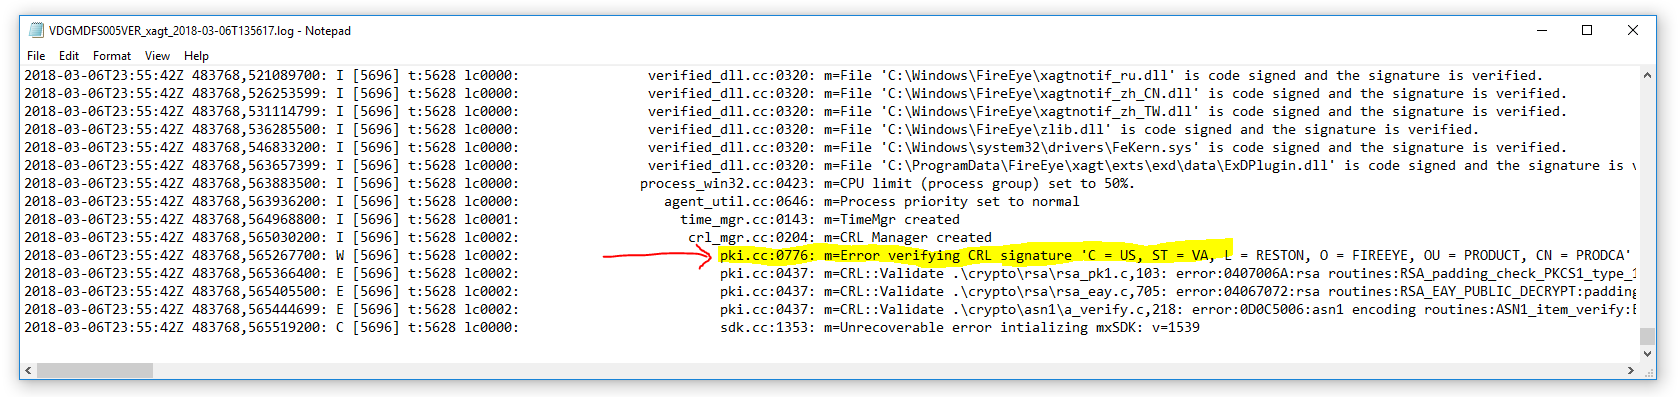
Included with the compliance analysis is the xagt service troubleshooting log file. This was gathered by running C:\Program Files (x86)\FireEye\xagt\xagt.exe -g <logFilePath> locally on each HX endpoint.
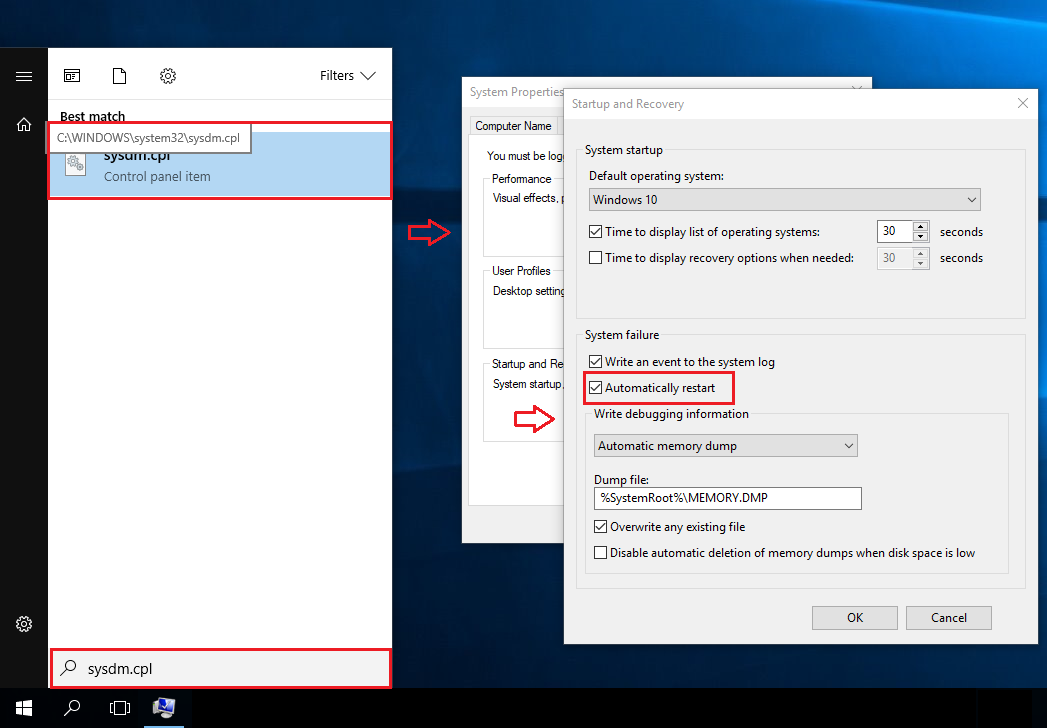
Pay specific attention towards the end of the file, looking for possible certificate issues, etc. As we see in this example, there is an error verifying the CRL signature in the .\crypto\rsa\rsa_pk1 file.
FireEye HX Deployment Approach
Purpose
The purpose of this section is to help you define a deployment strategy and plan for a FireEye HX Cloud deployment in your corporate environment. This section is comprised of two sections: the Deployment Strategy and the Deployment Plan. The Deployment Strategy section is used to formulate a deployment approach for FireEye HX Cloud (xAgt 26.21.8). The Deployment Plan section contains detailed schedule recommendations, resource, technical, and support information necessary for a successful deployment of the FireEye HX Cloud (xAgt 26.21.8).
RECOMMENDED SETTINGS For Deployment
The following are recommended configurations for your JSON file version 26.21.8. Note a deployment of the xAgent installation will either update the previous version of the xAgent or install the new version of xAgent if it does not already contain it.
-
Server: URL of FireEye HX Cloud Connector
-
Active Collection Enabled: False
-
Production Exploit Detection Enabled: False
-
FIPS Enabled: False
-
Configuration Poll Interval: 900 Seconds
-
CPU Limit: 50%
-
Protection Services Enabled: True
-
Age to Purge Protection Services: 90 Days
Deployment Strategy
The Deployment Strategy section of this article provides an overview of the deployment strategy you should plan for a FireEye HX Cloud (xAgt 26.21.8) rollout. Included in the deployment strategy is suggested timeline information, a description of the deployment approach, and associated benefits, assumptions and risks.
Deployment Overview
The Deployment Date’s referenced below are the date FireEye HX Cloud (xAgt 26.21.8) could potentially attempt to begin installation on your selected HX endpoint computers. Because the installation of the MSI was designed to be able to occur outside your maintenance window, installation during this phase could be scheduled to occur during any time during your chosen deployment deployment date.
|
Phases
|
Sites
|
Computers
|
Scheduled Dates
|
|
PRE-PILOT
|
Select Workstations and Servers
|
10
|
February 26, 2020 – February 27, 2020
|
|
PILOT
|
Pilot Workstation/Server Group
|
100
|
February 28, 2020 – March 02, 2020
|
|
PRODUCTION 1A WORKSTATIONS
|
Production Workstations Group
|
1,000
|
TBD Based on Pilot and Pre-Pilot Results
|
|
PRODUCTION 1B SERVERS
|
Production Server Group
|
400
|
TBD Based on Pilot and Pre-Pilot Results
|
Exclusions to Upgrade
The following types of systems should not be targeted within the scope of the project:
-
Citrix CEND Computers (but not CAU or CVU)
-
Domain Controllers (ADC)
-
Domain Joined Appliances
-
Virtual CNOs
-
Systems with no SCCM client
Deployment Plan
Deployment Approach
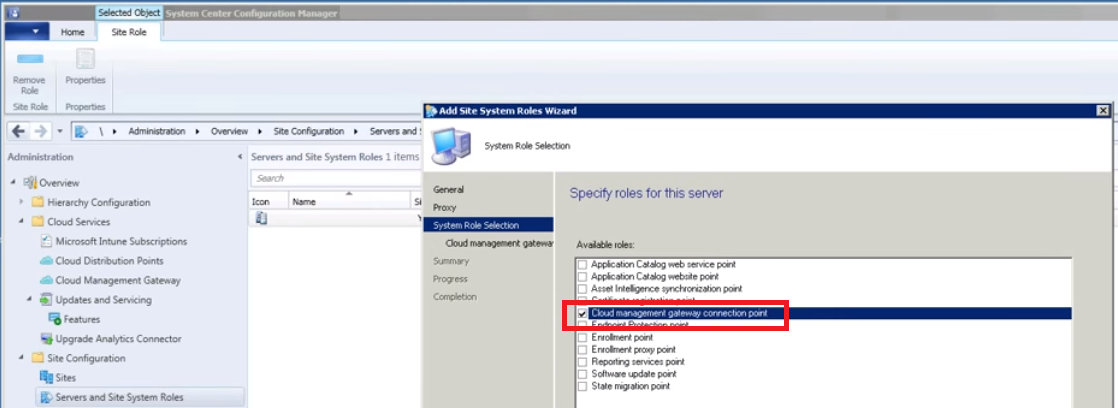
System Center Configuration Manager (SCCM) should be used to deploy FireEye HX Cloud (xAgt 26.21.8). When each phase is approached, the computers should be instructed to execute the installation in Parallel outside of the maintenance window. Create an SCCM application and deploy it as a required application to your HX endpoints as I have here.

Assumptions and Risks
Assumptions
The workstations and servers targeted for deployment are assumed to be left on and connected to your corporate network during their respective phase window.
Risks
During a deployment of the 24.9.0 version of the xAgent deployment, you may run in to a few issues where processor utilization can heighten during an xAgent scan.
Engagement and Promotion Strategy
During each deployment phase a corporate email should be sent to communicate the associated deployment phases. Members in your teams may choose to notify specific application owners if they feel the need.
Testing Methods and Monitoring
In the event an issue is determined, a rollback to a previous version should be deployed through the uninstall command on the application. Additional information should be available once the Pre-Pilot and Pilot phase of your rollout to xAgent 26.21.8 have completed.
Monitoring The Deployment
Basic Monitoring
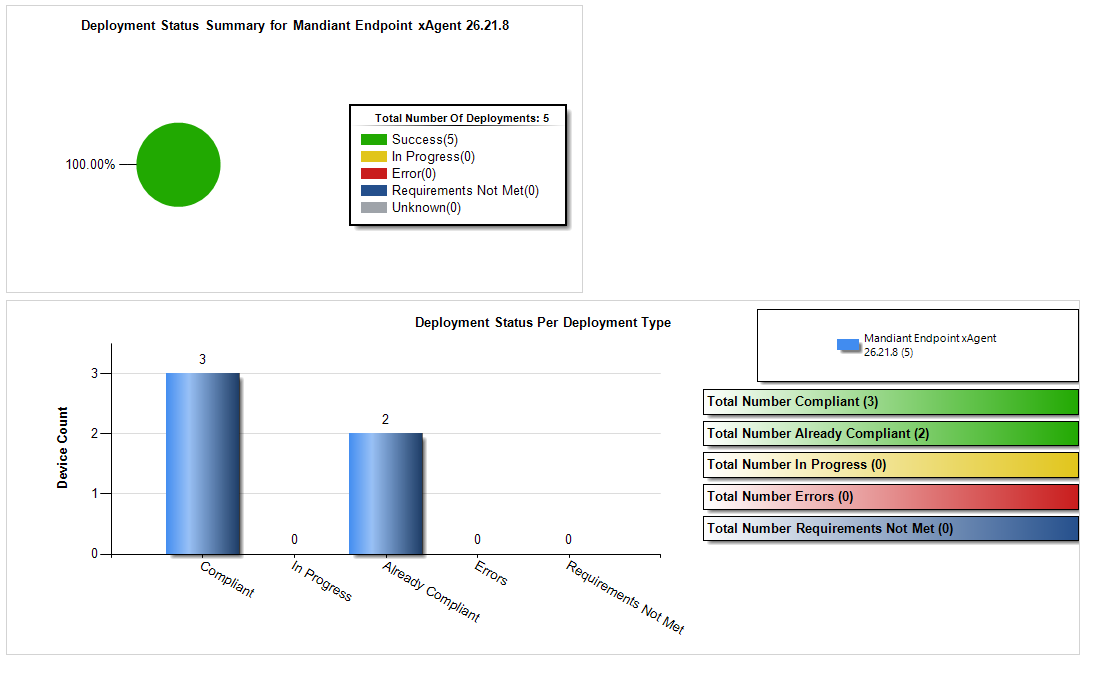
Central monitoring of the FireEye HX Cloud (xAgt 26.21.8) rollout can be viewed from your computer by visiting http://sccmserver/Reports/ and searching for the report ‘All application deployments (basic)’.
Choose By: Application
Select Application:
-
FireEye HX Cloud (xAgt 26.21.8) choose your xAgt deployment
Select Collection (Application): All

Clicking the “View Current” data for the phase will allow you to further drill down, even to the computer and user level if necessary:

The SCCM monitoring should be setup by determining your MSI product code associated to the FireEye HX Cloud (xAgt 26.21.8) MSI installer exists on the machine. In this example, the product code is:
{CB3A0A18-EA4B-45AA-801B-AAA9D00CABE5}
Critical-Need Endpoint Strategy
I developed an additional solution that can allow you to start or stop the Mandiant xAgt on any set of your HX endpoints if they are a critical-need system where you do not want the agent running during a certain time span.
Script 1: A small program that takes a list of your HX endpoint critical-need computers as input, and pauses the Mandiant agent on these computers.
Script 2: Another small program that resumes the Mandiant agent, again taking the same list as input.
The first script should be run on a schedule as a scheduled task. In this example, we choose 7AM, and then then the second program at 8PM. This creates a “Mandiant Agent is off during business hours and on at night” environment.

Technical Notes on Critical-Need Endpoint Computers Start / Stop Procedure
STOP / SET TO MANUAL THE xagt SERVICE ON Critical-Need MACHINES
-
RDP into the server you want the scheduled task to run on
-
Open PowerShell ISE -> C:\Scripts\XAGT_Service_Tasks\XAGT_Service_Tasks_Stop_Service.ps1
-
Click Run (the Green Play Button)
START / SET TO AUTOMATIC THE xagt SERVICE ON Critical-Need MACHINES
-
RDP into the server you want the scheduled task to run on
-
Open PowerShell ISE -> C:\Scripts\XAGT_Service_Tasks\ XAGT_Service_Tasks_Start_Service.ps1
-
Click Run (the Green Play Button)
MODIFYING LIST of Critical-Need MACHINES
Modify: C:\Scripts\XAGT_Service_Tasks\hostnames_PRODUCTION.txt
LOGS OF YOUR RESULTS
Starting Log: “C:\Scripts\XAGT_Service_Tasks\XAGT_Service_Tasks_START_DATE.log”
Stopping Log: “C:\Scripts\XAGT_Service_Tasks\XAGT_Service_Tasks_STOP_DATE.log”
Mandiant_xAgt_Tasks_Stop_Service.ps1
$path = "C:\Scripts\Mandiant_xAgr_Tasks"
$hostname = Get-Content "$path\hostnames_PRODUCTION.txt"
$service = "xagt"

foreach ($h in $hostname){

    try{
        (get-service -ComputerName $h -Name $service).Stop()
        set-service -ComputerName $h -Name $service -startuptype "manual"
        Write-Host "Success: Stopped and set to Manual xagt service on $h ..." -foregroundcolor green
        Write-Output "Success: $(Get-Date); Stopped and Set to Manual the $service service on $h" >> "$path\Mandiant_xAgt_Tasks_STOP_$(Get-Date -Format dd-MM-yyyy).log"
    }
    catch{
        Write-Host "Error: Could NOT Stop nor set to Manual xagt service on $h ..." -foregroundcolor red
        Write-Output "Error: $(Get-Date); Could NOT Stop nor set to Manual xagt service on $h" >> "$path\Mandiant_xAgt_Tasks_STOP_$(Get-Date -Format dd-MM-yyyy).log"
    }

}
Mandiant_xAgt_Tasks_Start_Service.ps1
$path = "C:\Scripts\Mandiant_xAgr_Tasks"
$hostname = Get-Content "$path\hostnames_PRODUCTION.txt"
$service = "xagt"

foreach ($h in $hostname){

    try{
        (get-service -ComputerName $h -Name $service).Start()
        set-service -ComputerName $h -Name $service -startuptype "Automatic"
        Write-Host "Success: Started and set to Automatic xagt service on $h ..." -foregroundcolor green
        Write-Output "Success: $(Get-Date); Started and Set to Automatic the $service service on $h" >> "$path\Mandiant_xAgt_Tasks_START_$(Get-Date -Format dd-MM-yyyy).log"
    }
    catch{
        Write-Host "Error: Could NOT Start nor set to manual xagt service on $h ..." -foregroundcolor red
        Write-Output "Error: $(Get-Date); Could NOT Start nor set to Automatic xagt service on $h" >> "$path\Mandiant_xAgt_Tasks_START_$(Get-Date -Format dd-MM-yyyy).log"
    }

}
Mandiant Endpoint xAgent Antivirus Exclusion Policies
In order to prevent potential conflicts with antivirus and/or host-based intrusion detection software, a series of files should be whitelisted using SCCM Antimalware exclusion policies. Below are example policies you can create
-
EP -SERVER – Mandiant Endpoint xAgent Antimalware Policy
-
EP -WORKSTATION – Mandiant Endpoint xAgent Antimalware
Collectively, the policies should target the workstations and servers that the Mandiant Endpoint xAgent Application should be deployed to. These policies need to include exclude the following files:
C:\Program Files (x86)\FireEye\xagt\audits.dll
C:\ProgramData\FireEye\xagt\events.db
C:\ProgramData\FireEye\xagt\events.db-wal
C:\Windows\System32\drivers\FeKern.sys
C:\ProgramData\FireEye\xagt\main.db
C:\Program Files (x86)\FireEye\xagt\mindexer.sys
C:\Windows\FireEye\NamespaceToEvents_xx.dll (note the xx is wildcard)
C:\Windows\FireEye\NamespaceToEvents32_xx.dll (note the xx is wildcard)
C:\Program Files (x86)\FireEye\xagt\xagt.exe
C:\ProgramData\FireEye\xagt\xlog.db
C:\ProgramData\FireEye\xagt\xlog.db-wal
The DGMFireEyeHXCompliance PowerShell Module
function Run-DGMFireEyeHXCompliance{
<#
.SYNOPSIS
    Test FireEye HX Compliance And Aggregaget Test Resullts
.NOTES
    File Name  : Run-DGMFireEyeHXCompliance.psm1
    Author     : David Maiolo
    Version    : 2018-03-06
.LINK
#>

    param(

        [Parameter(Position=0,Mandatory=$true,ValueFromPipeline=$true)]
        $HXEndpointComputers,
        [Parameter(Position=1,Mandatory=$true,ValueFromPipeline=$false)]
        $RemotePath,
        [Parameter(Position=2,Mandatory=$true,ValueFromPipeline=$false)]
        $LocalPath

    )


    #Create a script block to run on the remote machine to test for FireEye issues
    $script = {
        #define local hostname
        $hostname = $env:COMPUTERNAME

        function Get-DGMTCPPortOpenResults{
            <#
            .SYNOPSIS
                Test TCP Port and Display Results
            .NOTES
                Author     : David Maiolo - david.maiolo@gmail.com
            .LINK
            #>
            param(
                $tcpports,
                $destinationAddress
            )

            $hostname = $env:COMPUTERNAME

            foreach ($port in $tcpports)
            {

                try{
                    $Socket = New-Object Net.Sockets.TcpClient
                    $ErrorActionPreference = 'SilentlyContinue'


                    $Socket.Connect($destinationAddress, $port)

                    if ($Socket.Connected) {
                        Write-Host $hostname ": Outbound port $port is open to $destinationAddress." -ForegroundColor Green
                        $Socket.Close()
                    }
                    else{
                        Write-Host $hostname ": Outbound port $port is closed or filtered to $destinationAddress." -ForegroundColor Red
                    }

                }catch{
                    Write-Host $hostname ": Could NOT open the socket for $port port, so result unknown." -foregroundcolor yellow
                }
            }
        }

        function Start-DGMService{
            <#
            .SYNOPSIS
                Attempt to start a Service and Display Results
            .NOTES
                Author: David Maiolo - david.maiolo@gmail.com
            .LINK
            #>
            [CmdletBinding()]
            [OutputType([int])]
            Param
            (
                [Parameter(Mandatory=$true,ValueFromPipeline=$true, Position=0)]
                $service
            )

            $hostname = $env:COMPUTERNAME
            try{
                #(get-service -Name $service).Start()
                #set-service -Name $service -startuptype "Automatic" -ErrorAction Stop
                Start-Service $service -ErrorAction stop
                Write-Host $hostname ": Successfully started the $service service." -foregroundcolor green
            }
            catch{
                Write-Host $hostname ": Could NOT Start $service service:" ($error[0]) -foregroundcolor red
            }
        }

       function Test-DGMService{
           <#
           .SYNOPSIS
               Look to see if a service is running, stopped, etc and display results
           .NOTES
               Author: David Maiolo - david.maiolo@gmail.com
           .LINK
           #>
           [CmdletBinding()]
           [OutputType([int])]
           Param
           (
               [Parameter(Mandatory=$true,ValueFromPipeline=$true, Position=0)]
               $service
           )

           $hostname = $env:COMPUTERNAME
           try{
               $serviceStatus = (get-service -Name $service).Status
               if (($serviceStatus -eq "Running")){
                   Write-Host $hostname ": The $service service is currently $serviceStatus." -ForegroundColor Green
               }else{
                   Write-Host $hostname ": The $service service is currently $serviceStatus." -ForegroundColor Red
               }
           }
           catch{
               Write-Host $hostname ": The $service service could not be checked for current status. Result unknown." -foregroundcolor yellow
           }
       }

        function Get-DGMProxyPACFile{
        <#
        .SYNOPSIS
            Resturn proxy PAC file URL from registry entry
        .NOTES
            Author: David Maiolo - david.maiolo@gmail.com
        .LINK
        #>

            $hostname = $env:COMPUTERNAME
            try{
                $proxyPAC = Get-ItemProperty ('Registry::HKLM\SYSTEM\CurrentControlSet\Services\NlaSvc\Parameters\Internet\ManualProxies')
                $proxyPAC = $proxyPAC.'(default)'
                Write-Host $hostname ": The proxy PAC auto-config file is $proxyPAC."
            }
            catch{
                Write-Host $hostname ": Unable to determine the proxy PAC auto-config file." -foregroundcolor yellow
            }
        }

        function Get-DGMFireEyeLogFile{
            <#
            .SYNOPSIS
                Creates xagt log file
            .NOTES
                Author: David Maiolo - david.maiolo@gmail.com
            .LINK
            #>
            [CmdletBinding()]
            [OutputType([int])]
            Param
            (
            [string]$logFile
            )

            $hostname = $env:COMPUTERNAME
            try{

                $logFile = "$hostname`_xagt_$(get-date -f yyyy-MM-ddTHHmmss).log"
                $logFolder = "c:\temp\"

                #Create subdirectory if not present
                if (!(Test-Path $logFolder)) {
                    New-Item $logFolder -ItemType Directory > $null
                }

                $logFilePath = Join-Path $logFolder $logFile

                $command = 'cmd.exe /C "C:\Program Files (x86)\FireEye\xagt\xagt.exe" -g '+$logFilePath

                $expressionresult = Invoke-Expression -Command $command
                $logFileContent = Get-Content $logFilePath -ErrorAction Stop
                $lastTwoLinesOfLogFile = $logFileContent | select -Last 2
                Write-Host $hostname ": The XAGT log file was Successfully created $logFile. Last two lines of the file:" -ForegroundColor Green
                $lastTwoLinesOfLogFile

            }
            catch{
                Write-Host $hostname ": Unable to create the XAGT log file." $error[0] -foregroundcolor red
            }
        }


        function Get-DGMTraceResults{
            <#
            .SYNOPSIS
                Creates xagt log file
            .NOTES
                Author: David Maiolo - david.maiolo@gmail.com
            .LINK
            #>
            [CmdletBinding()]
            [OutputType([int])]
            Param
            (
            [string]$traceFile,
            [int]$traceTimeSeconds
            )

            $hostname = $env:COMPUTERNAME
            try{

                $traceFile = "$hostname`_trace_$(get-date -f yyyy-MM-ddTHHmmss).etl"
                $traceFolder = "c:\temp\"

                #Create subdirectory if not present
                if (!(Test-Path $traceFolder)) {
                    New-Item $traceFolder -ItemType Directory > $null
                }

                $traceFilePath = Join-Path $traceFolder $traceFile

                $traceTimeSeconds = 8

                #Start the Trace
                Write-Host $hostname ": Starting the trace process..."
                netsh trace start capture=yes tracefile=$traceFilePath

                #Restarting the xagt Service
                Start-DGMService -service xagt

                Write-Host $hostname ": Running trace for $traceTimeSeconds seconds..."
                sleep -Seconds $traceTimeSeconds

                #Stop The Trace
                netsh trace stop

                Write-Host $hostname ": The trace file was run for $traceTimeSeconds seconds and was Successfully created as $traceFile." -ForegroundColor Greenc

            }
            catch{
                Write-Host $hostname ": Unable to create the trace file of $traceTimeSeconds seconds." $error[0] -foregroundcolor red
            }
        }


        #Test FireEye Components Invocation
        Get-DGMTCPPortOpenResults -tcpports 80,443 -destinationAddress "dgmtest-hxdmz-agent-1.helix.apps.fireeye.com"
        Start-DGMService -service xagt
        Write-Host $hostname ": Waiting 8 seconds to see if service is still running..."
        sleep -Seconds 8
        Test-DGMService -service xagt
        Get-DGMTraceResults
        Get-DGMProxyPACFile
        Get-DGMFireEyeLogFile

    }#End Script Block

    #Get-Credentials to run script block as
    #$cred = Get-Credential -Message "Enter Credentials With Permissions to Start/Stop xagt Service and Test Ports"

    #Invoke the script remotely on each of the computers
    foreach ($computer in $HXEndpointComputers){
        Write-Host "Processing $computer..." -ForegroundColor Cyan
        if (Test-Connection $computer -Count 1 -ErrorAction SilentlyContinue){
            #Invoke the script block on the remote computer
            Invoke-Command -ComputerName $computer -ScriptBlock $script

            #Copy generated log files and scripts
            try{
                Write-Host $computer ": Copying generated logs and traces to $LocalPath..."
                $LocalPathSpecific = Join-Path $LocalPath $computer

                #Create subdirectory if not present
                if (!(Test-Path $LocalPathSpecific)) {
                    New-Item $LocalPathSpecific -ItemType Directory > $null
                }

                $RemotePathUNC = $RemotePath -replace "c:", "\\$computer\c$"
                $LocalPathSpecific = $LocalPathSpecific+"\"

                Copy-Item -LiteralPath $RemotePathUNC -Destination $LocalPathSpecific -Recurse -Force

            }catch{
                Write-Host $computer ": Could not copy the log files."$error[0] -ForegroundColor Red
            }


            #Convert .etl file to .cap
            try{
                Write-Host $computer ": converting .etl trace files to .cap files in $LocalPathSpecific...."

                $Files =  Get-ChildItem -Recurse $LocalPathSpecific | ? {$_ -like "*.etl"}

                $Count = 0
                foreach ( $File in $Files ) {

                    $Count++
                    Write-Host $computer ':(' $Count 'of' $Files.Count ') Generating Wireshark file for' $File

                    $CAPFile = $File -replace ".etl",".cap"

                    $s = New-PefTraceSession -Path $CAPFile -SaveOnStop
                    $s | Add-PefMessageProvider -Provider $File
                    $s | Start-PefTraceSession
                }
                Write-Host $computer ": Successfully converted the .etl trace files to .cap files." -ForegroundColor Green
            }catch{
                Write-Host $computer ": Could not convert the .etl trace files to .cap files. You may need to install Microsoft Message Analyzer on the computer you are running this script from (https://www.microsoft.com/en-us/download/details.aspx?id=44226)."$error[0] -ForegroundColor Red
            }

            #Cleanup Files on Remote Computer
            try{
                Remove-Item -Path $RemotePathUNC -Recurse
                Write-Host $computer ": Successfully cleaned up the files on $RemotePathUNC." -ForegroundColor Green
            }catch{
                Write-Host $computer ": Could not cleanup the files on $RemotePathUNC."$error[0] -ForegroundColor Red
            }


        }else{
            Write-Host $computer ": The computer is offline." -foregroundcolor yellow
        }
    }
    Write-Host "Run-DGMFireEyeHXCompliance Complete. Please use Microsoft Message Analyzer to view the capture files https://www.microsoft.com/en-us/download/details.aspx?id=44226" -ForegroundColor Magenta

}

function Invoke-DGMFireEyeHXCompliance{
    $HXEndpointComputers = @("DGM-SITE01-TST","DGM-SITE02-TST","VDGMDFS005VER","VDGMDFS006VER","WORKSTATION001","WORKSTATION002","WORKSTATION003")
    $RemotePath = "c:\temp\"
    $LocalPath = "c:\Run-DGMFireEyeHXCompliance\"

    Run-DGMFireEyeHXCompliance -computers $HXEndpointComputers -RemotePath $RemotePath -localPath $LocalPath
}