Overview
This article is meant to provide you an overview of common troubleshooting tasks centered around client health and upcoming SCCM components. I created several custom tools and scripts to aid in the detection and remediation of several SCCM related troubleshooting tasks. Snippets of those scripts are provided throughout. A Microsoft PFE assisted me in understanding this information and it was used to help a large company improve client health and software update compliance.
Log Files

Log File Locations
-
Client
-
%WINDIR%\System32\CCM\Logs
-
%WINDIR%\SysWOW64\CCM\Logs
- %WINDIR%\CCM\Logs
-
Server
Looking up Log File Errors in CMTrace
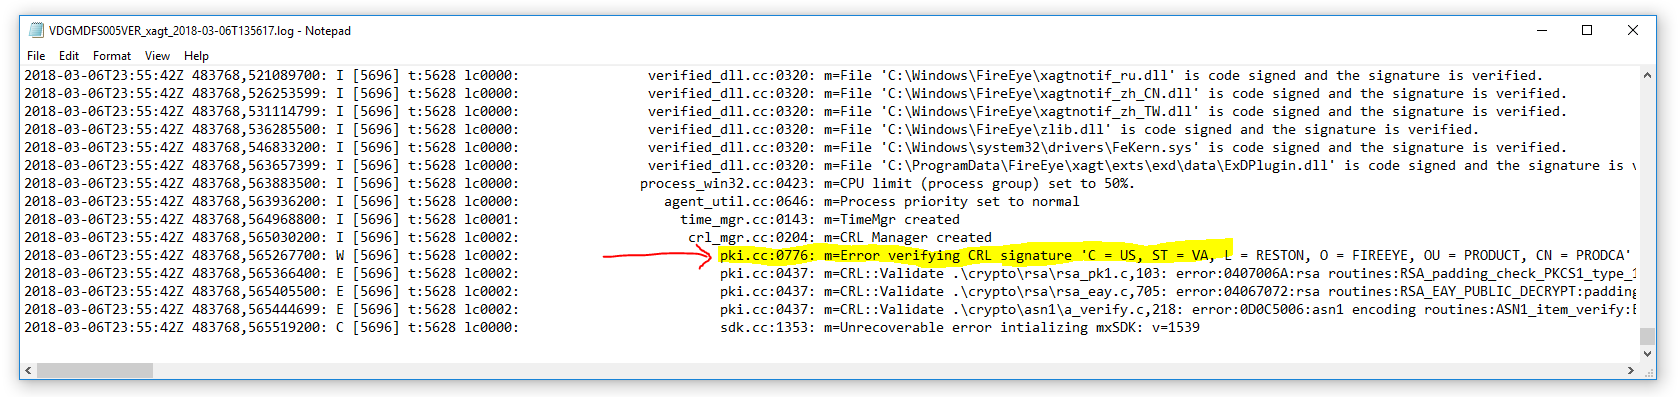
CMTrace has the option to look up an error code. For example, you might come across the message: Unable to find or read WUA Managed Server Policy 0x80004005. More information can be found in Tools -> Error Lookup.
Also, searching on the internet for a 0x80004005 error shows us you can rename registry.pol and run gpupdate /force as a potential solution.
Content Distribution
When you distribute content to one your distribution points, the Distribution Manager creates a content transfer job. Next, it notifies the Package Transfer Manager on the site server to transfer the content to the remote distribution points.
Package Transfer Manager logs this process in the pkgxfermgr.log file on the site server.
Content Distribution Troubleshooting (Using Log Files)
- smsdbmon.log (SITE SERVER)
-
SMS_DATABASE_NOTIFICATION component updates the database
- Records database changes.
- distmgr.log (SITE SERVER)
-
SMS_DISTRIBUTION_MANAGER component starts the process of adding package to DP
- Records details about package creation, compression, delta replication, and information updates.
- Monitoring Workspace (SCCM CONSOLE)
- PkgXferMgr.log (SITE SERVER)
-
SMS_PACKAGE_TRANSFER_MANAGER Package Transfer Manager Log
- Records the actions of the SMS Executive component that is responsible for sending content from a primary site to a remote distribution point.
- smsdbprov.log (remote DP)
-
Provides information about the SMS Provider
Content Distribution Troubleshooting (By Tracking Content)
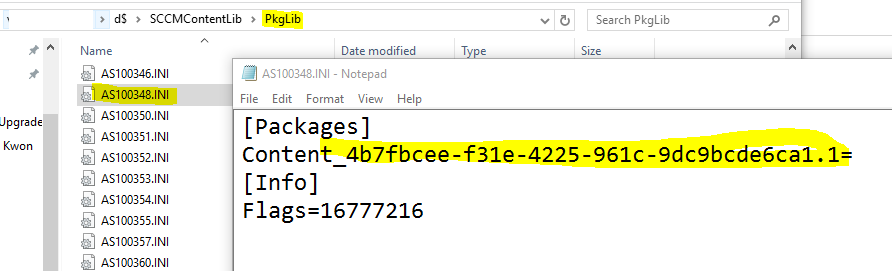
Troubleshooting content distribution is important. The following SCCMContentLib folders are located in the Content Library folder on any given distribution point:
- P – PkgLib
- D – DataLib
- F – PkgLib
Tracing content through a distribution point starts by identifying its Package ID in the SCCM console at Monitoring > Overview > Distribution Status > Content Status

Then, using this Package ID, you can further discover the GUID within the associated INI file within PkgLib:
Now using the GUID, you can find the content information in DataLib:
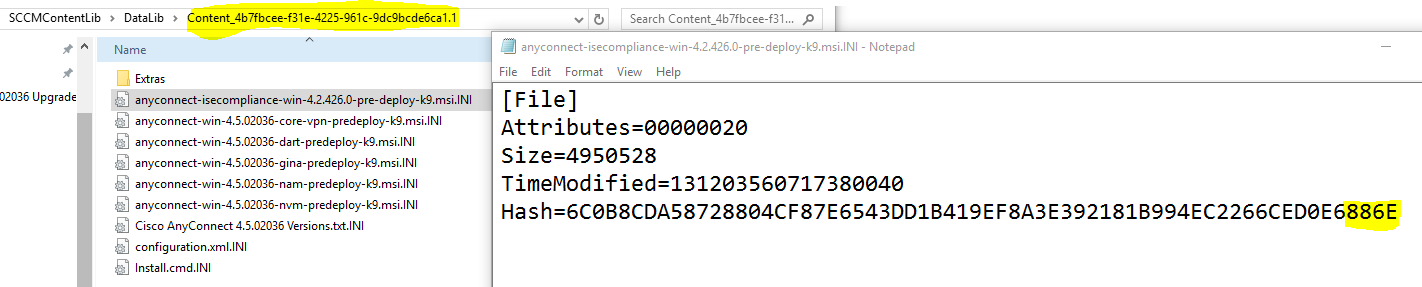
Finally, using the last 4 characters of the hash value within this INI, you can find the differential content in the FileLib directory:
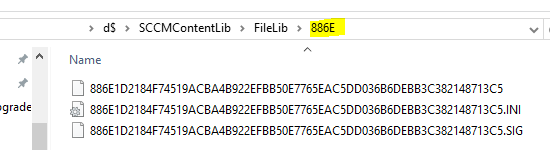
SCCM only stores differential content in order to save space. In other words, these files are the differences between this and a different content folder somewhere else in SCCM of similar files. This is used in order to save space on the distribution point.
The only two places the full content exists is at the source location and final cache on the client such as:
-
\\sccmserver\d$\SOURCE_FILES
-
c:\windows\ccmcache
Distribution points, as you saw in the P. D. F. example above only contain the differential content.
Application Deployment
Enable Enhanced Logging for Application Deployment
Enable enhanced logging to get more intricate details of your application deployment issues.
-
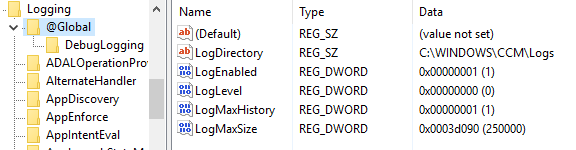
Enable verbose logging on client: HKLM\Software\Microsoft\CCM\Logging\@GLOBAL
-
LogLevel = 0
-
Restart SMS Agent Host service
-
Enable debug logging on client: HKLM\Software\Microsoft\CC\Logging, Create DebugLogging
-
Create Enabled = True
-
Restart SMS Agent Host Service

Troubleshooting Empty CCMCache Folders
In some cases the cache subfolder within C:\Windows\ccmcache for the content will be empty.
-
Open CMTrace on the client you wish to troubleshoot and browse to C:\Windows\CCM\Logs
-
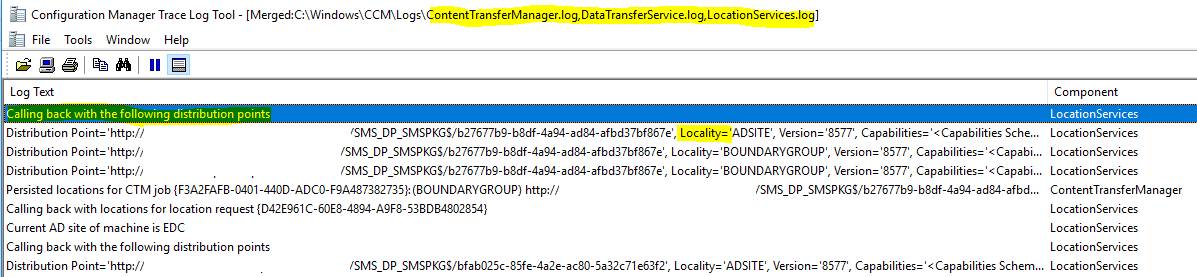
Merge the three files below. File -> Open -> Merge Selected Files
- L – LocationService.log
- C – ContentTransferManager.log
- D – DataTransferService.log
-
Find call backs. Find -> Find What: “calling back”
Calling back with an “empty distribution point list” means there are no DPs for the boundary group (likely no boundary group). Also look at the “Locality=” below the calling back line. This will tell you where the boundary group is. Also look at ContentTransferManager component. This will tell you what DP was actually used.
Troubleshooting Application Deployments
Get Deployment ID of The Application You’re Trying to Troubleshoot
-
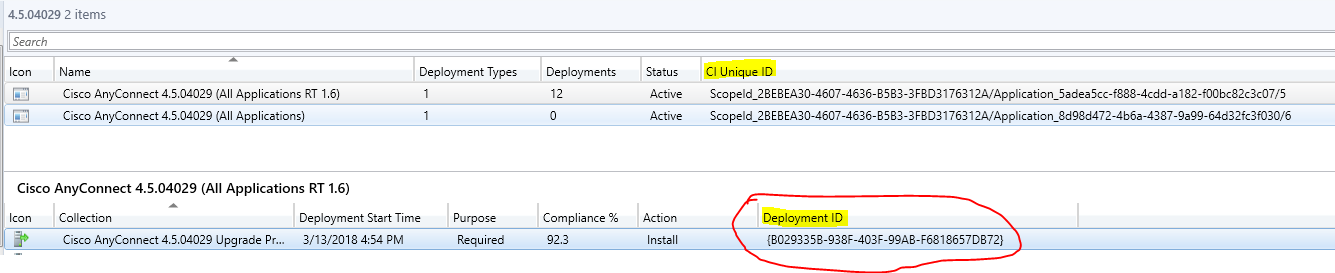
Go to Applications and add column ‘CI Unique ID’ (CONSOLE)
-
Write down the ‘CI Unique ID’ of problem application.
-
Write down the ‘Deployment ID’ of problem deployment by either
-
SQL Studio: Select * from dbo.v_CIAssignment where AssignmentName like ‘%Acrobat%’ <– Assignment_UniqueID
-
Console: Application -> Deployments -> Show Deployed ID Column
Use That Deployment ID To Track Down Issue
-
PolicyAgent.log <– Initializing download of policy <Deployment ID> (CLIENT)
-
Find ‘DTS Job ID’ from log and write it down
-
DataTransferService.log <- DTSJob <DTS Job ID> created to download… (CLIENT)
-
PolicyAgent.log <– Applying Policy <Deployment ID> (CLIENT)
Software Updates and Troubleshooting
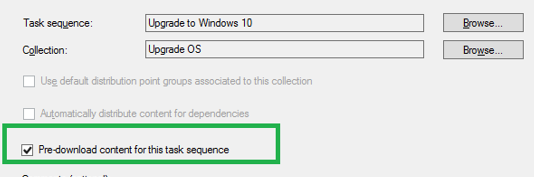
The software update deployment phase is the process of deploying Microsoft software updates to your workstations and servers. Within SCCM, the updates are typically added to a software update group, the software updates are downloaded to distribution points, and the update group is deployed to clients.
When you deploy software updates, you add the updates to a SUG and then deploy the SUG to your clients. When you create the deployment, the update policy is sent to client computers, and the update content files are downloaded from a DP to the local cache on the client computer. The updates are then available for installation. After the deployment and the deployment policy have been created on the server, clients receive the policy on the next policy evaluation cycle.
Software Update Log Files

|
Log name
|
Description
|
Computer with log file
|
|
objreplmgr.log
|
Records details about the replication of software updates notification files from a parent to child sites.
|
Site server
|
|
PatchDownloader.log
|
Records details about the process of downloading software updates from the update source to the download destination on the site server.
|
The computer hosting the Configuration Manager console from which downloads are initiated
|
|
ruleengine.log
|
Records details about automatic deployment rules for the identification, content download, and software update group and deployment creation.
|
Site server
|
|
SUPSetup.log
|
Records details about the software update point installation. When the software update point installation completes, Installation was successful is written to this log file.
|
Site system server
|
|
WCM.log
|
Records details about the software update point configuration and connections to the Windows Server Update Services (WSUS) server for subscribed update categories, classifications, and languages.
|
Site server that connects to the WSUS server
|
|
WSUSCtrl.log
|
Records details about the configuration, database connectivity and health of the WSUS server for the site.
|
Site system server
|
|
wsyncmgr.log
|
Records details about the software updates synchronization process.
|
Site system server
|
|
WindowsUpdate.log
|
Records details about when the Windows Update Agent connects to the WSUS server and retrieves the software updates for compliance assessment and whether there are updates to the agent components.
|
Client
|
Getting Your Console Ready for Software Update Troubleshooting
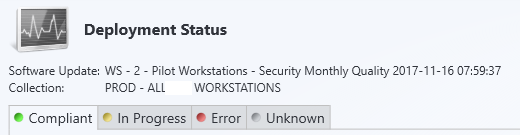
Before you can track a deployment, you must first find the Deployment Unique ID of the deployment by adding the Deployment Unique ID column in the console.
Making the Console More Useful
Within the SCCM console, adding the following columns under Software Updates can help when diagnosing issue in the log files and on the client side:
-
Bulletin
-
Article ID
-
Unique Update ID

Troubleshooting Software Updates Using Reports
Windows Update Related Reports
The following reports are available from your SCCM reports server and will allow you to further diagnose server related update issues:
Compliance Reports
|
Report Name
|
Description
|
|
Compliance 1 – Overall Compliance
|
Displays the overall compliance data for a software update group.
|
|
Compliance 7 – Computers in a specific compliance state for an update group
|
Displays all computers in a collection that have a specified overall compliance state against a software update group.
|
Deployment Management Reports
|
Report Name
|
Description
|
|
Management 2 – Updates required but not deployed
|
This report returns all software updates that have been detected as required on clients but that have not been deployed to a specific collection. To limit the amount of information returned, you can specify the software update class. Please see my article
Automating Required But Not Deployed Updates to automate this task.
|
|
Management 7 – Updates in a deployment missing content
|
This report returns the software updates in a specified deployment that do not have all of the associated content retrieved, preventing clients from installing the update and achieving 100% compliance for the deployment.
|
Deployment State Reports
|
Report Name
|
Description
|
|
States 1 – Enforcement states for a deployment
|
This report returns the enforcement states for a specific software update deployment, which is typically the second phase of a deployment assessment. For the overall progress of software update installation, use this report in conjunction with “States 2 – Evaluation states for a deployment”.
|
|
States 2 – Evaluation states for a deployment
|
This report returns the evaluation state for a specific software update deployment, which is typically the first phase of a deployment assessment. For the overall progress of software update installation, use this report in conjunction with “States 1 – Enforcement states for a deployment”.
|
|
States 5 – States for an update in a deployment (secondary)
|
This report returns a summary of states for a specific software update targeted by a specific deployment. For best results, start with ‘Management 3 – Updates in a deployment’ to return the software updates contained in a specific deployment, and then drill into this report to return the state for the selected software update.
|
Scan Report
|
Report Name
|
Description
|
|
Scan 1 – Last scan states by collection
|
This report returns the count of computers for a specific collection in each compliance scan state returned by clients during the last compliance scan.
|
Troubleshooting Report
|
Report Name
|
Description
|
|
Troubleshooting 2 – Deployment errors
|
This report returns the deployment errors at the site and a count of computers that are experiencing each error.
|
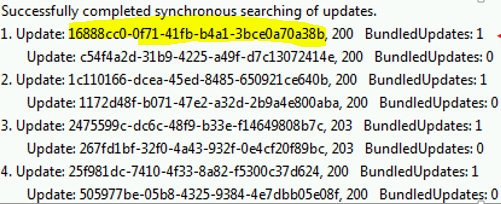
How To Track a Windows Update Error (Using Log Files)
If you receive errors in your console in the status area, there are several areas we can look at.
Once you have found an error in the SCCM console, we can continue to troubleshoot by looking at the log files on the affected client.
-
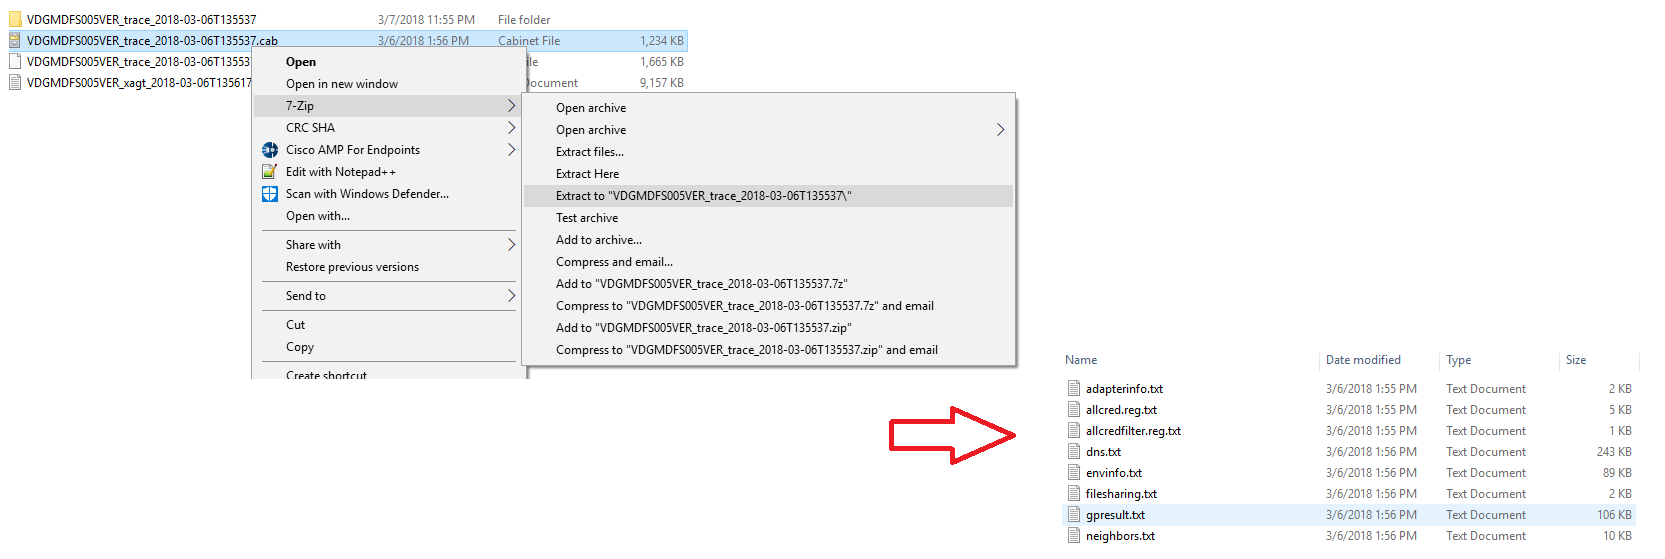
Open CMTrace on the client you wish to troubleshoot and browse to C:\Windows\CCM\Logs
-
Merge the three files below. File -> Open -> Merge Selected Files
- W – WUAHandler.log
- U – UpdateStore.log
- S – ScanAgent.log
-
Filter for missing updates. Tools -> Filter -> Filter when the entry test contains “missing”
If the log file displays “missing” but Add\Remove Programs (appwiz.cpl) shows that the update is installed, you can assume scanning is not working properly.
Further, when looking through the WUHandler column in CMTrace, you can track a deployment as follows:

Windows Update Shows “In Progress”, But You Know Its Installed: State Message Communication
If the UpdateStore.log on the client shows that a particular windows update component is installed, but it is still in progress in the SCCM console, the State Message is likely not communicating properly to the SQL Server.
State messaging is a mechanism in SCCM which replicates point in time conditions on the client.
Fix-DGMSCCMStateMessage Tool
I created the tool Fix-DGMSCCMStateMessage.ps1 which will automatically update the State Message locally on the SCCM client by invoking the following two commands:
$SCCMUpdatesStore = New-Object -ComObject Microsoft.CCM.UpdatesStore
$SCCMUpdatesStore.RefreshServerComplianceState()
The tool requires the –csvfile argument, which is the path to a csv file containing one column, Hostname, with the hostnames listed in the column.
For more information on the latest changes and updates to this tool please see SCCM Script: Fix State Messages
Fixing Windows UpdateStore Corruption (Datastore.edb)
The Windows UpdateStore Datastore.edb in Windows\Software Distribution\.. contains scan results. This may become corrupted.
Fix-DGMSCCMUpdateStore Tool
I created the tool Fix-DGMSCCMUpdateStore.ps1 which will automatically attempt to fix the Windows Update Store on an array of clients imported via a CSV. It accomplishes this by performing the following steps:
-
Stop the Windows Update Service
-
Move SoftwareDistribution to a backup location
-
Start Windows Update Service
-
Recreate SoftwareDistribution
For the latest updates on this tool, please see SCCM Script: Fix Software Update Store
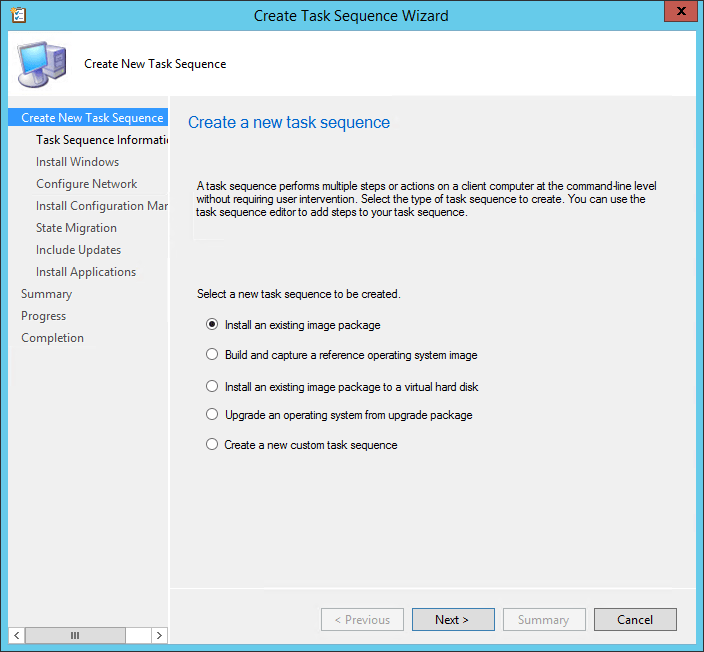
Software Update Points: Troubleshooting Creation
Creating a Software Update Point
-
Install WSUS 3.0 SP2 (WSUS SERVER)
-
Administration -> Site Config -> Servers and System Roles -> Create Site -> Update Point (CONSOLE)
Troubleshooting a Software Update Point Creation
- sitecomp.log (SITE SERVER)
-
“SMS_WSUS_CONTROL_MANAGER has been flagged for installation”
- Records details about the maintenance of the installed site components on all site system servers in the site.
- SUPsetup.log (WSUS SERVER)
- Records details about the software update point installation. When the software update point installation completes, Installation was successful is written to this log file.
Errors?
-
The port settings configured for the active SUP must be the same as the port settings configured for the WSUS website in Internet Information Services (IIS) (that is, port 8530).
-
The computer and local Administrator accounts must be able to access virtual directories under the WSUS website in IIS from the site server.
Software Update Points: Troubleshooting Configuration
You have three options when configuring a software update point:
-
Sync from Microsoft Update
-
Sync Upstream data source location (URL)
-
Don’t do either
Troubleshooting Configuration of Software Update Point
- WsyncMgr.log (SITE SERVER)
-
any issues with synchronizing “WSUS server not configured”
- Records details about the software updates synchronization process.
- WCM.log (SITE SERVER)
-
Issues with ports or connectivity “Attempting connection to WSUS Server: <SiteServerName, port: <portnumber>, useSSL:<True or False>.” (SERVER)
- Records details about the software update point configuration and connections to the Windows Server Update Services (WSUS) server for subscribed update categories, classifications, and languages.
- WSUSCtrl.log (SITE SERVER)
-
configuration or database connectivity issues (SERVER)
- Records details about the configuration, database connectivity, and health of the WSUS server for the site.
A Software Update Point Common Problem
-
Both IIS Configuration for WSUS and SUP properties are both using port 8530. However, IIS Config for WSUS is really using port 80.
-
Best thing to do is just wait for the next retry to see if it pulls in the new port.
Software Update Points: Other Issues
Software Update Point Switching/Failover
-
Multiple SUPs? List is given to clients. They choose one at random.
-
Fails? Tries 4 times, 30 mins a part. After 4th attempt, waits 2 minutes and tries next SUP on list.
-
Only certain error codes will trigger SUP to failover.
Verifying Software Update Point in Client Registry
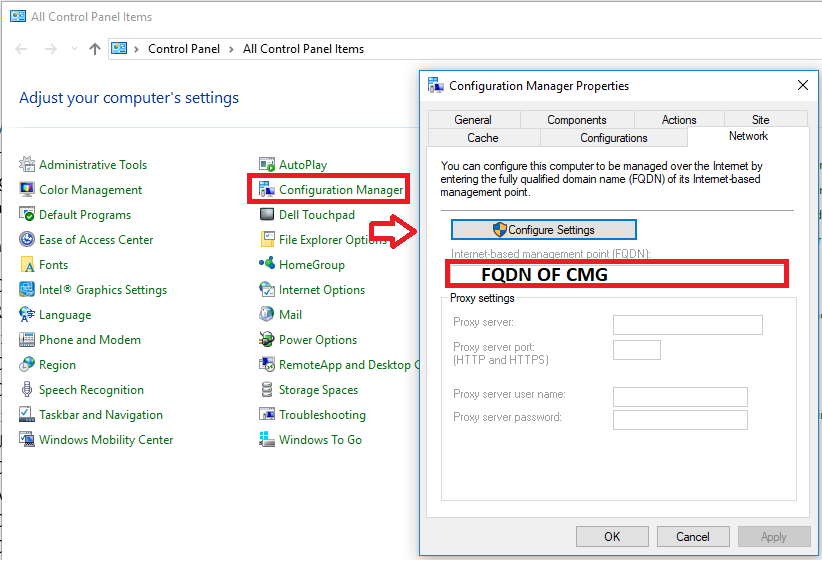
On the client, the Software Update Point can be verified in the following registry location:
HKEY_LOCAL_MACHINE\Software\Policies\Microsoft\Windows\WindowsUpdate

Pull Distribution Points
Create a Pull Distribution Point
-
Administration -> Site Config -> Servers and System Roles -> Create Site -> DP (CONSOLE)
-
Configure Pull and Source for Pull (CONSOLE)
Troubleshooting Pull Distribution Point
- hman.log (SITE SERVER)
-
“Inserted DP”
- Records information about site configuration changes, and the publishing of site information in Active Directory Domain Services.
- distmgr.log (SITE SERVER)
-
“Windows Installer installed the product. ConfigMgr Distribution Point”
- Records details about package creation, compression, delta replication, and information updates.
-
Verify “c:\SMS_DP$” is created (PULL DISTRIBUTION POINT)
- pulldp_install.log (PULL DISTRIBUTION POINT)
-
c:\SMS_DP$\SMS\BIN\ “Windows Installer installed the product. ConfigMgr Distribution Point”
- How to confirm whether the Package or application is replicated to PULL DP
What To Do If DISTMGR.LOG Has WMI Error
-
Check Windows Firewall on the pull distribution point server to see if the connection to the remote WMI provider is being blocked.
-
Check to see if an anti-virus program might be blocking the communication.
-
Verify that the site server’s computer account (for example, PrimaryServer$ if PrimaryServer is the name of the server) is part of the local Administrator group on the pull distribution point server.
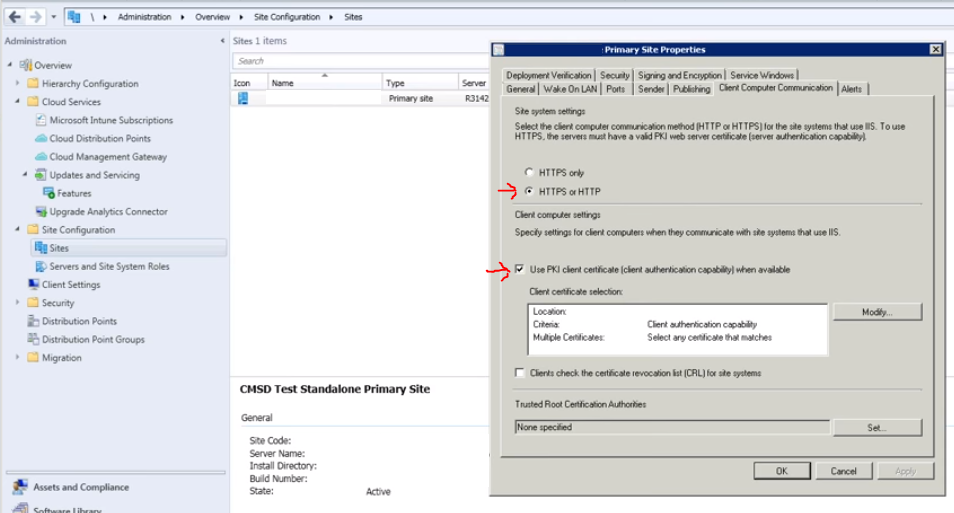
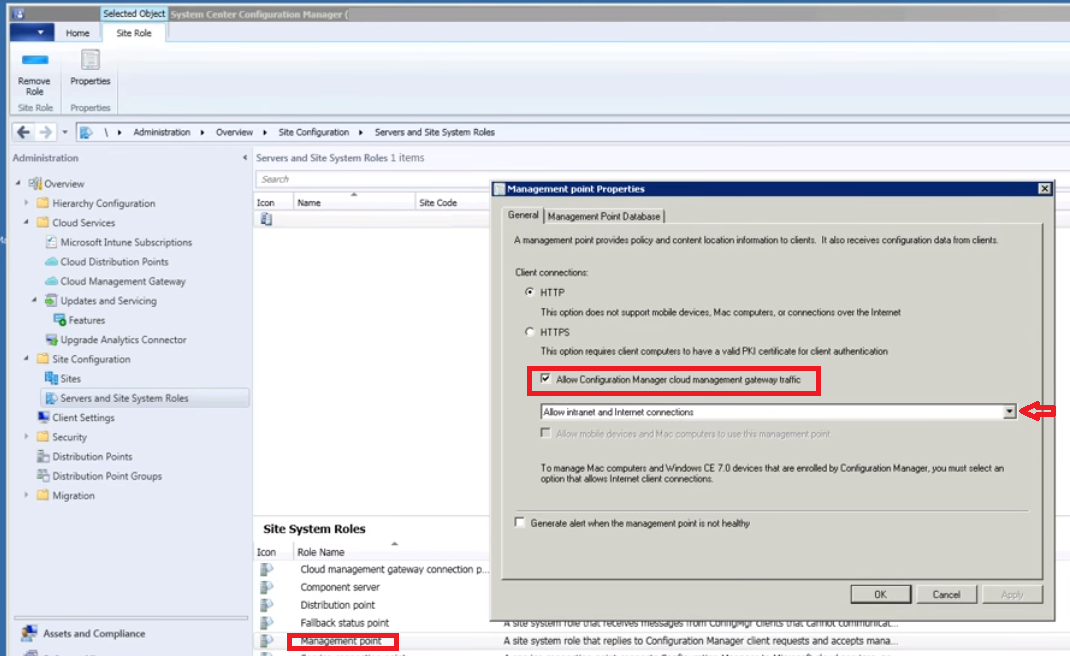
Rotating Management Point
Think of this scenario:
-
2 Management Points. One with HTTPS with PKI and client has PKI, this one chosen first.
-
If both HTTP, clients prefer MP from their forest.
Scenario: Assume Forests A, B and C. Clients are in C. B has open firewall, A does not. If both B and A are HTTP, who knows if Clients will try to connect to B or A, when they should really only be connecting to A.
Solution: Install MP in C or HTTPS PKI n B.
Client Troubleshooting
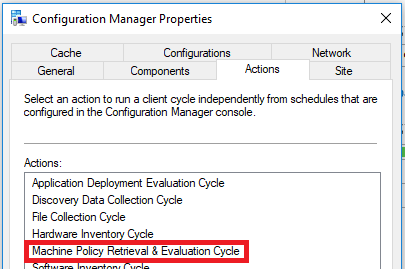
Troubleshooting Configuration Manager Client Issues is an important step to understanding why you have certain deployment issues and understanding the overall client health in SCCM.
Understanding Client Health
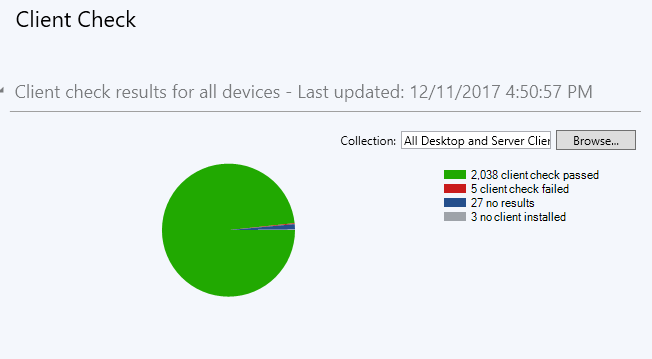
A client heath task on each client will perform checks to make sure that key areas such as prerequisites, dependent services and WMI are all functioning, and if needed remediate those issues. The Configuration Manager Health Evaluation runs as a schedule task and launches an executable called CCMEval.EXE which will perform checks and remediation listed in the CCMEval.XML file. This scheduled task is called “Configuration Manager Health Evaluation” when vieyoud in Task Scheduler.
The results of the CCMEval task can be vieyoud in the Monitoring > Client Status > Client Check area of the console:
Client Health Reports
Your reports server has several client health reports available. Searching for “Client Health” yields plenty of useful results, including a new Dashboard – Client Health Statistics report that can imported through a special Microsoft PFE engagement (details on this below).
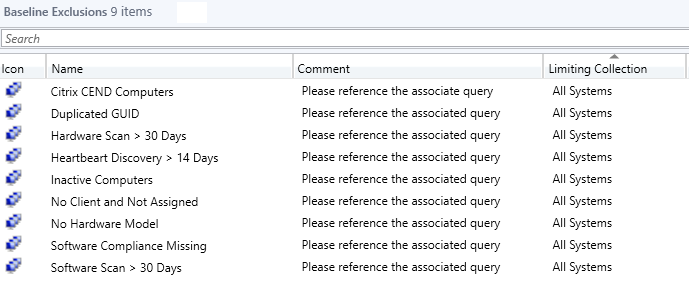
Baseline Collections
In order to create a good baseline for your other collections to limit against, the following best practice queries are recommended to create the baseline collections:
Exclude Inactive Clients
select SMS_R_SYSTEM.ResyourceID,SMS_R_SYSTEM.ResyourceType,SMS_R_SYSTEM.Name,SMS_R_SYSTEM.SMSUniqueIdentifier,SMS_R_SYSTEM.ResyourceDomainORWorkgroup,SMS_R_SYSTEM.Client
from SMS_R_System inner join SMS_G_System_CH_ClientSummary on SMS_G_System_CH_ClientSummary.ResyourceId = SMS_R_System.ResyourceId
where SMS_G_System_CH_ClientSummary.ClientActiveStatus = 0
Exclude Heartbeat Discovery That is Greater Date > 14 Days
select SMS_R_SYSTEM.ResyourceID,SMS_R_SYSTEM.ResyourceType,SMS_R_SYSTEM.Name,SMS_R_SYSTEM.SMSUniqueIdentifier,SMS_R_SYSTEM.ResyourceDomainORWorkgroup,SMS_R_SYSTEM.Client
from SMS_R_System
where SMS_R_System.ResyourceId in (select ResyourceID from SMS_R_System where (SMS_R_SYSTEM.AgentTime <= DateAdd(dd,-14,getdate())) and AgentName = 'Heartbeat Discovery') and SMS_R_System.ResyourceId NOT in (select ResyourceID from SMS_R_System where (SMS_R_SYSTEM.AgentTime > DateAdd(dd,-14,getdate())) and AgentName = 'Heartbeat Discovery') and SMS_R_System.ResyourceId in (select ResyourceId from SMS_G_System_CH_ClientSummary Where ClientActiveStatus = 1)
Exclude HW Missing
select SMS_R_SYSTEM.ResyourceID,SMS_R_SYSTEM.ResyourceType,SMS_R_SYSTEM.Name,SMS_R_SYSTEM.SMSUniqueIdentifier,SMS_R_SYSTEM.ResyourceDomainORWorkgroup,SMS_R_SYSTEM.Client
from SMS_R_System inner join SMS_G_System_COMPUTER_SYSTEM on SMS_G_System_COMPUTER_SYSTEM.ResyourceID = SMS_R_System.ResyourceId
where SMS_G_System_COMPUTER_SYSTEM.Model is null and SMS_R_System.ResyourceId in (select ResyourceId from SMS_G_System_CH_ClientSummary Where ClientActiveStatus = 1)
Exclude HW Inventory Greater Than 30 Days
select SMS_R_SYSTEM.ResyourceID,SMS_R_SYSTEM.ResyourceType,SMS_R_SYSTEM.Name,SMS_R_SYSTEM.SMSUniqueIdentifier,SMS_R_SYSTEM.ResyourceDomainORWorkgroup,SMS_R_SYSTEM.Client
from SMS_R_System where SMS_R_System.ResyourceId not in (select SMS_R_System.ResyourceId from SMS_R_System inner join SMS_G_System_WORKSTATION_STATUS on SMS_G_System_WORKSTATION_STATUS.ResyourceId = SMS_R_System.ResyourceId
where SMS_G_System_WORKSTATION_STATUS.LastHardwareScan >= DateAdd(dd, -30, getdate())) and SMS_R_System.ResyourceId in (select ResyourceId from SMS_G_System_CH_ClientSummary Where ClientActiveStatus = 1)
Exclude SW Inventory Greater Than 30 Days
select SMS_R_SYSTEM.ResyourceID,SMS_R_SYSTEM.ResyourceType,SMS_R_SYSTEM.Name,SMS_R_SYSTEM.SMSUniqueIdentifier,SMS_R_SYSTEM.ResyourceDomainORWorkgroup,SMS_R_SYSTEM.Client
from SMS_R_System
where SMS_R_System.ResyourceId not in (select ResyourceID from SMS_R_System inner join SMS_G_System_LastSoftwareScan on SMS_G_System_LastSoftwareScan.ResyourceID = SMS_R_System.ResyourceId where SMS_G_System_LastSoftwareScan.LastScanDate >= DateAdd(dd,-30,getdate())) and SMS_R_System.ResyourceId in (select ResyourceId from SMS_G_System_CH_ClientSummary Where ClientActiveStatus = 1)
These queries can be used to create new baseline collections and exclusions for those collections
Advanced Troubleshooting: SCCM ToolKit
Use the SCCM toolkit for advanced troubleshooting tools. It contains fifteen downloadable tools to help you manage Configuration Manager.
Installer: ConfigMgrTools.msi (download the latest via Bing)
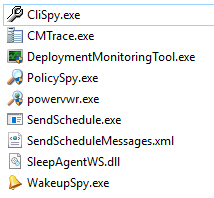
Client Based Tools
-
Client Spy – A tool that helps you troubleshoot issues related to software distribution, inventory, and software metering on System Center 2012 Configuration Manager clients.
-
Configuration Manager Trace Log Viewer – A tool used to view log files created by Configuration Manager components and agents.
-
Deployment Monitoring Tool – The Deployment Monitoring Tool is a graphical user interface designed help troubleshoot Applications, Updates, and Baseline deployments on System Center 2012 Configuration Manager clients.
-
Policy Spy – A policy viewer that helps you review and troubleshoot the policy system on System Center 2012 Configuration Manager clients.
-
Power Viewer Tool – A tool to view the status of power management feature on System Center 2012 Configuration Manager clients.
-
Send Schedule Tool – A tool used to trigger a schedule on a client or trigger the evaluation of a specified DCM Baseline. You can trigger a schedule either locally or remotely.
-
Wakeup Spy – A tool that provides a view of the power state of Configuration Manager client computers and which operate as managers or manages.
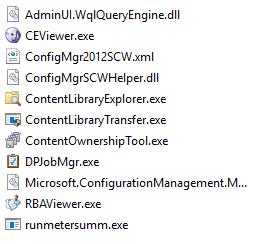
Server Based Tools
-
DP Job Manager – A tool that helps troubleshoot and manage ongoing content distribution jobs to Configuration Manager distribution points.
-
Collection Evaluation Viewer – A tool that assists in troubleshooting collection evaluation related issues by viewing collection evaluation details.
-
Content Library Explorer – A tool that assists in troubleshooting issues with and viewing the contents of the content library.
-
Security Configuration Wizard Template for Microsoft System Center 2012 R2 Configuration Manager – The Security Configuration Wizard (SCW) is an attack-surface reduction tool for the Microsoft Windows Server 2008 R2 operating system. Security Configuration Wizard determines the minimum functionality required for a server’s role or roles, and disables functionality that is not required.
-
Content Library Transfer – A tool that transfers content from one disk drive to another.
-
Content Ownership Tool – A tool that changes ownership of orphaned packages (packages without an owner site server).
-
Role-based Administration Modeling and Auditing Tool – This tool helps administrators to model and audit RBA configurations.
-
Run Metering Summarization Tool – The purpose of this tool is to run the metering summarization task to analyze raw metering data
Infrastructure Health (SQL and Site Server)
The SCCM infrastructure health is vital to the overall system responsiveness and functionality for your installation.
Bandwidth Throttling
Within the SCCM console, bandwidth throttling is available to the Distribution Points at Administration > Overview > Distribution Points -> Properties -> Rate Limits.
Limited to a specific maximum: This method allows you to limit bandwidth to a configured percentage by hyour as a time slice.
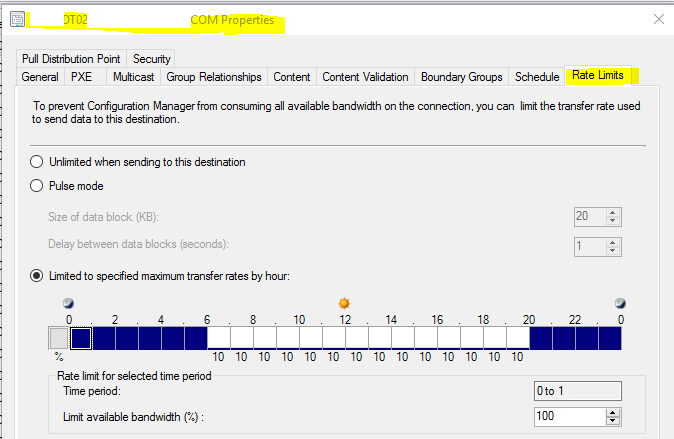
Pulse mode throttling is also available, which divides the data into data blocks, transmitted at a time interval. In your example above, 20KB would transmit every second, or 20KBps.
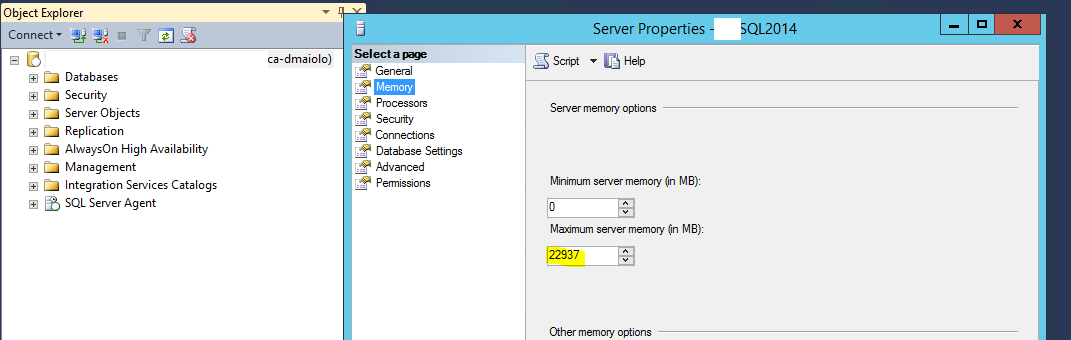
SQL Memory Allocation
Your SCCM SQL instance is handled by your SQL Server or SQL Failover CNO.
If you have a virtual SQL server, you can use the Virtual Machine Manager Console to first increase the minimum and maximum memory available to the two SQL servers:
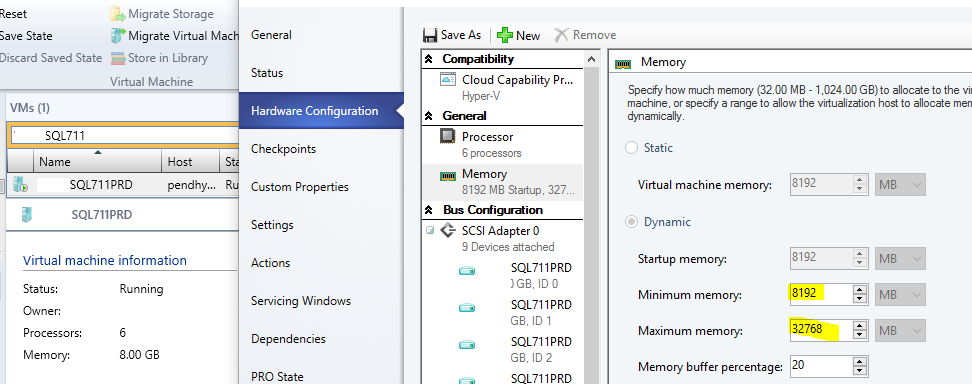
Opening SQL Management Studio allows you to then adjust the maximum memory used by the SQL service
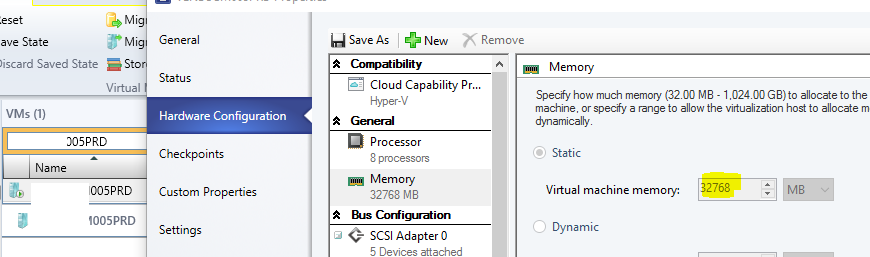
Site Server Memory Allocation
Using the Virtual Machine Manager Console you can verify your SCCM site server has adequate memory allocation:
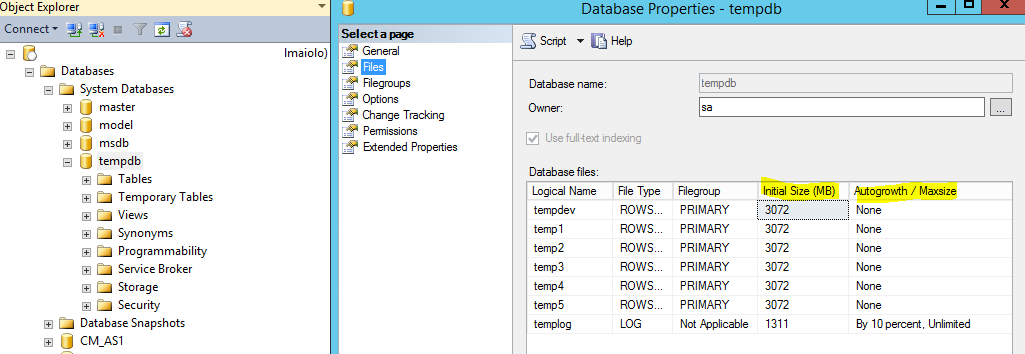
TempDB Memory Allocation
Opening SQL Management Studio now allows you to verify and adjust the initial size and autogrowth settings on the Tempdb database.
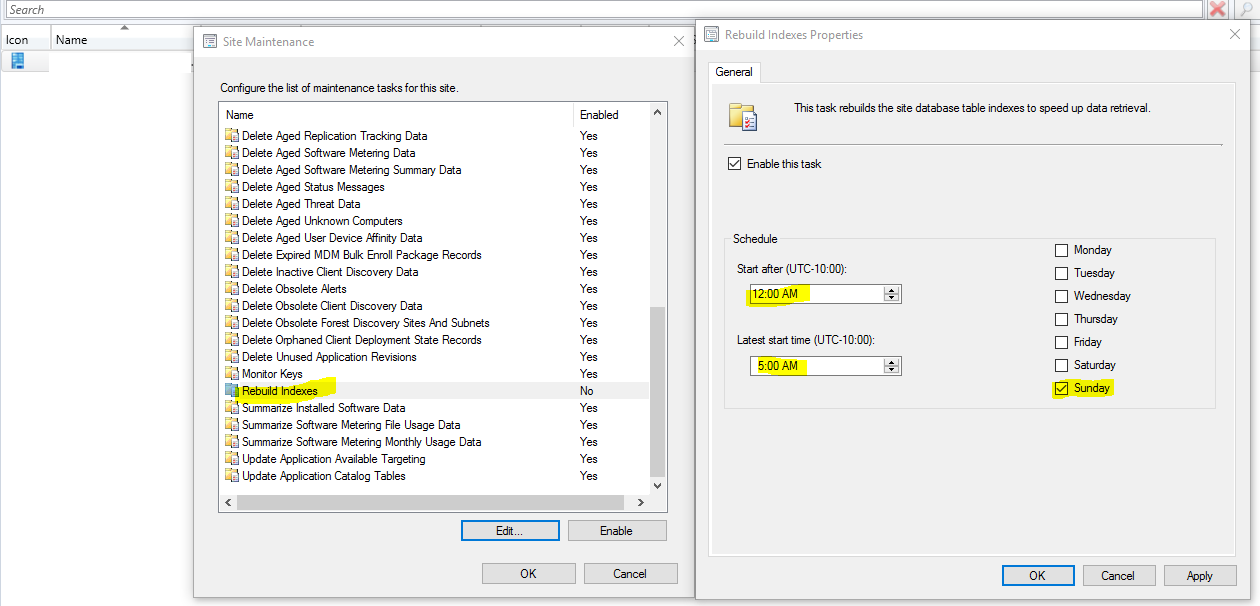
Console Latency
Rebuilding Indexes can help maintain the SCCM SQL database efficiency. To turn on database indexing, go to
Administration > Site Configuration > Sites
To help with console latency, the rebuild index task can enabled with a Sunday 12:00AM to 5:00AM schedule.
Data Discovery Record (DDR) Workflow
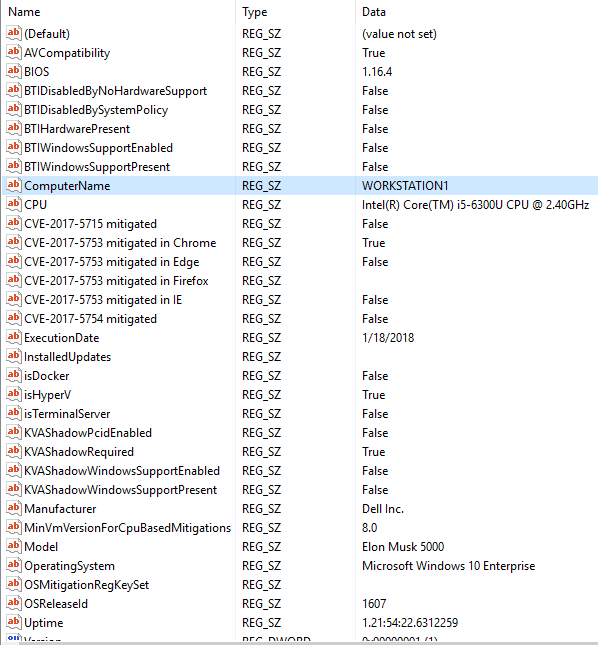
When SCCM Discovery runs, it creates discovery data records (DDRs). The information contained in a DDR varies depending upon the discovered resyource. For example, it can include the NetBIOS name of a computer, the IP address and IP subnet of a computer or device, and the computer operating system name.
DDRs are sent to the site server inbox located as a .DDR file:
- \\siteserver\C$\Program Files\Microsoft System Center Configuration Manager\inboxes\auth\ddm.box
Once processed, the .DDR file is erased. If many .DDR records are visible, that likely means Active Directory discovery in SCCM is set to too short of an interval.
Additional values in DDR files appear within the SCCM console in the client properties of an asset. Although it is not officially supported, one can create their own DDRs to be processed by the site server by
-
Creating a new instance of the SMSResGen class.
-
Creating a new DDR by using the NewDDR method.
-
Adding properties to the DDR by using the ADDPROP_ methods.
-
Writing the new DDR to a file by using the DDRWrite method.
The site server can process multiple DDRs for the same asset, as is the case in a custom PFE engagement that was mentioned during your engagement.